April 30, 2009

Water, Light, Action

While in Fort Smith last week, I went down to the Arkansas River to see if I could get a few night photos.  I tried lots of different things but nothing seemed to be working.  So, I sat down on a bench and started watching the water flow.  After watching a while, I decided to move towards the bridge where the lights were casting all sorts of patterns on the river below.

Again, I tried different things, but again, not much was happening.  Finally, I settled on isolating totally on the lights reflecting off the moving water.  I switched lens to my 70-200mm f/2.8 so that I could isolate and compress the scene.  I also put a neutral density filter on the lens so that I could slow my shutter speed.

I wanted the photo to be about the colors and the patterns.

Enjoy.

Camera settings:  Nikon D3, 70-200mm f/2.8 at 170mm, shot at ISO 200, f/16 and 8 second with a exposure combination of -1.0 EV and 4-stop neutral density filter on a tripod with white balance set to 7,800K to add more warmth to the lights.

Post Processing:

Lightroom—Set white and black points, added mid-tone contrast, clarity and vibrance.

April 29, 2009

Cool Lighting on a Weathered Building

The old and weathered aspects of the windows, shutters and siding was neat, but what really drew me to this scene was the really cool lighting—and when I say “cool” I mean both how it was falling on the building and its color.  I have no idea why the lighting had a bluish tent, but it was really cool.

I wanted the photo to match the overall lighting so I set my exposure compensation to -1.5 EV and dialed my white balance to 3,400K to make the light a little bluer.

Enjoy.

Camera settings:  Nikon D3, 28-70mm f/2.8 at 70mm, shot at ISO 200, f/11 and 1/60th of a second with a exposure combination of -1.5 EV.

Post Processing:

Lightroom—Set white and black points, added mid-tone contrast, clarity and vibrance.

Photoshop—used nik Color Efex Pro Tonal Contrast filter to add contrast to highlights, mid-tones and shadows.

April 28, 2009

Spring Blooms

On one of the plantations near Saint Francisville is this pond with a wonderful garden that was just starting to strut its stuff.  In another week or two, I am sure a lot more flowers would be in full bloom.

I wanted this photo to be about the tree and its reflection so I selected a very low camera area, used a short telephoto lens and underexposed the photo by about 1.0 EV.  I thought that the low angle would enhance the reflection and the telephoto lens would compress the overall scene.

Enjoy.

Camera settings:  Nikon D3, 70-200mm f/2.8 at 100mm, shot at ISO 200, f/8 and 1/500th of a second with a exposure combination of -1.0 EV.

Post Processing:

Lightroom—Set white and black points, added mid-tone contrast, clarity and vibrance.

April 27, 2009

Plantation Drive

A few weeks ago, I visited one of my friends who resides in Saint Francisville, Louisiana.  As a mentioned in a previous post, I really enjoy visiting Saint Francisville because the people are so nice and there are lots of things to photograph.

This is the dirt road to one of the many plantations along the Mississippi River outside of Saint Francisville and was taken a little after sunrise.   It was a very complicate image to make:  put camera on tripod, get meter reading, compensate the meter reading by -1.0 EV and push shutter.  Yes, you now know what a shire photographic genius I happen to be for this one photograph.

My thought process was even more complicated:  “Patrick, don’t screw this up.”  I wanted the image to show-off how the live oaks look so graceful.  I wanted the road to lead the viewer’s eye deep into the image.

Enjoy.

Camera settings:  Nikon D3, 28-70 mm f/2.8 at 28mm, shot at ISO 800, f/11 and 1/125th of a second with a exposure combination of -1.0 EV on a tripod.

Post Processing:  Lightroom—Set white and black points, added mid-tone contrast, clarity and vibrance and changed the hue of the greens to better reflect what I remember the scene to be.

April 24, 2009

Red Tail Hawk

Ever since Hurricane Ike, we have a more Red Tail Hawks around our house.  I have no idea as to why. 

I see a Ret Tail Hawk setting on one of my neighbor’s fence almost every day when I walk out to the street to get the mail. The hawk will usually stand on the fence and not move until I start across the street.    For the past week or so, I have been carrying my camera when I go get the mail.  I tried several times to get a good shot, but until the other day, I did not get anything that I liked.  He would not be looking in the right direction or the background would be too busy.

I finally got a shot that I like.  In this image, I liked the color combinations, the soft background and the details of the Red Tail Hawk, especially his claws, which you can see are really powerful weapons.

Enjoy.

Camera settings:  Nikon D3, 300 mm f/4, shot at ISO 200, f/8 and 1/500th of a second with a exposure combination of -1.0 EV.

Post Processing: Lightroom—Set white and black points, added mid-tone contrast, clarity and vibrance.

April 23, 2009

Sci-Fi Fungus?

Every spring a few of our trees get a fungus like this one.  I find the fungus very interesting.  I think the color is so different than the surrounding colors and the texture makes it look like something right-out of a science fiction movie.  

I wanted this photo to be about contrast—the contrast of the colors of the fungus and the background, the contrast in the exposure of the fungus and tree bark versus the background and the contrast of the in-focus versus the out-of-focus. I tried different crops but then settled on one that showed a lot of the trees in the background.  For some reason, that crop seemed right to me.

Enjoy.

Camera settings:  Nikon D3, 300 mm f/4, shot at ISO 200, f/5.6 and 1/250th of a second on a tripod.

Post Processing: Lightroom—Set white and black points, added mid-tone contrast, clarity and vibrance.

April 22, 2009

Glamour Glow

Looking at these two flowers, I wanted the photograph to be about their shapes.  I really was not concerned about the details of flowers or the background.  

To help focus on the shapes rather than the details, I used a Tony Sweet technique to make this image.  In this technique you take three exposures on the same frame:  first exposure at f/2.8 with the front flower in focus; second exposure at f/2.8 with the back flower in focus; and, a third exposure at f/2.8 with everything out of focus.  This technique gives the flowers a slight glow.

Enjoy.

Camera settings:  Nikon D3, 105 mm Macro f/2.8, shot at ISO 200, f/2.8 and 1/125th of a second on a tripod with a exposure compensation of -1.5 EV.

Post Processing: Lightroom—Set white and black points, added mid-tone contrast, clarity and vibrance.

April 21, 2009

Wandering Iris

I believe this flower is a Wandering Iris.  It is a small flower, about two inches across, which I photograph every year about this time of year.  I find it a very unique flower because of its color and structure.  It only blooms for a couple weeks, so I start photographing as soon as I see it in the yard.  I find it difficult to photograph because of how small the depth of field that you have to work with--it never seems big enough to really show it off properly.

I wanted this photo to be all about the details of the flower and its brilliant colors.

Enjoy.


Camera settings:  Nikon D3, 105 mm Macro f/2.8, shot at ISO 200, f/16 and 1/125th of a second on a tripod with a Nikon SB-800 with a softbox attached connected to camera with Nikon SC-29 TTL cable.

Post Processing: 

Lightroom—Set white and black points, added mid-tone contrast, clarity and vibrance.

Photoshop:  Used nik Color Efex Pro Tonal contrast filter to increase local contrast of highlights, mid-tones and shadow. 

April 20, 2009

Dramatic Lighting


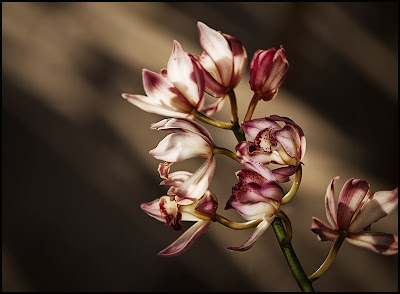
JD has some beautiful orchids around the house right now.  This one is on our screened-in back porch.  I like the colors, the flow and the textures of these orchids, but every time I have tried to photograph them, I did not like my results.  

On Sunday, I tried a new approach.  I wanted the photograph to be more dramatic with a surreal look.  I wanted to create more flow within the image.   I thought that I could create more flow through how I lit the scene.   

I places a Nikon SB800 outside of our screened-in porch and shot through some lattice work in order to create some shadows on the floor.  Next, I placed a SB800 with a snoot and pointed at the back of the flowers.  I wanted this flash to provide some separation from the background and to make the flowers look more translucent.   And finally, I used a SB800 with a small softbox attached to light the flowers from the front.   I triggered everything using the commander unit in the Nikon D700.  I played with the lighting ratios until I got them to where I wanted.

After taking several shots, I decided that I wanted the lighting pattern on the floor to be more blurred but I could not change my aperture because I need the aperture I was using in order to get most of the flowers in focus.  I moved the orchids to the top of a small step latter (thereby increasing the flowers' distance from the floor) and shot from the top of a larger step latter--thus I was able to keep my shooting angle (and the lighting pattern on the floor) and  the depth of field that I needed for the flowers, but added blur to my background.

I am still not completely happy with my final shot, but, I am getting there.  I have a couple of more ideas about how to shoot this one, so you might see these flowers again in the near future.

Enjoy.

Camera Setting:  Nikon D700, 70-200mm f/2.8 at 200mm, ISO 200, f/11 at 1/60th of a second with three NIkon SB800 speedlight triggered by Nikon CLS.

Post Processing:  Lightroom and Photoshop--set white and black point, adjusted white balance, used nik Color Efex Pro tonal contrast and glamour glow filters and sharpened the flowers using the high pass filter in soft light mode.

After completing my post processing, I flipped the image so that I had the lighting pattern running from top left to bottom right as Craig Tanner recently suggested in a couple of his daily critiques.  I was quite surprised at the difference it made.  It made the overall flow of the image more pleasant and less strained as I was looking at it.  What do you think?

April 17, 2009

Elissa #5

As we finished our cruse, I was near the front of the ship and noticed that the captain was on this deck pacing from one side to the other.  The ship traffic in this area of the harbor is quite heavy and I am sure he was quite concerned—which, by the way, I think is a good thing.

What I noticed most about this scene was all the ropes and mask were going every which way, yet, my eyes seemed to pick the captain out of the maze.  I tried to get a spot where I could show only two things:  the ship’s ropes and mask and the captain.  I wanted to show the captain's size relative to the ship and give an indications of how complex the ship is.

Steve Schuenke has an outstanding shot of the captain at about the same time in the voyage.  He took his from a different position and with a slightly different angle.   I think it is very interesting that we both saw a photograph in the way the captain was standing, yet approached it from such different points of view.  Looking at the two photographs, you can see that the two photographers had different things in mind when they took their respective photos. 

Enjoy both shots.

Camera settings:  Nikon D3, 28-70mm f/2.8 at mm, shot at ISO 200, f/13 and 1/500th of a second.

Post Processing: Lightroom—Set white and black points, added mid-tone contrast, clarity and vibrance.

Photoshop:  used to change content of image--guess what!

April 16, 2009

Elissa #4

This was a tough shot to get.  The sun reflecting from the rail and other parts of the image was probably 6-8 f-stops hotter than the light on the subject.  I had to dial the ambient light down so that it would look natural throughout the scene and then get enough flash on him to properly expose him.  This was definitely a trial and error shot.

Enjoy.

Camera settings:  Nikon D3, 28-70mm f/2.8 at mm, shot at ISO 200, f/11 and 1/180th of a second (Aperture priority with a -4.5 EV compensation) with Nikon SB-800 (with a +2.5 EV compensation) connected to camera with SC-29 iTTL cord and attached to camera with Really Right Stuff Wedding Pro Flash Bracket.

Post Processing: Lightroom—Set white and black points,added clarity and vibrance.

Photoshop:  used nik Color Efex Pro tonal contrast filter to add contrast to highlights, mid-tones and shadows. 

April 15, 2009

Elissa #3


Happy Income Tax Day!

There is probably little doubt what drew me to take this photo:  women doing some heavy lifting while the men chat in the background.   As you can see, the women were angled away from me in such a manner that the woman on the left was probably four feet closer than the one on the far right.   I knew that I would not have a problem getting everyone in focus at 28mm and f/11, but I needed to make sure that my light would be relatively even on all the women. 

I pointed my flash about two feet above their heads and over the gap between the two women on the right.  I figured this would help feather the light over all the women.   Even doing this, I still got a little too much light on the far left woman.   I tried a couple more approaches, but none did the job as well as the one I used.

If you have any suggestion on how you might take this one using only one on camera flash, please let me know.

Enjoy.

Camera settings:  Nikon D3, 28-70mm f/2.8 at mm, shot at ISO 200, f/11 and 1/180th (Aperture priority with a -1.5 EV compensation) of a second with Nikon SB-800 (with a +.5 EV compensation) connected to camera with SC-29 iTTL cord and attached to camera with Really Right Stuff Wedding Pro Flash Bracket.

Post Processing: Lightroom—Set white and black points, added mid-tone contrast, clarity and vibrance.

April 14, 2009

Elissa #2

As I watched this scene I noticed the contrast:  old versus young; weathered versus smooth skinned; and relaxed versus tense.  I also like how simple the background was (which was unusual with all the robes going everywhere) and color combination (basically blues and red). 

The real challenge in getting a good exposure was the contrast that I had—highly reflective surface of wheel versus the man being in deeper shadows.  I pointed my flash about two feet above the subjects head in order to get some soft, even light on their faces.   I would have liked to get a little more light on his face, but could not figure out any changes that would do that.

Enjoy.

Camera settings:  Nikon D3, 28-70mm f/2.8 at 70mm, shot at ISO 200, f/8 and 1/180th of a second (Aperture priority with a -2.0 EV compensation) with Nikon SB-800 (with a +1.0 EV compensation) connected to camera with SC-29 iTTL cord and attached to camera with Really Right Stuff Wedding Pro Flash Bracket.

Post Processing: Lightroom—Set white and black points, added mid-tone contrast, clarity and vibrance.

Photoshop:  Used nik Color Efex Pro tonal contrast filter to bring out more details in the wheel and the clothes.

April 13, 2009

Elissa #1

A couple weeks ago, Steve Schuenke arranged for Shirley, Cindi and me to sail on the Elissa, which is a three mast, iron-hulled sailing ship built in Aberdeen Scotland.  Shirley’s blog has an outstanding write-up about the ship along with some great photos of our sail.  I want to thank Steve for this opportunity.  I found the whole afternoon very rewarding, not just for the photo ops, but for learning how a sailing ship of this size operates.

My original thought for shooting was to use a polarizing filter to tame the background.  I quickly discovered that due to the shadows cast by the sails and equipment, I had lots of shadows to address.  I used the same set-up as I used for the Fat Tuesday parade plus the use of the polarizing filter.  My goal was to make the shots look properly exposed, both subject and background, without any indications that flash was used.

My first shot is of a crew-member who is most photogenic and always seemed to strike a pose.  Steve also has a shot of this guy on his blog that you should check-out.   

I wanted this shot to look like sunlight was lighting his face and the front of his clothes.  I pointed my flash about three feet in front of him so that the light feathered onto his front side.  I had my white balance set to cloudy which produced a slightly warm glow to the photograph.

Enjoy.

Camera settings:  Nikon D3, 28-70mm f/2.8 at 60mm, shot at ISO 200, f/9.5 and 1/125th of a second (Aperture priority with a -1.5 EV compensation) with Nikon SB-800 (with a +.5 EV compensation) connected to camera with SC-29 iTTL cord and attached to camera with Really Right Stuff Wedding Pro Flash Bracket.

Post Processing: Lightroom—Set white and black points, added mid-tone contrast, clarity and vibrance.

April 11, 2009

Weekend Special

It seems that DHaass, Charles M and Debbie are at odds over how I cropped my photo yesterday.  I had to admit to DHaass that I often just use one of my preset crops in Lightroom when I crop my photos for the blog. For some reason, I have always thought that a 4x5, or there about, is the best for portraits.  The image I posted yesterday was cropped using my 11x14 crop preset in Lightroom.

After taking everyone's suggestions, I submit to you two alternatives to the one I posted yesterday.  

The first is a square crop suggested by DHaass and agreed to by Charles M.  I think this crop makes the photo into one that is almost exclusively about her.  You have her and then lights in the background, with no real context as to how the two relate.  

Debbie said that by cropping the Budwiser sign-out, you lost an idea of where the photo was taken, i.e., a bar. Although you cannot really read the Budwiser, I think most people would know that is what the neon sign reads, which in turn, tells you that the photo was taken in a bar. 

Thanks everyone for reminding me how important cropping really is.  Cropping can drastically change the photo so much, yet I sometimes forget to really think about how I should crop the image.  

Not sure which of the two I like better.  I do know that I like both of them better than the one I posted yesterday.  Thanks again, and enjoy.

April 10, 2009

Fat Tuesday #4

As Steve and I were leaving, we went by this bar, or some might say, an “establishment for adult beverages.”  Looking over, I was struck by how the neon lights framed the bartender.  The lighting was perfect.  I wanted just a little fill flash on her face and make the photo about the entire scene. 

Today's post is the last of Fat Tuesday photographs. Next week, I will be posting shots from a day sail I took on the Elissa (a three mask ship docked in Galveston, Texas).  I will, again, be using flash, but this time, as fill light on a sunny day.  Stay tuned.

Enjoy.

Camera settings:  Nikon D3, 70-200mm f/2.8 at 116mm, shot at ISO 400, f/2.8 and 1/60th  of a second.

Post Processing:  Lightroom:  Set white and black points, added mid-tone contrast, clarity and vibrance.