June 29, 2010

Fireworks at Bay Area Photo Club Field Trip


Last Friday, I joined about twenty other Bay Area Photo Club members at our monthly field trip to photograph fireworks in Kemah.  Neal Kelsoe and Mark Westerman did a great job selecting a great place and providing some instruction on how to do it.  The basic instructions included:  manual focus at infinity, manual mode, aperture of f/13, bulb shutter speed (2-3 seconds), 50-100mm lens, on a tripod and use of shutter release.
I looked at the field trip as an opportunity to sharpen my skills (which are not that good) at photographing firework.  However, when I saw that first firework, my mindset immediately switched to getting a great fireworks photo.  Big mistake.
I fired shot after shot without really looking at the display.  Finally, I took a little time to see what I had—NOTHING.   I generally held the shutter open for 2 to 3 seconds, but that seemed to make the fireworks look blurred.  So, I changed my strategy—ISO 1600, aperture f/8 and shutter speed between 1.5 and 2 seconds.  Immediately I got better results, or what I thought was better results.
What did I learn from this outing?
Remember your intentions when the gun goes off—I wanted to improve my skills at photographing fireworks, but my focus was trying to get a great photo.  I did not look at my display to get feedback.
I think that most of the fireworks look best using a shutter speed of 1.5 to 2.0 seconds, so next time, I will probably go shutter speed priority at 1.5 or 2.0 seconds and then look at what I am getting.
Higher ISO allow you to get ambient light that you want.  So, dial-in the shutter speed that is best and then select an f-stop that will get you the ambient exposure you want.  I look at it similar to using flash photography, but only in reverse.
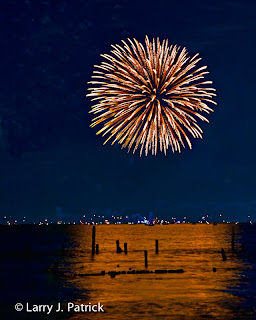
Here are two of the shots that I liked best.
Enjoy.
Camera settings:  Nikon D3, Nikon 28-70mm f/2.8 shot at 70mm, ISO 1,600, f/8 and 1.5 and 1.7 seconds and set white balance to tungsten (to make sky bluer).
Post Processing:  
Lightroom—Set black and white points, added clarity and increased contrast.
Photoshop—used spot healing to clean-up various ugly spots.

June 25, 2010

An Ice Cream Parlor from the Past


Ste. Genevieve has many neat old building.  My favorite was probably the ice cream parlor because it reminded me of one in Alma, a small town near Fort Smith.  Every time my grandfather and I went to Alma, Mr. Harris, one of my grandfather’s closest friends, would take all of us over to the ice cream parlor for some home made ice cream.  Great ice and great memories.
I wanted the photo to have a slightly aged look, but I did not want to use a boarder or any textures.  I tried making the photo into a black and white, but it didn’t have the aged look that I wanted.  I then toned the black and white to sepia and reduced the opacity of the layer so that the layer muted the colors of the parlor.
Enjoy.
Camera settings:  Nikon D3, Nikon 28-70mm f/2.8 shot at 28mm,  ISO 560, f/5.6 and 1/60th of a second.
Post Processing:  
Lightroom—Set black and white points, added clarity and increased contrast.
Photoshop—Used Topaz Adjust to bring out the details and then added a black and white layer with a sepia toning at 40% to mute the colors and to give the photo a more aged look.

June 22, 2010

Sunset before the Wedding Reception

The Patrick’s moved their base to the Chaumette Vineyards & Winery in Ste. Genevieve, Missouri for my niece’s wedding.  The ceremony was very nice and the location was fantastic, but the best part of the week was being with my family—brothers, sisters, wife, son, special daughter and, of course, the grandchildren.
I must admit, young Mr. Cameron stole the show.  He put himself into the middle of everything.  I believe that he truly thinks he is the same as his five year old sister and seven year old brother.  He seems to think that he can get his way by simply smiling at everyone.
Today’s photo was taken after a small storm moved through the area and just before sunset.  In the photo, I wanted to show the colors of the sunset and the shadows that the low sun cast over the vineyard.  I set the white balance to K7,500 to add warmth to the photo.
Enjoy.
Camera settings:  Nikon D3, Nikon 28-70mm f/2.8 shot at 42mm, ISO 800, f/8 and 1/125th of a second.
Post Processing:  
Lightroom—Set black and white points, adjusted hue and saturation of various colors and added clarity and mid-tone contrast.
Photoshop—used nik Color Efex Pro Tonal Contrast filter to add detail to the foreground.

June 18, 2010

Playing with Slow Shutter Speeds


JD and I truly enjoyed hiking in and around Johnson Canyon.  Within the canyon, there are many waterfalls and a lot of fast moving water—a great time to play with slow shutter speeds.  For many of my photos, I used my Sing Ray variable neutral density filter.  The filter allows you to adjust the you exposure anywhere from 2 to 8 stops.  The filter is great for capturing moving water.
In this photo, I wanted to capture the water flow and the reflective light on the rocks.
Enjoy.
Camera settings:  Nikon D3, Nikon 28mm f/2.8 shot at ISO 200, f/13 and 8 second with Sing Ray variable neutral density filter attached.
Post Processing:  
Lightroom—Set black and white points, added clarity and mid-tone contrast.
Photoshop—used nik Color Efex Pro to add contrast to various parts of the photo. 

June 15, 2010

Yes Dear, I Think the Bears Are Out


We had just finished a great hike around the Valley of the Five Lakes and were relaxing near our car when the following conversation took place:
JD:  We have not seen any bears.  Do you think they out of hibernation?
Me:  I don’t know.  It is pretty late in the year but then again a lot of the lakes are still frozen and we have been snowed on several times this week; so they may not be.
Me walks to the back of the SUV to get some drinks out and spots a mamma bear with two cubs.
JD:  I think they are still hibernating.
Me:  I don’t think they are.  (as me is leaning over the hood of the SUV and taking rapid series of photos).
JD:  Make up your mind.  What proof do you have that the bears our out.
Me:  About 40 frames of proof.  (as JD comes around to the front of the SUV and finally sees the momma bear and the two cubs)
JD:  Get in this car right now before that bear eats you.
Unfortunately, I did not get any good photos of the entire bear family.  The two cubs always stayed behind momma thus making it very hard to get a clear shot of them.
Enjoy.
Camera settings:  Nikon D3, Nikon 70-300mm f/4-5.6 shot at 200mm, ISO 200, f/8 and various 1/500th of a second.
Post Processing:  
Lightroom—Set black and white points, cropped photos, and changed and added saturation of certain colors.
Photoshop—used nik Color Efex Pro tonal contrast to enhance details in the bear.

June 11, 2010

Church of the Mountains


JD and I visited the Church of the Mountains on our way back from Emerald Lake.  The church sets in a rather deserted area with only a small walking path leading up to it.
Upon reaching the church, I took several shots of it from the front, but really did not like any of them because the background was not very interesting.  I walked around to the back of the building where I was provided with a wonderful view of the mountains and a setting sun. 
The color combination of the sky, mountains and church was not that interesting so I decided to convert the image to black and white.  I wanted to make sure that I retained all the details in the white church so I underexposed the image by ½ f-stop.
Enjoy.
Camera settings:  Nikon D3, Nikon 17-35mm f/2.8 shot at ISO 200, f/8 and 1/350th of a second.
Post Processing:  
Lightroom—Set black and white points and cropped photos.
Photoshop—converted photo to black and white using nik Silver Efex Pro.

June 8, 2010

Lessons—Relearned


Reading comments from Mel and Sya on last Friday’s photo of the mountain goat, I immediately said: “Why didn’t you see that?”   They were correct—the rocks are a very distracting element in the photo.  So, I decided to repost the image without the rocks, or at least without most of them.  At first I tried cloning the rocks out, but I really did not like the results I got.  Then I looked at the image more closely and decided that by cropping the image I would: (1) get rid of most of the rocks; and, (2) place the goat in a much better position within the composition.
The second lesson relearned concerns remembering to take ALL the photos that you should take on your vacation. 
While out hiking one day, JD’s boot began to disintegrate on the trail.  We had to cut our hike short in fear that JD would be hiking barefoot.  Not a good idea!  After we got back to the cabin, I noticed JD’s boots setting on the floor.  I thought:  “I need a photo of those boots so that we can remember our ‘special hike.’”  It is not a great photo, but it does help to build memories, so remember, don’t forget to make those memories on your next vacation.
Enjoy.

June 4, 2010

Along a Trial

One of the great things about hiking in national parks is seeing things that you do not normally see in your day-to-day life.  JD and I was about half way through our hike when we wondered upon three mountain goats.  Normally, mountain goats are very shy and take-off the moment that they see you, however, these three stayed around for about twenty minutes while we ate a snack and watched them.
In this photo, I like the way the white of the mountain goat contrasted against the dark bark of the trees.
Enjoy.
Camera settings:  Nikon D3, Nikon 70-300mm f/4.5-5.6 at ISO 800, f/9.5 and 1/500th of a second on a tripod.
Post Processing:  
Lightroom—Set black and white points, and added clarity and vibrance.

June 1, 2010

Not Exactly How I Remember It

JD, Monte and I had gone to Banff/Jasper many years ago.  All of us thought that it was truly beautiful with many great hiking trails that generally led to emerald colored lakes.  JD and I returned a couple weeks ago, but things were not the same.


Our last visit was during the summer; this time we made the trek in the middle of May.  To my surprise, we found many of the trails still closed due to snow.  According to the locals, most of the trails are open by the beginning of May, but not this year.  In fact, one of Banff National Parks most famous sites, Lake Louise, was still quite frozen, as you can see by the photo. 


I wanted the image to be a classical landscape photo—the rocks in the foreground anchoring the bottom part of the photo, the lake with some interesting shapes and colors and finally the majestic mountains and sky acting as the background to the whole season.
Enjoy.
Camera settings:  Nikon D3, Nikon 17-35mm f/2.8 at 17mm shot at ISO 200, f/13 and 1/180th of a second.
Post Processing:  
Lightroom—Set black and white points, adjusted hue and saturation of various colors and added some mid-tone contrast to photo.
Photoshop—used Topaz Adjust to bring out the details in the rocks.