January 29, 2010

Those Blue Eyes

I was walking down the sidewalk when I looked over and saw this great looking pair of eyes staring at me. I immediately told Terry’s mother that he had quite a pair of eyes. She shyly smiled and said that he already seemed to know how to use them to his full advantage.

Terry and his mother were there to cheer his dad and uncle to the finish line. I asked his mother if she minded if I took a few shots of Terry. This is my favorite photograph of him. For some reason, I really like the way he was intently staring at something, but from my perspective, I did not know what it was. It seemed to give the photo a little added mystery.

Enjoy.

Camera settings: Nikon D3, Nikon 70-200mm f/2.8 at 200mm shot at ISO 800, f/5.6 and 1/90th of a second.

Post Processing:

Lightroom—Set white and black points, added mid-tone contrast, added clarity.

Photoshop—used nik Color Efex Pro tonal contrast to his jacket.

January 26, 2010

Family Cheering Family

Before I discuss today’s photo, I would like to write a few words about last weeks photo. I appreciate all the comments that everyone took the time to write, however, I would prefer that people keep from criticizing other’s opinions. I do not see that helping anyone. I do fully expect a critical analysis of everything I post; that is why I post my work. Now, about today’s post.

Probably the neatest aspect of the Houston Marathon is meeting lots of family members who are cheering their fellow members.

Meet Annie. Her brother and cousin were running in the Fun Run and her father was running in the half marathon. She was at the starting line cheering each of them off and was planning on being near the finish line cheering them. She told me about each one of them and how proud she was of all of them. Great conversion with a really cute young lady.

After we talked a while, she asked me to take her picture for her dad. I wanted this photo to be about her enthusiasm and her child-like charm.

Enjoy.

Camera settings: Nikon D3, Nikon 70-200mm f/2.8 at 70mm shot at ISO 800, f/4.8 and 1/350th of a second.

Post Processing:

Lightroom—Set white and black points, added mid-tone contrast, added clarity and reduced saturation of pink to reduce affect of pompoms.

January 22, 2010

Portrait with Edgy Lighting

Originally, I was planning on posting another photograph from the Houston Marathon, but after a portrait session on Monday, I decided to post one from that session.

As Doug Haass indicated in his post on Tuesday, Doug, Steve Schuenke and I tried a little “edgy” lighting on some portraits of Kelsi on Monday. Steve and I have been discussing doing this for some time, but the opportunity to do it had not presented itself before our shoot with Kelsi.

Before I get to the particulars of today’s photograph, I would like to say something about Kelsi, her mother and brother: they were great! I really enjoyed seeing such a close-knit family.

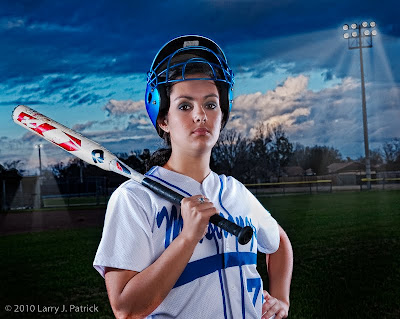
I wanted to “push the envelop” with this portrait and a great subject like Kelsi made that very easy. I must admit, we were blessed with some great clouds that rolled into the areas just as we started setting-up the lighting for the edgy portraits.

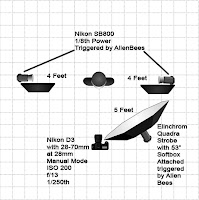
Both Steve and I was somewhat surprised with how easy the lighting was to set-up for the edge lighting that we wanted. We placed an Nikon SB-800 at about four feet on each side of Kelsi. We put a homemade gobo on each strobe and pointed the strobes at Kelsi’s ears. From past experience we knew that 1/8th power would be a good starting point for the strobes for properly exposing her at f/13.

Next, we placed the main light, a 53” octagonal softbox housing Elinchrom Quadra strobe. Ideally, the main light would have been directly over Kelsi on a boom, but since we did not have a boom, we placed it above and slightly to the right of the camera. I wanted the two Nikon SB-800s to be the primary source of light, so I dialed the Elinchrom strobe down to a power rating that underexposed her face and front of her uniform by about one to two stops. I wanted the edge lighting to be very pronounced in my versions of the portraits. Steve and Doug used higher power settings for the Elinchrom strobe, so the effects from the Nikon strobes is less.

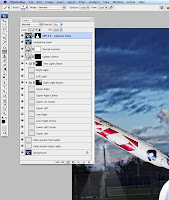
Not shown on the screen grab is some minor clean-up I did on the background and the layer in which I used Topaz filter (described below).

After seeing the image on my computer, I decided to make the portrait more surreal. I added more details to the background by using Topaz Adjust filter to increasing the contrast and color saturation. I also turned the field lights on and added some light beams. I used separate layers for each one of the beams so that I could adjust opacity of each beam independently. The beams were created by making a selection with a feathering of 25-40 pixels, filling the selection with white, adding noise to the selection and then blurring the noise. I used used a gradient at the group level to reduce the effect of the light beams from the source to the ground. I also added a glow around the lights to simulate how they look in real life.

Enjoy.

Camera settings: Nikon D3x, Nikon 28-70mm f/2.8 at 56mm shot at ISO 200, f/13 and 1/250th of a second.

January 20, 2010

Lots of People, Doing What?


Last Sunday, I headed downtown Houston very early. I wanted to photograph various aspects of the Houston Marathon.

If you have never gone to and photographed a marathon, I suggest you do so. Before the start, you will meet lots of people who for some strange reason want to run over 26 miles, just to return to the same place. The pre-marathon atmosphere is more like a party than you would think. Everyone is excited.

In these first photographs of the marathon, I wanted to show the magnitude of the crowds that were participating while also isolating on one person. Since these photos were taken at sunrise, I shot them at ISO 4,500. I did set black and white point and did apply some noise reduction in Lightroom.

Enjoy.

January 15, 2010

Enough Interest?

When I saw this scene I really liked the textures of the foreground versus the foggy, blown-out background. I started to shoot the image in HDR but then decided that I would normalize the overall scene and the contrast would be eliminated. I decided to properly expose the foreground so I used a spot meter on the net area and expose accordingly.

The basic question I have about this image is simple: Does the subject of the boat and the contrast with the background create a photograph that has impact?

Enjoy.

Camera settings: Nikon D3, Nikon 28-70mm f/2.8 at 50mm shot at ISO 200, f/13 and 1/60th of a second.

Post Processing:

Lightroom—Set white and black points, added mid-tone contrast, added clarity.

Photoshop—used nik Color Efex Pro tonal contrast to add contrast to highlights, mid-tones and shadows of the boat and dock.

January 12, 2010

Shapes in the Fog

Last week Sam asked for some more shooting information. So, before I discuss today’s photo, I will give you a few more details. First, I have shot at this location a couple times, but never got anything that I really liked. I had decided that I wanted to visit it when there was fog, as I did over the holidays. Second, I spent about an hour and half shooting and took about 230 photos (including several bracketed exposures for possible HDR). Today, I have only 12 images from the session on my hard drive. Of the remaining images, there are about six that I feel may be worthy of showing and another six that for some reason, I like—ones similar to the second image I presented on Friday.

Now, about today’s image. When I looked at this scene, I really did not see boats, piers, water and fog; I saw geometric shapes. And, that is what I wanted this photo to show. I felt that a sepia toned photo helped simplify it so that the shapes showed-off better. What do you think?

Enjoy.

Camera settings: Nikon D3, Nikon 28-70mm f/2.8 at 34mm shot at ISO 200, f/11 and 1/125th of a second.

Post Processing:

Lightroom—Set white and black points, added mid-tone contrast, added clarity.

Photoshop—used nik Silver Efex Pro to convert to sepia toned image.

January 8, 2010

Different Views of the Same Thing


The first photo has some of the same characteristics as the one I presented earlier in the week: detailed boats complemented by simple foggy areas. But, in this one, I wanted to present the complex details of the mask fading into the simple lines of the boats’ hulls and finally the solid off white of the foggy background. I like the progression of complexity to total simplicity.

After taking the first photo, I moved closer to the boats to see if I could get some detailed photos of the boat’s mask. I must admit, I was very surprised to see really how complicated the scene before me was. I decided to take a few shots to show the complexity of the scene. This shot raises a question I constantly ask myself: “what is the subject?” After looking at the photo, I decided to ask you the question: “Can you have a photo of complexity and details as the subject?”

Enjoy

January 5, 2010

The Wonders of Fog

Since 2009 was a much busier year for my photographic business than I expected, I decided to take the last two weeks of the year off. It was a great break. I delivered all the portraits that I had taken before Christmas and so between Christmas and the New Year, I was official on “vacation.”

I had some blog posting prepared for that week, but, forgot to post. Oh, well, it looks like everyone out there in cyber land got lucky!

I was going to try some new lighting techniques with my buddy Steve, but the weather got to us and we were not able to shoot, so instead, I just went out and roamed the countryside looking for something that might resemble a decent photo.

What photographer does not like fog? It adds instant mystery and mood to any photo. Add some water and a few boats, and it is hard not to make a good photo.

As I looked at this scene before me, I wanted emphasize the contrast between the details in the dock and boats and the total lack of details in the foggy foreground and background. I decided to frame the detailed portion of the photo in the upper right quadrant and leave the reaming portions of the photo as negative space to help emphasize the details. I tried various crops of negative space and finally settled on the photo as shot. A lot of people might think the amount of negative space is excessive, but I felt that I needed that much space to balance and contrast with the details of the dock and boats.

Enjoy.

Camera settings: Nikon D3, Nikon 28-70mm f/2.8 at 56mm shot at ISO 200, f/13 and 1/90th of a second.

Post Processing:

Lightroom—Set white point.

Photoshop—used nik Color Efex Pro tonal contrast to add highlight, mid-tones and shadows of the dock and boats and then sharpened that are using a high pass filter in the soft light mode.