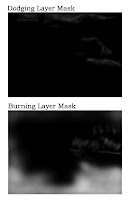
A few years ago, I was in Chicago and visited one of the museums that was presenting a collection of Ansel Adam’s photographs. The collection included several images that Ansel had printed four or five different times over a twenty or thirty year period. As you looked at the various photos in a series, you quickly noted differences in the dodging and burning that Ansel had done. I studied the different photos within a series and then between the different series (trying to line-up the printings by when they were printed). Ansel took different directions with each of the series, but, after spending a lot of time studying the photos, I came to two conclusions about Ansel’s dodging and burning: it was an evolutionary process and the last print was almost always my favorite of the series.

I do some dodging and burning on almost every photograph that I print. In Photoshop, there are a number of ways to do dodging and burning: (1) use curves or levels adjusting layer with mask for areas to be affected; (2) use a blank layer in the soft light mode and paint in white to dodge and black to burn; or, (3) use copies with a mask for areas to be affected of the final image in screen mode to dodge and multiple mode too burn.

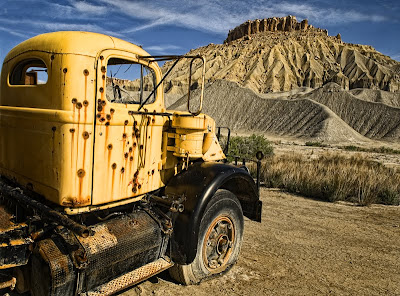
I generally use a screen and multiple-layer to do my dodging and burning. I find that this method seems to more evenly lighten or darken the area without shifting the colors. For this photo, I dodged the clouds and tops of plants in middle of photo and burned the edges of the frame, the dirt by the truck and parts of the near hills.
Enjoy and don’t forget to ask any questions you might have along the way. I will do my best to revise my next posting to accommodate the questions this week.
Post Processing in Photoshop—used a screen layer and a multiple layer of the final image to dodge and burn various parts of the photograph by using mask and then used high pass filter to slightly sharpen entire image.
I opened up yesterday's final image and todays image in separate windows on my computer and was I amazed at how much your dodging and burning affected the photo. Looking at the mask you included in today's post, it just does not look like you have done much. I suggest that everyone do what I did. The additional details that the darkening of the dirt brought out amazed me. And, the clouds, which look like very, very slight on your mask, now help provide a lot of depth to the sky. You have made me a believer in dodging and burning. Great job.
ReplyDeleteTed
Very interesting! It is always so helpful to learn how and why you do certain techniques. I am still a little confused though, on this post --- did you duplicate the previous layer, or merge visible, and change the blending mode to screen for dodging and multiply for burning and then mask out the areas you don't want affected? Or did you add blank layers and use a brush in those modes on the new separate layers, one for dodging and ine for burning? The first example would increase the file size a lot...
ReplyDeleteFor my dodging and burning layers using this method, I duplicate the composite layer twice--one for a dodging layer in screen mode and then one for the burning layer in multiple mode. I then add a black mask on each layer and paint white with a soft brush (0% hardness) and opacity of 3-5%. I keep painting over the mask until I get enough the level of dodging or burning that I want in a given area of the photo. If I make a mistake, I just paint back in black, thus removing the effect.
ReplyDeleteAfter painting the mask, I then "play around" with the opacity slider for the layer to adjust the overall effect of the screen or multiple effects.
Again, I prefer this method best because it does not seem to shift the colors--it just lighten or darkens the area in a very uniform nature.
Hope this helps you.
I like what you are doing. You have given me several things that I can use in my own photography. I agree with Ted you can see a big difference in the two photos.
ReplyDeleteMel