June 19, 2009

A Fine Belly Flop

I have never seen a dog be able to consistently produce the splash that this guy was able to do. This shot is all about the splash and his drive through the water. Because of his great performance, this guy earned the nickname "Big Splash."

Enjoy.

Camera settings: Nikon D700, Nikon 70-200mm f/2.8, shot at ISO 200, 200mm, f/5.6 and 1/4,000th of a seconds.

Post Processing in Lightroom—Set white and black points, added mid-tone contrast.

June 18, 2009

A Little Dog Action


A certain young lady and I ended up in one of our usual haunts last week. There was a lot of action, so that’s the theme of the next few shots. These shots are all about action—in case you could not tell, I tried to turn my D700 into a movie camera. With performances like this, this dog earned the nickname "Splash."

Enjoy.

Camera settings: Nikon D700, Nikon 70-200mm f/2.8, shot at ISO 200, 200mm, f/5.6 and 1/4,000th of a seconds.

Post Processing in Lightroom—Set white and black points, added mid-tone contrast.


June 17, 2009

Abstract Forms #5

Today’s image is a three shot multiple exposure image of a man walking along a fountain. I wanted this photo to be all about the forms of the building and the man walking.

Enjoy.

Camera settings: Nikon D3, Nikon 70-200mm f/2.8, shot at ISO 200, 70mm, f/5.6 and 1/30th of a seconds.

Post Processing in Lightroom—Set white and black points, added mid-tone contrast.

June 16, 2009

Abstract Forms #4


Today’s image is a three shot multiple exposure image of the reflection of a lady behind a chained-link fence. I moved the camera position slightly between each exposure.

Enjoy.

Camera settings: Nikon D3, Nikon 70-200mm f/2.8, shot at ISO 200, 200mm, f/4.8 and 1/60th of a second.

Post Processing in Lightroom—Set white and black points, added mid-tone contrast, increased saturation of red, orange and yellow.

June 15, 2009

Abstracted Forms #3

Today’s image is three multiple exposures shot of a couple at various zoom levels while the lady turned her away from me. 

Enjoy.

Camera settings:  Nikon D3, Nikon 70-200mm f/2.8, shot at ISO 200, three shots at varying zoom levels, f/22 and 1.5 seconds.

Post Processing in Lightroom—Set white and black points, added mid-tone contrast, increased saturation of red, orange and yellow.

June 12, 2009

Abstracted Forms #2


Today’s image is three multiple exposures:  a couple setting on the bench, a bush of yellow flowers and two yellow flowers with their stem. 

Enjoy.

Camera settings:  Nikon D3, Nikon 70-200mm f/2.8, shot at ISO 200, three shots at varying zoom levels, f/22 and 1.5 seconds.

Post Processing in Lightroom—Set white and black points, added mid-tone contrast, increased saturation of yellow, red, and green.

June 11, 2009

Abstracted Forms #1

Over the next four or five days I am sure I will get a few comments like: “Have you lost your mind”, “I just don’t get what you are doing”, and “I think it is time that you take-up kite flying”.   I know a lot of people will not like the shots that I will be posting.  That’s OK with me.  These shots are all about trying new things. I have been trying various techniques over the past few months, but really have not had too much success with them until the past few times our.  These photos are about colors and movement.

All the effects have been achieved totally in camera.  I have not used Photoshop to combine photographs.  All post processing of the images have been done only in Lightroom (or essentially, Camera RAW).

I have used slow shutter speeds, zooming while shutter is open and multiple exposures on same image to make these abstracts.  Again, I wanted this to be all about trying new things to achieve movement and show colors in different ways.

Today’s shot is of a couple setting on a bench in Herman Park, which was taken while zooming my lens at a very slow shutter speed.

Enjoy.

Camera settings:  Nikon D3, Nikon 70-200mm f/2.8, shot at ISO 200, zoomed during shutter opening from 70mm to 145mm, f/22 and 1.5 seconds.

Post Processing in Lightroom—Set white and black points, added mid-tone contrast, increased saturation of orange, green, blue and aqua.

June 10, 2009

Brazos Bend State Park #11

I was disappointed with two things in my visit to Brazos Bend State Park—no good alligator photos and not really that many wildflowers. I really expected a lot more wildflowers, but saw very few.

I ran across these Yellow Prairie Coneflowers as I was leaving the park. I find Coneflowers to have a great shape to photograph, even though I sometimes have trouble controlling their bright yellow color. They were definitely past their prime, but I really liked the overall arrangement. I wanted the image to be a high-key photo with limited depth-of-field—I only wanted a few of the closest flowers to be in focus.

I pushed the high-key aspect of the flowers by putting a light vignette in Lightroom.

Enjoy.

Camera settings: Nikon D700, Nikon 300mm f/4 with a 1.7x Nikon Teleconverter and polarizing filter attached, shot at ISO 200, f/8 and 1/350th of a second on a tripod.

Post Processing:

Lightroom—Set white and black points, reduced clarity and added a light vignette to edges.

June 9, 2009

Brazos Bend State Park #10

After I photographed the two Black Bellied Whistling Ducks, a single one landed on a perch a few feet away. Again, better being lucky rather than being good. I had everything set, and just waited until the duck turned his head around.

Again, I liked the earth-tone colors throughout the image. I wanted the duck to be tack sharp so I selected an f/11. I knew that even at f/11, the background would be virtually out-of-focus.

Enjoy.

Camera settings: Nikon D700, Nikon 300mm f/4 with a 1.7x Nikon Teleconverter and polarizing filter attached, shot at ISO 200, f/11 and 1/125th of a second on a tripod.

Post Processing:

Lightroom—Set white and black points, added mid-tone contrast, clarity and added vignette.

Photoshop—ran nik Color Efex Pro tonal contrast filter on the duck and stump to add contrast to shadows, mid-tones and highlights and added boarder with onOne PhotoFrame.

June 8, 2009

Children at Play

The other night at one of our photo club meetings, one of our members asked me why I no longer submitted any photographs in our monthly assignment.  I told him that I was just interested in doing other things right now.  He then asked me, “Do you ever shoot photos for the assignments and just not submit them?”  I had to admit that I have done a few of the assignments just for fun, but have never really “finished” any of them to the point that the photo is ready to be printed or seen by anyone other than yours truly.  He then indicated that he would like to see some of them them.

I decided that over the next few months, I might share with everyone what I might have submitted as an assignment.  So, today, we interrupt our normal presentation of Brazos Bend State Park to bring you this month’s assignment:  Children at Play.  This is the monthly assignment for June.  Everyone will present their photographs on Tuesday evening.  

I find this subject to be one of the richest assignments that we have had at our club.  You cannot drive down too many streets without seeing children playing—baseball, romping in a sprinkler, diving in a pool, etc.

Today’s photo could have been taken when I was a small boy.  Kids and tire swings are enduring.  I think almost everyone has swung on a tire swing—and if they have not, they sure wished that they had.   This old tire swing in our back yard is one of our grand children’s favorite toys, so it seemed very natural for my “children at play photo” to include it.  While my grandchildren were taking turns in the swing, I decided that this would be a really good "children at play" photo.

This is not my normal “one-man-band” shot.  I had a whole production crew for this one:  granddaughter Chloe playing our child having fun, grandson Cole being my VAL (Voice Activated Light) holding the Nikon SB-800 and following his sister’s movements in the swing while asking “When is it my turn?” and Grandma acting as our power source for the swing.  I never thought that my photograph would ever lead to such a giant production!

I wanted the photo to show the saturated greens in the trees and have somewhat “dreamy look.”  I set my exposure to be -1.5EV and my flash to be +0.5 EV.  I ran Kubato’s Deep Forrest A3 filter on the background because I have found that it adds a richness to the greens and browns in a scene and also seems to add that slightly out-of-focus dream look that I wanted.  

I probably should have changed Chloe into a dress that was more complementary to the greens and browns of the background and also removed her shoes (those white shoes do grab your eye), but I really did not think about it at the time.  The photo still needs some work, but I am not really sure what I would do next.  Any suggestions?

Enjoy.

Camera settings:  Nikon D700, with Nikon 28-70 f/2.8 with polarizing filter attached, shot at ISO 800, f/6.7 and 1/180th with a compensation adjustment of -1.5 EV and a Nikon SB-800 to the camera left with a flash compensation of +0.5 EV to the left of the camera.

Post Processing:

Lightroom—Set white and black points, added mid-tone contrast and adjusted hue and saturation of various colors.

Photoshop—applied Kubato’s Deep Forrest A3 filter to the background, sharpened the subject and the tire, and added a vignette by painting black at 4% opacity on a layer in soft light mode.

June 5, 2009

Brazos Bend State Park #9--REVISED!

This morning, I was working on some portraits that I took yesterday, and for some reason, I decided to look at my blog.  Now, as I have stated before, I normally do not read the comments that have been posed on my photographs until the weekend--I feel this is a substitute for a leisure read of the Sunday paper.  I know that this infuriates some of the people who comment on my work, but that's just the way I do things.   Sorry.

Well, both Wayne and DHaass had the same comment on today's photo of a dragonfly, i.e., the curved branch below the dragonfly was very distracting and took your attention off the main subject.    I respect both of their opinions, even if I do not always agree with them (for everyone's information, I only agree with one person's opinion a 100% of the time--Janice D. Patrick's!)

As all of you know, I like things simple.  So, I studied the photograph for a while and decided that they were absolutely right.   I know present my new and improved version of the dragonfly for only an additional . . .

Enjoy.

Brazos Bend State Park #9


Again, I have no idea what kind of dragonfly this is other than it’s a blue one with green eyes.  At first, I was hoping that the dragonfly reverse it’s position so that I could include its eyes in the photo.  Then, I decided that I wanted to make the photo about how delicate the wings seem to be.  I tried various positions and finally decided on this one.  I think it shows the delicate nature of the wings very well.

I do wish that I had chosen a smaller f-stop, say a f/16 so that the tip of the tail would have been in focus, but, regardless, I like the shot and believe that it does what I wanted it to do.

Enjoy.

Camera settings:  Nikon D700, Nikon 300mm f/4 with a 1.7x Nikon Teleconverter and polarizing filter attached, shot at ISO 200, f/9.5 and 1/350th of a second on a tripod.

Post Processing:

Lightroom—Set white and black points, added mid-tone contrast, clarity.

Photoshop—sharpened dragonfly using high pass in hard light mode.

June 4, 2009

Brazos Bend State Park #8

I saw this Green Heron from some distance away.  I approached him very slowly.  I did not want to disturb him because I really liked how the green moss on the water set-off his blue and purple colors.  

I tried to frame my photo so that it only showed only a minimum amount of different components of the scene.   I wanted my image to really contrast the blues and purples of the Green Heron against the green slim on the water.

Enjoy.

Camera settings:  Nikon D700, Nikon 300mm f/4 with a 1.7x Nikon Teleconverter and polarizing filter attached, shot at ISO 200, f/16 and 1/125th of a second on a tripod.

Post Processing:

Lightroom—Set white and black points, added mid-tone contrast, clarity and vibrance.

Photoshop—cloned out some leaves on the water so that the green became very uniform through the image and used nik Color Efex Pro tonal contrast on the bird to increase the contrast of the shadows, mid-tones and highlights.

June 3, 2009

Brazos Bend State Park #7

Today’s photograph is all about the dragonfly’s form and details.  I was happy with all the details that I got in his body and wings.  I believe that the details are set-off very well by the bokeh of the bankground.

Enjoy.

Camera settings:  Nikon D700, Nikon 300mm f/4 with a 1.7x Nikon Teleconverter and polarizing filter attached, shot at ISO 200, f/16 and 1/90th of a second on a tripod.

Post Processing:

Lightroom—Set white and black points, added mid-tone contrast, clarity and vibrance.

Photoshop—used nik Color Efex Pro tonal contrast filter on the dragonfly and the branch to add contrast with the shadows, mid-tones and highlights and then sharpened the dragonfly using the high pass filter in soft light mode.

June 2, 2009

Brazos Bend State Park #6

I believe that this bird is a Yellow-Crowned Night Heron.  

There are two things that I liked about this photo.  First is how the blues and greens of the background complemented and set-off the neutral white, gray and black of the Heron.  Second, I liked the Heron’s pose--he even seems to be posing for me.  The lighting on the bird was very good except for some shadow on his face.

In processing the image, I just wanted to make sure that the details of the Heron came out.

Enjoy.

Camera settings:  Nikon D700, Nikon 300mm f/4 with a 1.7x Nikon Teleconverter and polarizing filter attached, shot at ISO 200, f/9.5 and 1/350th of a second on a tripod.

Post Processing:

Lightroom—Set white and black points, added mid-tone contrast, clarity.

Photoshop—used nik Color Efex Pro tonal contrast filter on the bird and the stump to bring out the details of both by adding contrast in shadows, mid-tones and highlights, and then made only the Heron’s face lighter by using a curves adjustment.

June 1, 2009

Brazos Bend State Park #5

Unless something amazing happens this week, I plan to post additional photographs from my visit to Brazos Bend State Park.  Before I describe today’s photo, let me do a little free advertising for our parks—local, state and national.  We are very fortunate in America to have a great parks system.  No matter how many times I go to any given park, I always find something new about it.  My advice (for what it is worth):  Go and support our parks!

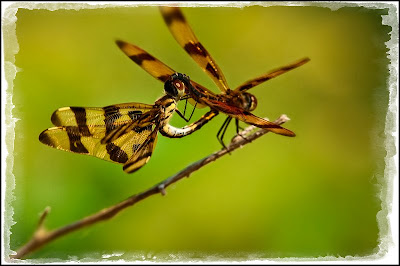
I tried to take Cindi’s advice and look-up the names of what I am posting, but do you realize how many different dragonflies there are?  I think there are billions; many of which, I cannot really see the difference between.  So, it’s back to:  “This is a dragonfly . . .”

Today's photo is all about the colors—earth tones throughout the image.  I tried to get both dragonflies in focus, but even at f/29 I could not get them both in focus.  After looking at all the images that I shot, I felt that f/16 was the sharpest so that is the one that I selected.  

Since I could not get both dragonflies in focus, I decided to add a vignette to make the viewer’s eye go to the dragonfly that is in focus. 

Enjoy.


Camera settings:  Nikon D700, Nikon 300mm f/4 with a 1.7x Nikon Teleconverter and polarizing filter attached, shot at ISO 200, f/16 and 1/180th of a second on a tripod.

Post Processing:

Lightroom—Set white and black points, added mid-tone contrast, clarity and vibrance and increased saturation of green background.

Photoshop—sharpened dragonfly and branch using the high pass method in the overlay mode and added a vignette to the image.