February 27, 2009

Houston Zoo #5

This monkey was sitting in the tree watching all the people walk by.  I could almost hear him thinking:  “If I evolve, do I have to wear that shirt with those pants.  I sure hope not!”

I really liked the monkey's pose and the clean background in front of him, but I had two problems:  there was a lot of “garbage” on the monkey's backside and the light was very hard on his front.  I decided on a slightly unconventional crop that did not show all of his body to solve the garbage issue and decided to underexpose the image by about 3 EV to make the photograph as much about the lighting as the subject.  I really did not care whether the fur on his front legs blew-out; I thought that would just help separate him from the background.

Enjoy.

Camera settings: Nikon D3, 300mm f/4 with 1.7x teleconverter attached (effective 500mm lens), shot at ISO 200, f/13 and 1/750 of a second on tripod.

February 26, 2009

Houston Zoo #4

I watched “Mystery Animal #3” for some time.  He was totally engrossed in eating his lettuce, but he was so far into the shadows of the trees that I could not get a good shot of him.  

After a while, another “Mystery Animal #3” came close to him and he moved into the light where I got this shot.   When he moved into the light, the lettuce became a very bright green which significantly took away from his eyes. I wanted his eyes to be emphasize in the final image, so,  I used selective color and saturation (green) layers in Photoshop to lower the brightness and color saturation of the lattice.  I thought about reducing the light on his tail, but then elected to leave it as it was recorded.  I believe the image looks like this little guy is out in the wild rather than in a zoo.

Enjoy.

Camera settings: Nikon D3, 300mm f/4 with 1.7x teleconverter attached (effective 500mm lens), shot at ISO 400, f/13 and 1/60 of a second on tripod.

February 25, 2009

Houston Zoo #3

I have seen some interesting photographs of “Mystery Animal #2.”  The photos are usually straight on, and showed his painted face—that is the shot that I wanted; but, this guy was behind a wire fence.  Shooting through the fence, I kept getting lots of lines in my shot.  Finally, I noticed a small brake in the fence that I could focus through.  This guy kept walking back and forth in front of the hole, but never looked straight at me.  I changed my plan and tried to get a profile shot of him with the light hitting his back.   I pre-focused on his position when he was in the opening and the started firing away at full speed while he walked from one side of the hole to the other.  I cropped-out the lines of the fence on all sides and selectively added some light to his face in Photoshop.

Enjoy.

Camera settings:  Nikon D3, 300mm f/4 with 1.7x teleconverter attached (effective 500mm lens), shot at ISO 400, f/13 and 1/125 of a second on tripod.

February 24, 2009

Houston Zoo #2


Thank you, Barry for telling me that the animals I posted yesterday are Meerkats--my lovely bride of 40+ years had already told me, as my six year old grandson also did.  JD and Cole have informed me of the names of all the animals that I forgot to shoot the signs of; but, I do not plan on using the names so I can demonstrate how "stupid" I was (some would say "am" would be a more appropriate verb) in not photographing the signs.  So, get ready for more "mystery animal #s".

The male lion wondered over next to the Plexiglas near where I was standing.  Looking at him, I wanted the photograph to be totally about his face, especially his eyes.  My Nikon 300mm would only let me focus at a distance where I could get his entire face.   I thought about cropping the image after I got it into the computer, but then decided that I wanted to show the total frame.  This image has not been cropped.  You are seeing everything that I recorded.  

The major problem in taking this shot was making sure that I did not get any distortion or reflection from the Plexiglas.   I wanted the shot to be straight-on so that his eyes would be the main aspect of the photograph, but I got too much reflection, so I shifted my angle slightly in order to eliminate as much of the reflection as possible.   I still got some reflection in the very top left corner which I cloned-out in Photoshop.  A polarizing filter might have been the answer, but I did not have one with me.

Enjoy.

Camera settings:  Nikon D3, 300mm f/4 with 1.7x teleconverter attached (effective 500mm lens), shot at ISO 600, f/11 and 1/60 of a second on tripod.

February 23, 2009

Houston Zoo #1

On Saturday, the Bay Area Photo Club had its first field trip for 2009.  I must admit, I am not the best at attending our club’s field trips.  No excuse.  I just have not made many of them over the past year.  I usually have a good time at the field trips—not so much for the photographing, but more for the talking to my fellow members.

Before I go on, let me give Bob Dempsey a big “thank you.”  He did a great job finding this outing at the Houston Zoo, and the fact that he, personally, made the rain stay away from Houston until late in the afternoon, well, you cannot say enough about this level of commitment to his fellow club members. 

Great job, Bob.  Now, what are you going to do for us next month?

When I first saw Bob’s email regarding the field trip, I really was not interested in going to the Houston Zoo because I regularly venture over to the zoo with my two grandchildren.  But, then I started thinking (I know a dangerous thing for me) that I do not take many photographs of the zoo because of the two little ones. 

So, I decided to go.  I then asked myself, “Self, what do you want to get from this outing?”  I thought aboutit for a while and then decided that I wanted ten shots for my blog:  three of the animals, three of birds, three of people and one whatever.  I thought that this would be a pretty high goal, but I wanted to push myself.   

I thought that I should pack light since I would be doing a lot of walking,  I narrowed my equipment down to:  Nikon D3, Nikon 70-200mm f/2.8, Nikon 300mm f/2.8, Nikon 1.7 Teleconverter, Nikon 105mm f/2.8 Macro, two Nikon SB800 Speedlights, and tripod.  Almost all of my animal and bird shots were taken with the Nikon 300mm with 1.7 teleconverter attached while almost all of my people shots were taken with the Nikon 70-200mm.  I never used the speedlights or the Nikon 105mm macro lens.

I limited my post processing to my usual global changes in Lightroom (setting white and black points, adding clarity, vibrance and mid-tone contrast) and in Photoshop, to some “clean-up” (or as Cindi calls it “gardening”), adding a black stroke around the edge, cropping the image, local sharpening of main subject and some local exposure adjustments.   I would estimate that I spent less than 10 to 15 minutes on post processing of each photograph in the series that you will be seeing.

I plan to limit the technical information and the back story on each of the photographs.  I want this series to be about what kind of photographs you can produce from a visit to the Houston Zoo.  I want to challenge my fellow Bay Area Photo Club members to tell me how I could have taken a better shot.  (Legal notice:  I reserve the right to delete all comments that tell me to sell my camera and take-up knitting.)

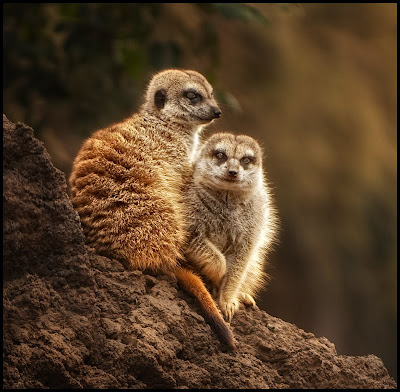
I want everyone to understand a few mistakes I made along the way.  First, I forgot to photograph the sign of the various animals.  I am not that good with the names of these wonderful creatures.  So, some of the photographs will include “mystery animal #”.  This is such a stupid mistake.  I usually photograph signs to help me remember things like this because I think it adds to the overall effect of the image if you have these details in your description and once you have then it is easy to add them to your keywords  in Lightroom.   Second, I did not always get the name of the people I photographed.  Finally, I did not “try” enough different things.  I did not experiment much.  Photographing many of the animals takes some effort because of the barriers that the zoo has to keep the animals in their cages or possibly keep the animals out of the cage (depending on your viewpoint).  I did not try shooting through many of these barriers.  In hindsight, I think I might have gotten something that is a little different if I had tried this more.

Today’s image is not really about the two “mystery animals #1s” but rather about the light.  It was taken early in the morning.   I wanted the soft light and the backlighting to be highlighted.

Enjoy.

Camera settings:  Nikon D3, 70-200 f/2.8 at 200mm, shot at ISO 800, f/4 and 1/180 of a second with on a tripod.


February 20, 2009

The World Is about to End!

Save the women and children.  The world is about to end.  I am posting my second bird photograph in the same week.  I have crossed over to the dark side.  I am a bird photographer.  Is there a cure?  Help!

I guess a little explanation is in order.  As many of you know, I have often said that I am not a good photographer of birds.  It seems the only shot of a bird that I get is one of their “south end when they are heading north.”  This pose does not make for a lot of great bird shots.  I really admire people who have the patience and skill to get really good bird photographs.  I am not one of those people.

This image landed in my lap.  I was setting in our back yard playing with my 300mm f/4 lens with a 1.7 teleconverter attached (trying to see the amount of depth of field that I would get at various f-stops) when this young lady landed on a branch about 10 feet from me.  Realizing that I was not a very good birder, she was very patient with me.  She sat there while I took about twenty shots.  She finally got tired of me and off she went.

It wasn’t until after she left that I realized that I had not gotten a model release from her.

Camera settings:  Nikon D3, 300mm f/4 with a 1.7 teleconverter attached, shot at ISO 800, f/8 and 1/250 of a second.

Post Processing: 

Lightroom— set white and black points, adjusted white balance and added clarity and vibrance.

Photoshop—used onOne PhotoFrame to add edge treatment.

February 19, 2009

Nice and Slow

I noticed this little guy on one of JD’s plants as I carried the paper into the house, so I got my camera and a SB800 with fine grid on it and headed out to take a few shots of my new “best friend.”   Sails may be my favorite animals to photograph.  Why?  Because I have lots of time to think about and then set-up my shot.

I wanted the light to look like it was a ray of sunlight breaking through some tree leaves, thus only on part of the scene.  I tried various things but finally settled on a light that had gaffer’s tape over about half the grid.  It pretty much did what I wanted it to do.  I was reasonably happy with my results—a decent photograph and a little more knowledge about how to modify my flash.

Enjoy.

Camera settings:  Nikon D3, 105 f/2.8, shot at ISO 200, f/13 and 1/125th of a second with camera set at -2.5 EV and SB800 hand held set in TTL mode at +1.0 EV.

Post Processing: 

Lightroom— set white and black points, adjusted white balance and added clarity and vibrance.

February 18, 2009

Spring Training #2

Near the end of practice, I noticed that I had a wonderful sunset behind the boys as they did their final batting practice.  I set my camera to underexpose the ambient light by about 1.5 EV and then set my flashes to overexpose the subject by about 1.0 EV.  I wanted to saturate the colors of the sunset, but show all the details of the boys batting.  Again, I placed the two SB800s on each side of the batter at 45 decree angles, but this time, I replaced one of the boys with a dad (to avoid injury).  Again, my VALs did a great job.

Overall, I was really impressed with how the CLS worked.  In about 100 shots, I think I only had two or three flash failures.  After this little test, I will try some additional tests for the system.  Who knows, I might be selling my AlienBee triggers if I keep getting good results, because it really is easier to adjust the flash levels from the camera as opposed to adjusting them at the flash.

Enjoy.

Camera settings:  Nikon D700, 70-200 f/2.8 at 150mm, shot at ISO 800, f/8 and 1/180 of a second.

Post Processing: 

Lightroom—set white and black points, adjusted white balance and added clarity and vibrance.

Photoshop—did some clean of spectacular highlights on the boy's batting helmet.

February 17, 2009

Spring Training #1

After photographing "Mr. Red Whatever", JD and I headed to watch the big boys at spring training.  

I took various shots of their practice and then decided to use a little flash and try something different.  I usually carry two SB800s in my camera bag and since I recently watched the DVD of Nikon School presents A Hands-on Guide to Creative Lighting, I wanted to try-out some of the things that Joe McNally did in the DVD.  I used my Nikon D700’s built in commander as the control unit and two of the boys as my VALs.

This turned into a lot of fun both for me and the boys.  The boys would line-up to run through the drill and then line-up to be the VAL for the next boy doing the drill.   The boys followed my instructions to the “T”, except for the oohs and aahs that I got after each time the units flashed.  Being a VAL for a six year old boy is a real treat!

According to the history books, Ty Cobb sharpened his cleats before each game.  Looking at this young, budding-star, I think I see the same thing in him.   Look at that face.   Does that not look like the face of a person who will win at any cost?

I had one SB800 on each side of the boy sliding into home plate at a 45 decree angle.  I set my camera at   -1.0EV and the SB800’s were programmed to TTL mode at +0.3EV so that I would get a nice fill but not completely light-up the whole area.  I instructed the VALs to point the SB800s about 2 to 3 feet in front of the subject so that the light would be somewhat feathered.  To make it easy for them, I placed water bottles down on the ground where I wanted them to point the flashes.   My VALs did a great job!

Enjoy

Camera settings:  Nikon D700, 70-200 f/2.8 at 200mm, shot at ISO 800, f/8 and 1/125 of a second.

Post Processing: 

Lightroom—set white and black points, adjusted white balance and added clarity and vibrance.

Photoshop—used nik Color Efex Pro tonal contrast filter to add local contrast to the image except on the boy’s face and arms.

February 16, 2009

A Little Red Goes a Long Way

Friday, JD had an appointment near Herman Park, so while she was at her appointment, I wondered over to the park to work some more on bokeh.  I wanted to use various bottles that I brought with me and one or more of the ponds as part of the background.  While trying various things, this guy showed up.  He was determined to get into my shoot.  Finally, I decided to try some things with him.  I wanted to get the details of his red “whatever” and his feathers against the softness of the background.  Overall, I was happy with the bokeh effect and the contrast with him, but was not really happy with the color combinations—red, black, white, blue and golden-browns just don’t do much for me.

Enjoy.

Camera settings:  Nikon D700, 70-200 f/2.8 at 200mm, shot at ISO 200, f/2.8 and 1/180 seconds.

Post Processing:   Lightroom—set white and black point, added clarity and vibrance.

February 13, 2009

A Different Look at Galveston's Seawall

After visiting where Steve and Charlie took their photos in Galveston, and being duly impressed with what they got, I went over to the Galveston Seawall near the old Galvez Hotel to check out where Cindi took a image of the pilings under the hotel.  Cindi had sent me her image and asked me what I might do with it.  I converted it to a HDR image and did several other changes, but overall, I was not really that happy with what I had done.   I really wanted to see what the scene actually looked like.  After looking everything over, I concluded that under the pier might produce an interesting shot, but, I think you it would probably be best taken at sunset to help reduce some of the hard contrast and that you would really need to work this one. Again, after seeing what she had to work with, I was more impressed with her photograph.

While down under the pier, I noticed these pink steps.  I had never seen them before; but, to my defense, I am not really much of a beach person.  I thought that there was a photograph here, but I knew that I would have to deal with the hard light.  After looking at the scene for a while, I thought that I need to make it about the colors--pink stairs and blue skies.  I set-up my camera at a very low angle and attached a polarizing filter onto the lens.   I took several shot, but really did not like what I was getting.  I then noticed the people walking-by on the seawall.   Immediately, I knew I needed a person walking-by in my shot.  I readjusted my camera and then sat and waited for people to wonder by.   

As I sat there waiting for people to go by, I would hear:  "what you doing down there?"   I would explain and most people would comment something like:  "that's nice"  which I knew meant--"he is a little crazy."   One lady was not convinced that I was telling her the truth, so she came down to see.  She then offered a few thousand suggestions to help my photograph.  I obviously looked like I needed a lot of help at that time.  I think I took about 20 different people in the shot before it was all over.

I liked this photo the best because of the complete harmony of colors among the stairs, the sky and the clothing on the man walking on the seawall and the dynamic position of the man.

Enjoy the photo and hope to read what you think of it.

Camera Settings:  Nikon D700, 28-70mm f/2.8, ISO 200, f/16, 1/500 of a second with polarizing filter attached and on a tripod.

Post Processing:  Photoshop--set white and black points, added mid-tone contrast, used nik Color Efex Pro tonal contrast filter to add contrast to the stairs and seawall, cropped some of the sky from the image.

February 12, 2009

Galveston Revisited

A couple weeks ago, I went down to Galveston to check out the location that Steve and Charlie took their photographs for our assignment, "Old Galveston."    No, I did not go there to try my hand at their shots.  I wanted to see, first hand, what was actually there.  After seeing what both of them had to work with, I am even more impressed with their photographs.  Both Steve and Charlie did an outstanding job with their images. Congratulations, guys.

After checking out the door and front porch from Charlie's photograph, I wondered around to the side of the house where  I found these steps and door with shutters.  Two things struck me about what I was seeing. First the two different, but complementary, color schemes I saw. Blue and grey in the shutters and reds and greens on the stairs.  Second, how the whole scene was a lot of rectangles, small ones at the top of the image and large ones at the bottom.  Since there was a fence in front of the steps, I had to shoot between two iron rods and use the fence as my tripod.  I did not get the exact angle I wanted, but, it was close enough to show what I wanted.


I wanted all the details to come-out in my final image, I shot seven exposures and combined them in Photomatix as a HDR image.  In the tone mapping, I "pushed" the contrast somewhat, since that was what I really wanted.  I thought that this would make a good black and white, but, I wanted my final image to really emphasize the two differences that I noted.

Camera Settings:  Nikon D3, 28-70 f/2.8, ISO 200, aperture priority, f/16, 1/8, 1/15, 1/30, 1/60, 1/125, and 1/250 of a second.

Post Processing:  Photoshop--used nik Color Efex Pro tonal contrast to bring out the details of both the top and bottom portions of the photograph.

Let me know what you think.

February 11, 2009

A Little Color

For some reason, I did not realize that I had been posting so many black and white photographs.  I must admit, I like black and white.  I think trying to make a good black and white photograph is sometimes very difficult since we see in color and a lot of images really need the color.

So, after my black and white marathon, I decided to give you a little splash of color today.  OK, a BIG splash of color!

In the past, I have not submitted too many photographs to contest or outside websites.  However, I am starting to submit more things to various outside sources.  In the March 2009 issue of Shutterbug, they announced that the photograph contest for April 2009 is "Bokeh: Painterly Backgrounds."   I like bokeh.  I have lots of photographs that include what I think is very good examples of bokeh.  But, I want to make a photograph specifically for the April contest.  I want to approach this similar to a monthly assignment at Bay Area Photo Club. 

I set this shot up to test my various lenses for bokeh.  I figured that I should really know which ones of my lenses produce what type and how much of bokeh at various f-stop and various distances to the subject and the background.   After testing my 50mm f/1.4 and my 70-200mm f/2.8 (two lenses that I think have very good bokeh), I tried my 105mm f/2.8 macro.  About the time that I got ready to take the shot, the bee landed on the flower.  It's sometimes better to be lucky than good.  I liked what the bee added to the image.  I also like the amount of bokeh I got in relation with the sharpness of the flower and bee.

What do you think?

Camera Settings:  Nikon D3, 105mm f/2.8, ISO 200, at f/8 and 1/60 of a second.

Post Processing:

Lightroom--set black and white points, increased saturation of different colors.

Photoshop--used nik Silver Efex Pro tonal contrast filter and sharpened the flower and bee using high pass filter method in the hard light mode.

February 10, 2009

Concentration

Scooter's Ice House has a pool tournament every week or so.  I am not a pool player, but I do enjoy watching a really good one take a spin around the table.  Now, I do not think that most of the guys who take part in this tournament are world-class pool players, but they might be world-class "trash talkers."  It seems that everyone at the tournament gets more pleasure from having the best line than from having the best shot.

As I watched the tournament the other day, I was struck with how much concentration everyone seemed to use when taking their turn. After a while, I decided that the concentration was what I wanted to capture. 


As I was watching this young man, I really liked his level of concentration, his overall appearance and of course the light that was on him.  I knew this had to be done in black and white.

Camera Settings:  Nikon D3, 28-70mm at 50mm, ISO 400, f/5.6 and 1/60 of a second.

Post Processing:

Lightroom--set black and white points, added mid-tone contrast and  clarity.

Photoshop--converted to black and white using nik Silver Efex Pro.


February 9, 2009

Old and Rusty


I found this old Ford pick-up near Alvin, Texas.   I really like the rust and the texture.   For some reason, like most photographers, I really think that old cars are great to photograph.  I wanted the age of the truck to show through in my final image.   Overall, I was pleased with the final image.   Enjoy. 

Camera settings:  Nikon D3, 17-35 f/2.8 at 24mm, shot at ISO 200, f/13 and 1/15 seconds on a tripod.

Post Processing: 

Lightroom—set white and black point, added mid-tone contrast.

Photoshop—converted photograph to black and white using nik Silver Efex Pro using high structure preset.