February 26, 2010

Kelsi Revisited

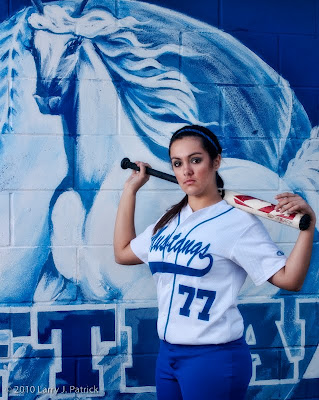
I meant to post this photo of Kelsi after I posted my doctored image of her a few weeks ago, but for some reason I just forgot about it.

In this photo, I wanted to give you a little more insight into Kelsi and her softball team—the fighting Lady Mustangs of Friendswood. I thought the mural added to the photo. I was concerned by the amount of blue in the photo, but after looking at it, I thought that the blue did a great job complementing her skin tones.

Enjoy.

Camera settings: Nikon D3x, Nikon 70-200mm f/9.5 shot at 95mm, ISO 200, f/9.5 and 1/180th with a Elinchrom Quadra softbox at camera left.

Post Processing:

Lightroom—Set white and black points increased vibrance.

Photoshop—used nik Color Efex Pro glamour glow filter and added a black and white layer created in nik Silver Efex Pro with an opacity of 12%.

February 23, 2010

Unusual Reflections

I was walking around this old building looking at all the texture that the weathered paint had produced when I noticed this window with a reflection of an old railroad car and station. I tried several different angles to get the reflection of the railcar and station just the way I wanted.

I think this one is all about the angles of the reflections and the saturated colors.

Enjoy.

Camera settings: Nikon D3, Nikon 28-70mm f/2.8 shot at 28mm, ISO 200, f/11 and 1/125th with a polarizing filter attached.

Post Processing:

Lightroom—Set white and black points increased clarity and vibrance.

Photoshop—used Topaz adjust to add greater detail and saturation of color.

February 19, 2010

Trying to Capture Some Lighting

A couple weeks ago, I was heading to Galveston to scout for a portrait session that I had booked when I noticed a lot of lightning off in the distance. I pulled my car off the freeway near a marsh where I hoped to get a few nice lightning bolts; but, alas, nothing.

Just for the record, I was not so stupid as to stand outside and try to get the shot of lightning. Rather, I took the “chicken” way out—I stayed in my car and hopped for the best.

I wanted the photo to depict the mood that I felt while watching the storm unfold in front of me. I thought that black and white would do that best.

Enjoy.

Camera settings: Nikon D3, Nikon 28-70mm f/2.8 shot at 36mm, ISO 200, f/16 and 1/125th of a second with various strobes triggered remotely.

Post Processing:

Lightroom—Set white and black points.

Photoshop—used nik Silver Efex Pro to convert photo to black and white.

February 16, 2010

A Snapshot of the Moment

I was out doing a little street photography and trying some new things when I spotted this father and daughter. They were having such a wonderful time and enjoying each other’s company. I really like their expression and how her face was reflected in his sunglasses. I wanted my photo to be totally about the moment so I zoomed into their faces as close as I could. I added a frame to make the photo look more like a snapshot.

Enjoy.

Camera settings: Nikon D3, Nikon 70-210mm f/2.8 with 1.7x teleconverter at 340mm shot at ISO 200, f/5.6 and 1/500th of a second.

Post Processing:

Lightroom—Set white and black points.

Photoshop—used onOne Photoframe to add frame.

February 12, 2010

An In-Your-Face HDR Photo


Earlier in the week, I presented what I consider a subtle HDR image—it captured the full dynamic range of the scene but did not have that surreal look to it. Well, today, we are going a full 180. I wanted this photo to look almost like a cartoon. I selected a subject with a lot of details and then processed the image to bring out all those details.

I wanted the buildings to completely cover the entire image so I was very careful to frame the photo from the left so that none of the sky behind the building was visible. I also tried to keep the two buildings to appear somewhat uniform. I purposely did not correct for the lens distortion. I felt that the distortion added to the surreal feel of the photo.

I shot five frames in the aperture priority mode at -2, -1, 0, +1 and +2 EVs. I used Photomatix to merge and tone-map the five frames into the final image.

Enjoy.

Camera settings: Nikon D3, Nikon 17-35mm f/2.8 at 17mm shot at ISO 200, f/13 and 1/8th of a second and on a tripod for the 0EV exposure.

Post Processing:

Lightroom—Set white and black points.

Photoshop—used Noise Ninja to reduce noise in the photograph and used Topaz adjust to enhance the overall photo.

February 9, 2010

Early Morning HDR

A couple years ago, I played around with HDR a lot, but for some reason, HDR lost its charm with me. Lately, I have been looking at various photographers’ (including Barry Armer’s) HDR work. As a result, I got the bug to give HDR another try.

I was downtown Houston trying to find a site for an upcoming shoot when I saw this early morning scene of Cabo. I used HDR to capture the full range of the scene. I shot five frames in the aperture priority mode at -2, -1, 0, +1 and +2 EVs. I used Photomatix to merge the five frames and tone map the final image.

I wanted the final image to show all the details that my eyes were seeing.

Enjoy.

Camera settings: Nikon D3, Nikon 28-70mm f/2.8 at 62mm shot at ISO 200, f/4 and 1/15th of a second and on a tripod for the 0 EV exposure.

Post Processing:

Lightroom—Set white and black points.

Photoshop—used Noise Ninja to reduce noise in the photograph.

February 5, 2010

Reluctant Subject

Before I discuss today's photo, I would like to answer a question posed on my last post: ". . . if you had not had all the comments for change would you have anyway? Probably not. Why? Because I was not thinking about the photo of Terry as a "street portrait" and because I think of my blog as a vehicle to post work that I consider more "work in process" as opposed to finished photos. But, then again, maybe I would have gotten there someday!

I find photographers are usually poor subjects. This gentleman was intently photographing everyone in sight, but then, when I pointed a lens at him, he immediately reacted. His face pretty much lost all expression and he even seemed a little flustered.

I wanted this photo to be about his expression—hence the use of black and white.

I must admit, I blew my change at a Nikon sponsorship by not getting the camera in focus—too little depth of field. Oh, well, maybe next year.

Enjoy.

Camera settings: Nikon D3, Nikon 70-200mm f/2.8 at 200mm shot at ISO 800, f/4 and 1/350th of a second.

Post Processing:

Lightroom—Set black and white points.

Photoshop—used nik Silver Efex to convert image to black and white.

February 2, 2010

I Got the Message

I think a few of you out there did not like the background of Terry’s photo that I posted last week. Well, I agree. The background was distracting. However, this was street photography. I am not of the school that says to do street photography you cannot let the subject know that you are photographing them. I generally let people know that I am photographing them, however, I generally do not change their environment. Consequently, when I look at Terry’s photo, I use a different criteria in judging it than I would a photograph which I call “street portraits.” I consider the photos that I take at the various festivals as street portraits. At the festivals, I often move people to better backgrounds, direct their pose and use flash. Here, I did none of that.

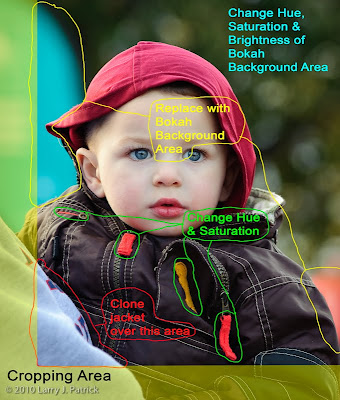
All that being said, it is very easy to push Terry’s photo into a much better portrait. When I look at the photo, I want to simplify it and bring Terry's face forward. Here are the changes that I think need to be made:

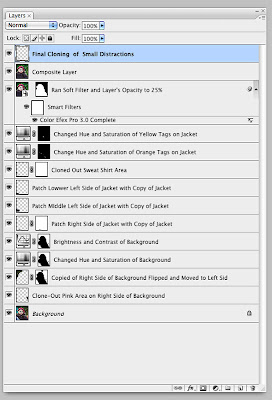
It took me about 20 minutes to “finish” Terry’s portrait. Here is a screen grab of the layers that I used to make the adjustments (please excuse the poorly worded labels, but I label for my benefit and was too lazy to change them for this post):

Enjoy