May 26, 2012

Nikon D4—What’s My Favorite Thing about the Nikon D4?


I did not receive many comments about my Tuesday’s post on my blog, however, I received many emails asking me questions about the Nikon D4.  I welcome communication with everyone but I would like to remind you that if you make a comment on my blog, everyone sees it; if you send me an email, only you and I see it.  Regardless which way you go, I do appreciate your comments.
Probably the biggest single question I received was:  what is the best thing about the Nikon D4? 
If I had to name one thing, I think it would be the sensor—images are just crisper and contain a wider dynamic range than those taken with my Nikon D3 or Nikon D3x.  I compared photos taken of the same subject and with the same lens (Nikon 85mm f/1.4—my sharpest lens) with the D4 and the D3x (which I think has a wider dynamic range than the D3), and looked at them on my computer.  To me, the D4 just outperformed the D3x.
Next, I would say high ISO performance.  The D4 has about two f-stops better performance than my D3.  The D3x is not made for high ISO use.
But, I am not sure that I would be as happy with the D4 if that were the only changes that Nikon made.  The “little refinements” in how the how the D4 operates makes it a real joy to use and easier to get the image that you want.
Today’s photo was taken at Brazos Bend State Park.  This alligator was near one of the piers.  There was a sliver of light that hit the alligator.  Although he (?) was not very active, I did wait until he moved so his eye was in that sliver of light.  In the photo, I wanted to show the texture of the alligator.
Enjoy.
Camera settings:  Nikon D4, 28-300mm f/3.5-5.6 at ISO 400, f/5.6 at 1/125th of a second on a tripod.
Post Processing:  
Lightroom 4—set white and black point and increased contrast.

May 22, 2012

Nikon D4—What’s with It?


At 4:17 PM on April 30, 2012, my UPS man delivered a package that I have been expecting for over three months.  Yet, no D4 photos have appeared on my blog.  What’s with that?
Well, the two of us have been getting to know each other.  Sound a little crazy.  Yep, that’s what my bride (of 45 years) thinks.  But, let me explain.
The first thing that I did (now hold your breathe) was read the manual.  I then started setting-up it the way that I thought would best fit my way of shooting.  Many people have said that the D4 is an evolution from the D3—well, that may be, but what an evolution.
So many of the D4’s controls have bee refined from the D3.  The D4 is much easier to shoot with because some critical controls have been moved from being buried within the menus to buttons on the camera.  To change image size, picture controls and autofocus mode and area-mode on the D4, you merely push a button.  No more searching menus.  Now this may not sound like much but all three of these controls were place in my menu on my D3 because I accessed them so often.
Enjoy.
Camera settings:  Nikon D4, 70-200mm f/2.8 at ISO 1600, f/5.6 at 1/350th of a second.
Post Processing:  
Lightroom 4—set white and black point and increased contrast.

May 18, 2012

Taylor #5


Obviously, today’s photo is a Joel Grimes rip-off.  Unlike Joel’s photos, this photo is not a composite with the background being an HDR photo. 
The lighting is pretty straight forward as you can see by the diagram.  The only difficult part of the lighting is making sure that the two rim lights (SB800s) are pointed at the same direction and are at the same power settings.  This required some fine tune adjusting to get it just right.  The Elinchrom Beauty Dish with a diffuser was attached to a pole and held in-front and above Taylor’s face
Enjoy.
Camera settings:  Nikon D3x on a tripod, Nikon 85mm f/1.4 at ISO 100, f/4 at 1/60th of a second with two Elinchrom Quadra flashes—one positioned in front of her and the other behind her as a hair light.
Post Processing:  
Lightroom 4—increased clarity and vibrance and did some basic dodging and burning various parts of the photo and used adjustment brush to cool temperature of background so that it would appear bluer than it actually was.
Photoshop CS5—ran nik Color Efex Pro glamour glow filter.

May 15, 2012

Taylor #4


Today’s photo was taken at the same location as last Tuesday’s photo.  Again, I wanted the photo to have both a lot of environment and an “after the race” look for Taylor.  Here, I had Taylor look at the camera to make a better connection between her and the viewer.
Enjoy.
Camera settings:  Nikon D3x on a tripod, Nikon 85mm f/1.4 at ISO 100, f/4 at 1/250th of a second with two Elinchrom Quadra flashes—one positioned in front of her and the other behind her as a hair light.
Post Processing:  
Lightroom 4—increased clarity and vibrance and did some basic dodging and burning various parts of the photo.
Photoshop CS5—ran nik Color Efex Pro glamour glow filter.

May 8, 2012

Taylor #3


Today’s photo was taken at the same location as Tuesday’s photo.  Here I wanted to bring more of the environment into the scene and make it appear as if Taylor had just finished a race.
I do like how the shadows in the background seem to mirror her mood.
Enjoy.
Camera settings:  Nikon D3x on a tripod, Nikon 85mm f/1.4 at ISO 100, f/4 at 1/250th of a second with two Elinchrom Quadra flashes—one positioned in front of her and the other behind her as a hair light.
Post Processing:  
Lightroom 4—increased clarity and vibrance and did some basic dodging and burning various parts of the photo.
Photoshop CS5—ran nik Color Efex Pro glamour glow filter.

May 4, 2012

Taylor #2


Before Taylor arrived, Steve and I walked around the area for the photo shoot.  When we walked behind the stands, I immediately thought of using the shadows as background.  I felt that the shadows would give the photo an added sense of depth.
Here, Taylor is setting on a support for the stands.  I wanted this photo to look more like a grab shot than a formal portrait. 
Enjoy.
Camera settings:  Nikon D3x on a tripod, Nikon 85mm f/1.4 at ISO 100, f/4 at 1/250th of a second.
Post Processing:  
Lightroom 4—increased clarity and vibrance and did some basic dodging and burning various parts of the photo.
Photoshop CS5—ran nik Color Efex Pro glamour glow filter only on Taylor.

May 1, 2012

Taylor #1


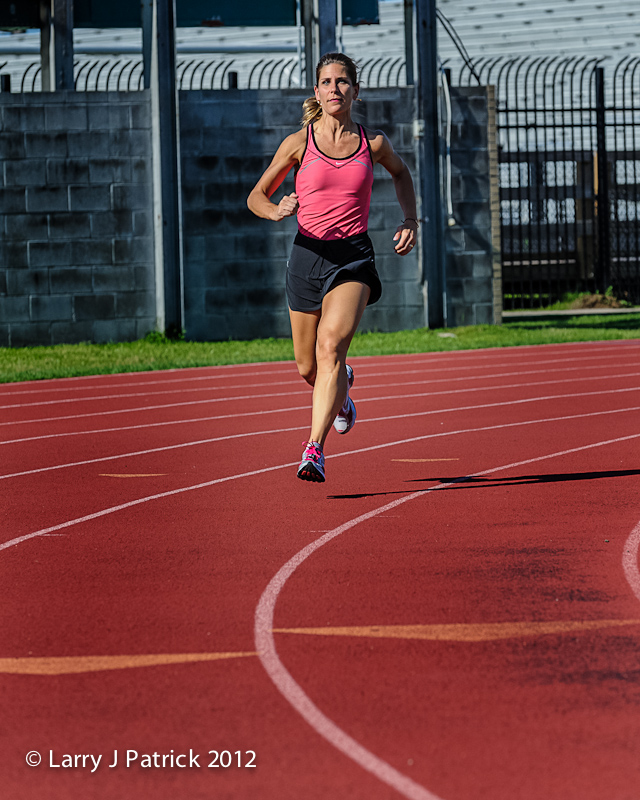
Meet Taylor—M.D., PhD., marathon runner and really nice lady.  I am sure there any many more things that you could say about here, but I think you get the idea—she is an accomplished young lady.
My buddy, Steve, and I had the pleasure of photographing her about a week ago.  Taylor’s only request was for us to get a good photograph of her running.  According to Taylor, a good photograph would be one in which both her feet were off the ground and she did not look like she was dreading the next step.
Steve and I had a few problems getting her good running photo—hard light, messy background and, in my case, not too much sports photography talent.
I think this photo qualifies.  But, as always, what do you think.
Enjoy.
Camera settings:  Nikon D3 on a tripod, Nikon 70-200mm f/2.8 at ISO 800, f/5.6 at 1/3000th of a second.
Post Processing:  
Lightroom 4—increased clarity and vibrance and did some basic dodging and burning various parts of the photo.

April 20, 2012

Fall Colors—Retake of Same Leaves


Today’s photo is a retake of Tuesday’s post.  In this photo, I repositioned the camera, set my white balance to 3,500K (which gave a blue look to everything), use a flash with a CTO gel and a snoot on it, and underexposed the background by about 1½ f-stops and the subject lighted by the flash by about ½ f-stop.   I think the changes gives the photo a totally different feel, but, what do you think?
Enjoy.
Camera settings:  Nikon D3 on a tripod, Nikon 70-200mm f/2.8 at ISO 1600, f/8 at 1/250th of a second.
Post Processing:  
Lightroom 4—increased clarity and added vibrance to the leaves in the foreground using the adjustment brush.

April 17, 2012

Fall Colors


Over this past weekend, I was doing some clean-up on my computer’s photo files when I ran across this photo.  Houston is not blessed with spectacular fall colors so when I see colors like this, I sometimes go a little crazy trying to get my “fall colors” shot.
In this photo, I like the contrast between the bright colors and texture of the leaves in the foreground with those in the background.  I used an aperture of f/8 to achieve maximum sharpness in the foreground while also rendering a soft bokeh to the background.
Enjoy.
Camera settings:  Nikon D3 on a tripod, Nikon 70-200mm f/2.8 at ISO 1600, f/8 at 1/90th of a second.
Post Processing:  
Lightroom 4—increased clarity and added vibrance to the leaves in the foreground using the adjustment brush.

April 13, 2012

Visitor to Our Porch


Our house has a screened-in porch that runs along the back of the house.  The other day, I discovered this fellow (?) on the back of a chair on the porch.  I thought that our visitor would be a great study of depth-of-field so I attached my Nikon 105mm Macro lens and started to try different things with him.
There was not a lot of light on the porch so I was forced to use a high ISO and a slow shutter speed with the stopped-down apertures that I was using.  I also did not want to disturb the frog, so I set my camera to shoot in DX format, which had the effect of changing my 105mm lens to a 150mm lens and making the files smaller and did not use any flash.
The first photo shows the overall scene and was shot at f/27 and 1/15th of s second.  The second photo was at f/36 and 1/4th of a second.  You will notice that even at these stopped-down apertures, the depth of field is still quite small.
Enjoy.
Camera settings:  Nikon D3 on a tripod, Nikon 105mm f/2.8 at ISO 6400, (top photo)  f/27 at 1/15th of a second and (bottom photo) f/38 at 1/4th of a second.
Post Processing:  
Lightroom 4—increased clarity and added vibrance on the frog.

April 10, 2012

Playing-Around in JD’s Garden


I was thinking about that old photographic axiom that you can only get great landscape and nature photographs during the “golden hours.”  I decided to test that theory around noon a few days ago.  I saw this Iris and tried to do something with it.
Here, I overexposed the image by about 2 EVs.   The very top of the flower is blown-out but I think that helps add to the effect that I was trying to get.   To enhance the abstract feeling of the flower, I shot the flower slightly out of focus.
What do you think?
Enjoy.
Camera settings:  Nikon D3x, Nikon 24-70mm f/1.4 at ISO 100, f/2.8 and with shutter speeds 1/1000th of second.
Post Processing:  
Lightroom 4—cropped photo into a square, reduced clarity and added vibrance.

April 3, 2012

Emili and Jordon Shoot #5


Before I discuss today’s photo, I would like to answer my own question in the last post—“Can you guess what that one thing is?”  That one thing that I wished that I had done was to also shoot this in portrait mode.  I think such a shot would have made Emili more the subject of the photo while still giving the photo that high key look that I wanted.  I also think that both of Doug's suggestions are excellent ones and I would use them for my next bicycle rack photo.
Today’s photo of Jordon is one in which I wanted to show the richness of the colors and her famine side by surrounding her with soft floral.  The setting for this photo (see below) was less than 15 feet from the bicycle rack, but had the look and feel that I felt Jordon deserved.  I selected a near wide-open aperture of f/3.3 to soften everything except her face.  I felt that this aperture gave me the depth-of-field and sharpness that I needed for the portrait.
Because of Jordon’s white jacket, I had to point my flash above her head so that just a minimum amount of light would be on her white jacket.  I did not want the whites of her jacket to "blow-out."  The light’s orientation also contributed to the  softness of the light on her face.
Enjoy.
Camera settings:  Nikon D3, Nikon 85mm f/1.4 at ISO 200, f/3.3 and with shutter speeds 1/60th of second with an Elinchrom Ranger Quadra flash with a 17” beauty dish attached.
Post Processing:  
Lightroom 4—set white point, added clarity and vibrance, used adjustment brush to add details to eyes and hair and soften skin.

April 1, 2012

Emili and Jordon Shoot #4


I intended to post this photo on Friday, but, I must not be able to read a calendar so you are getting it today.
I took photos of Jordon before I took those of Emili.  When I was taking Jordon’s photos, I keep looking at this location of a bicycle rack with no bikes in it (first photo) and saying to myself that there was a photo here, but, even though I tried a few things with Jordon, nothing panned out.
This photo came about because Emili mentioned that she could do the splits.  Half joking, I suggested that she do it on the bike rack.  I do believe that she thought “this guy has a few screws loose.”  She is right, of course, but this "crazy talk" gave me the idea to have her lay on the rack.  I did it first to make sure that it was not too uncomfortable, and, it was not.
In this photo, I intentionally blew-out (over exposed the light portions so that there was no details left in the highlights) the background on the left.  I did this because I wanted the photo to have a light feeling to it and I did not have sufficient dynamic range to capture both the left side and the right side of the background.  I wanted to only get her face in focus so I selected an aperture of f/4.
I was laying flat on the ground and shooting her at a slight upward angle.  I positioned my light so that it came from the left and was sufficient just to open-up the shadows on the right side of her face.
Overall, I was please with the photo, but as I look at it, I wished that I done one thing.  Can you guess what that one thing is?
Enjoy.
Camera settings:  Nikon D3, Nikon 85mm f/1.4 at ISO 200, f/4 and with shutter speeds 1/60th of second with an Elinchrom Ranger Quadra flash with a 17” beauty dish attached.
Post Processing:  
Lightroom 4—set white point, added clarity and vibrance, used adjustment brush to add details to eyes and hair and soften skin.

March 27, 2012

Emili and Jordon Shoot #3


Before I write another word, let me say that the photos that I have previously presented of both Emili and Jordon are no better than the two that I now present.  To me, it is a matter of personal preference as to which one of the photos of them you prefer.   
I present these adjusted photos (as requested in several comments) to merely show how a low-key version of Emili’s and a high-key version of Jordon’s photo might look.  I do not think that you can get the same effect using Lightroom or Photoshop that you can be actually shooting with a given look in mind, but I do think that these are a relatively good representation of what the shots might look like.
It is totally up to you to decide which photo you prefer.
Enjoy.
Camera settings: as previously reported.
Lightroom 4—adjusted exposure and contrast to make changes to the respective photos.

March 23, 2012

Emili and Jordon Shoot #2


It’s Friday, so, it time to present my photo of Emili in the same location as the one that I showed earlier this week of Jordon.
As I said in Tuesday’s post, Emili has light completion and eyes so rather than photographing her with rich colors I wanted the colors in the photo to be light and airy.  I changed my f-stop from f/5.6 to f/4 and the shutter speed from 1/90th of second to 1/30th of a second—thus increasing both the ambient light and the effect of the strobe on Emili’s face.  I think that the changed produced an image that was more high-key and more in-tune with Emili. 
The ambient light was darker when I took the photo of Emili so I I think that the overall effect of my camera changes on the ambient light was about one f-stop—not the three that you would expect from the changes that I made to both the f-stop and the shutter speed.  The power changes on the strobe unit was the same so the change in f-stop had the effect of one f-stop on Emili's face.
When I shot the photo, I debated upon putting an additional light to Emili’s left to open-up the background but then after seeing the photo on my computer monitor, I was glad that I did not do it.  I think the additional light would have flattened the image.  The darker side helps add depth to the photo.
Enjoy.
Camera settings:  Nikon D3, Nikon 85mm f/1.4 at ISO 200, f/4 and with shutter speeds 1/30th of second with an Elinchrom Ranger Quadra flash with a 17” beauty dish attached to Emili’s right and about eye level.
Post Processing:  
Lightroom 4—set white and black points, added clarity and vibrance, used adjustment brush to add details to eyes and hair and soften skin and added vignette.

March 20, 2012

Emili and Jordon Shoot #1


Sunday, I had the privilege of shooting Emili and Jordon.  Both ladies are quite photogenic, but are quite different in their appearance.  Emili is a high-school senior with light completion and hair and blue-green eyes.  Jordon, on the other hand, is a young adult with dark eyes and completion.  For the most part, I photographed the two in same places, however, I did change how I approached the shots differently for each of them.
The first photo is just one that shows where the second photo was taken.   
The photo of Jordon was taken inside the statue using the gold inside as a background.  Because of Jordon’s coloring, I wanted the photo to have rich colors so I intentionally under-exposed the shot by about ½ f-stop.  The flash was positioned to the right at eye level and was about three feet from Jordon.  Overall, I like the soft, even lighting on Jordon and I think the backgrounds brings out her coloring.
On Friday, I will present a shot of Emili in the same location.
Enjoy.
Camera settings:  Nikon D3, Nikon 85mm f/1.4 at ISO 200, f/5.6 and with shutter speeds 1/90th of second with a Elinchrom Ranger Quadra flash with a 17” beauty dish attached.
Post Processing:  

Lightroom 4—set white and black points, added clarity and vibrance, used adjustment brush to add details to eyes and hair and soften the skin and added vignette.

March 16, 2012

Lady Liberty Revisited


This Tuesday, I went to Honor’s Night (members present their printed photos to be judged) at Bay Area Photo Club.  I did not present anything—mainly because I did not expect to be going because of Cole’s baseball games which none were scheduled due to spring break—however, I like to see what others are doing and I try to learn from what I see.
Bill Baker presented a black and white image of a castle in Spain.  The judges said that the print would be more successful if it had an established black and white point and more contrast.  I agreed with this assessment but still felt that it needed something else.  To me the castle need to separate from the sky.  But how?
I believe that the eye is naturally drawn to details within a photograph.  So, today I present two prints of Lady Liberty—one, as shot and the other and a second with added clarity, sharpness and contrast within the statue.  Does the second photo make Lady Liberty more significant?
Enjoy. 
Camera settings:  Nikon D3, Nikon 28-300mm f/3.5~5.6 at 300mm, ISO 200, f/11 and with shutter speeds 1/500th of second.
Post Processing:  
Lightroom 4—set white and black points, added clarity and vibrance to second photo.

March 13, 2012

Liberty


Last fall, I began rereading the works of Ayn Rand.  I really enjoyed her writing when I was in high school and for some reason, I thought that it might be time for me to revisit them.  I have finished The Fountainhead, Red Pawn, Night of January 16th and We the Living.  I am currently reading Atlas Shrugged.
The reason that I bring-up my current reading list is because of a conversation I overheard by two 6th graders at Cole’s baseball game last week.  The two boys were discussing an assignment that they had regarding the "state of America".  Both boys seemed to be alarmed by some things going-on in our country—the excessive spending by our government, the amount of debt that “they” would have to repay and the control that the government seemed to exert over everything.  I do believe that the boys were echoing some of the parent’s concern however I was impressed by the amount of factual information that the two boys seemed to have.  They definitely were not just parroting what they had been told by grown-ups and they were concerned.
In light of these two events, I thought this photo of the Statue of Liberty would be a good one for today’s blog.
Enjoy.
Camera settings:  Nikon D3, Nikon 70-300mm f/3.5~5.6 at 300mm with polorizing filter attached, ISO 200, f/8 and with shutter speeds 1/350th of second.
Post Processing:  
Lightroom 3—set white and black points, added clarity and vibrance.

March 9, 2012

Something New and Very Different Part 2


Today’s photo is another from my shoot last Sunday.  If I had to title this photo, I might call it “Portrait of Motorcyclists.”   As you can see, most of the motorcycle is not included in the frame.  This photo is all about Eric and Crystal and their relations to each other and the motorcycle.  Motion blur is present, but here I was not trying to make it a primary part of the story.  In this photo, I wanted Eric and Crystal to be tack sharp and provide only a hint that the motorcycle was moving.
Enjoy.
Camera settings:  Nikon D3X, Nikon 24-70mm f/2.8 at 70mm, ISO 200, f/13 and with shutter speeds 1/180th of second.
Post Processing:  
Lightroom 3—set white and black points, added clarity and vibrance, and adjusted hue and saturation of various colors.
Photoshop CS5—used nik Color Efex Pro Detail Extractor and Tonal Contrast to the bring-out details in the subject and did some basic dodging and burning.

March 6, 2012

Something New and Very Different


Sunday, I met up with four of my buddies from Bay Area Photo Club to photograph something totally different from anything that I have previous photographed—a moving motorcycle from a moving truck. My friend, Neal Kelsoe, invited his nephew and his girl friend to be our subjects for the photo shoot.
I had no idea what I was doing and it showed in about 98% of the photos that I took.  I knew that I wanted a blurred background and tack sharp subjects.  Little did I know that was going to be extremely hard to do.
The truck and motorcycle were generally moving at about the same speed—50 MPH.   However, the road did not cooperate and as a result, both the subjects and me were bouncing up and down.  Studying my bad frames I noticed that a most of the blur on my subjects was more up-and-down blur as opposed to side-to-side blur.  This of course presents my dilemma how do you eliminate the up-and-down blur while still shooting a slow enough shutter speed to get the desired motion blur.
Any and all suggestions regarding how I might improve on my hit rate would be most welcomed!
Thanks Neal for this humbling experience.
Enjoy.
Camera settings:  Nikon D3X, Nikon 24-70mm f/2.8 at 36mm, ISO 50, f/22 and with shutter speeds 1/30th of second.
Post Processing:  
Lightroom 3—set white and black points, added clarity and vibrance, and adjusted hue and saturation of various colors.
Photoshop CS5—used nik Color Efex Pro Detail Extractor and Tonal Contrast to the bring-out details in the subject, removed some telephone lines and pole and did some basic dodging and burning.