January 21, 2011
Street Photography No. 4
January 18, 2011
Street Photography No. 3
Think about how much Photoshop work it would take to make this photo be on par with the original photo I posted of the Mad Hatter. I have neither the time nor the patience to do it. I prefer moving the five steps it took to get the original one.
January 14, 2011
Street Photography No. 2
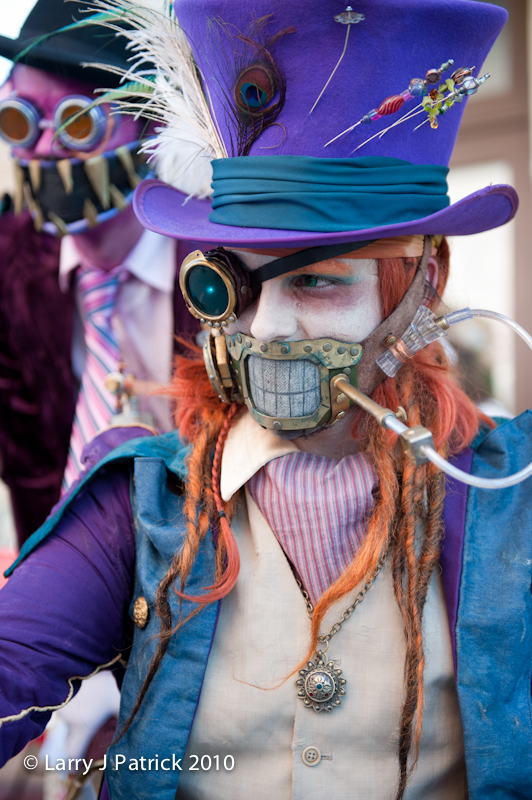
Dickens on the Strand #4 and #6 were part of 18 shots taken over four minutes and 22 seconds. Below is how I moved around the subjects to get the two photos previously posted (starting at position 1 and moving to position 4), plus the photo shown above. Posting #4 was taken from a low vantage point at position #3 and posting #6 was also taken from a low vantage point at position #4. As I moved around, I notice that I still had a lot of clutter in the background if I photographed the subject from my normal height, so I lowered my shooting position until I got a nice clean background. Being aware of the background is essential when photographing people.
Although today's posting does not have a clean background, I like it because it adds additional context to the photo of the Mad Hatter. I should have taken a little more care in framing the shot to include all of the tube running from the Mad Hatter's mouth.
January 7, 2011
Dickens on the Strand #8
Enjoy.
Lightroom 3—Adjusted white balance, added mid tone contrast and saturation of various colors.
Photoshop CS5—used spot healing to clean-up various spots, softened her skin slightly and then did some dodging and burning.
January 4, 2011
Dickens on the Strand #7
For some reason, the combination of cigar and the Steampunk goggles just seemed odd to me. Naturally, I had to record it.Upon seeing the image on the computer, I felt that the soft background really set the subject off.
Lightroom 3—Adjusted white balance, added mid tone contrast and sharpness and contrast to the goggles.
December 24, 2010
Dickens on the Strand #6
I did not get this young man’s name but he was Mad Hatter’s running mate. I was very lucky when I took this photo that my subject tilted his head just before I took the shot. This slight tilt added so much to the image. December 17, 2010
Dickens on the Strand #4
This is one of the few photos that I took of the Mad Hatter that I think he was in one position for more than two seconds.December 14, 2010
Dickens on the Strand #3
December 10, 2010
Dickens on the Strand #2
December 7, 2010
Dickens on the Strand #1
December 24, 2009
Dickens on the Strand #4

While doing many portraits over the last year, I have noticed a very difference between how females and males react in front of a camera. It does not seem to be affected by age.
In this photo, notice how relaxed and posed the young girl is and how the young boy seems to be more tense and suspicious he looks. For whatever reason, this seems to be the norm.
In this photo, I wanted to show how boys and girls react so differently.
Enjoy.
Camera settings: Nikon D3, Nikon 28-70mm f/2.8 at 62mm shot at ISO 200, f/9.5 and 1/125th of a second with a SB800 with softbox attached right and left of subject and set to 1/8th and 1/16th power and triggered with AlienBee radio triggers.
Post Processing:
Lightroom—Set white and black points, added mid-tone contrast, added clarity.
Photoshop—use nik Color Efex Pro soft focus filter to add minimium amount of soft focus to the overall image.
December 23, 2009
Dickens on the Strand #3

Today’s photos are of grandfather and granddaughter. I noticed the grandfather sitting on the bench watching everything going on around him. I thought his face and clothing would make for an interesting photo and the reflection in the window would add both context and depth to the image.
When I started photographing him, I immediately encountered a couple problems: reflections from his glasses, the strobes showing up in the window and finally the highly reflective nature of his shirt and cape. The first two were relatively easy to resolve by moving the strobes a little, however, I never really resolved the high reflection off of the shirt. Looking at the histogram, none of the shirt is blown-out, but yet, there is not enough detail in the shirt to make it look real.
In post processing, I used a black and white layer to tone down and mute brightness and intensity of the colors in his clothing.
Camera settings: Nikon D3, Nikon 28-70mm f/2.8 at 32mm shot at ISO 200, f/5.6 and 1/45th of a second with a SB800 with softbox attached right and left of subject and set to 1/4th and 1/16th power and triggered with AlienBee radio triggers.
Post Processing:
Lightroom—Set white and black points, added mid-tone contrast, added clarity.
Photoshop—use nik Silver Efex to create a black and white layer and then reduced the opacity of the layer to 25% to reduce the brightness and intensity of the colors in his clothing.

The photograph of the granddaughter was much easier to light. I wanted part of the sign and the archway in the background and I wanted the lighting to look as if there was some side-lighting coming from the right. We positioned the main light at 1/4th power to the right and then added the second light at 1/32nd power to light under her hat and parasol.
Camera settings: Nikon D3, Nikon 28-70mm f/2.8 at 60mm shot at ISO 200, f/5.6 and 1/60th of a second with a SB800 with softbox attached right and left of subject and set to 1/32nd and 1/4th power and triggered with AlienBee radio triggers.
Lightroom—Set white and black points, added mid-tone contrast, added clarity.
Photoshop—use nik Color Efex Pro soft focus filter at a very low level.
Enjoy.
December 22, 2009
Dickens on the Strand #2

Meet Kelly. Steve and I took her photograph last year, and to be honest, in spite of having a really great subject, we did not do a very good job. What was the problem? Well, we did not do a very good job controlling the background. In my photo, I had tent supports growing out of Kelly’s head. I changed the background and ended-up with a very nice photo of her, but, the original photo was just not that good. You can see the post of last year’s photo and the altered background here.
When Steve and I saw Kelly at this year’s Dickens on the Strand, we both rushed over to her to make amends. We immediately started looking for a background that would complement her and her clothes. Steve photographed her in landscape mode and included very little of her clothing. You can see his portrait here.
I wanted to show more of her so I photographed her in portrait mode and included enough background to establish her position relative to a building. I really like the vanishing lines of the background and thought that they played well off of Kelly.
Enjoy.
Camera settings: Nikon D3, Nikon 28-70mm f/2.8 at 50mm shot at ISO 200, f/6.7 and 1/250th of a second with a SB800 with softbox attached right and left of subject and set to ½ and ¼ power and triggered with AlienBee radio triggers.
Post Processing:
Lightroom—Set white and black points, added mid-tone contrast, added clarity.
Photoshop—Cloned-out part of a sign in the upper right corner and used nik Color Efex Pro soft focus filter at 35% opacity to soften Kelly.
December 21, 2009
Dickens on the Strand #1
I recently finished processing photographs that I took at Dickens on the Strand in early December. I must admit that I was disappointed in my work at Dickens on the Strand and at the Texas Renaissance Festival in November. I felt that neither session produced the quality of photographs that I did last year. I know that I understand lighting and basic posing much better this year than I did last year, but, the fact is the photos from last year sessions were better.
I have been studying both last year’s and this year’s photos to see if I could determine why last year’s photos were better. After a while I noticed something very interesting: last year, I generally took 10-15 photos of each subject whereas this year, I usually took only 5-7 shots of each subject. Because I have gained more skill at lighting a portrait over the last year, I know that I am able to get the exposure I want much quicker, but, then my photos this year were worse. Why?
I thought about a Joe McNally seminar I recently attended. Joe, who knows significantly more than I will ever know about photography and lighting, would start each portrait session very simply and then would tweak his lighting ever so slightly until he got what he wanted and then he would start working with his subject. I was quite surprised how he worked each situation until he got what he wanted.

At the Renaissance Festival and Dickens on the Strand, I did not work the situation. I got the lighting right and then I stopped. As a result, I got photos that were generally properly exposed, but nothing more than that.
What attracted Steve, Doug and me to this man was his unusual eye glasses. We decided that the red building would be a great background, but there was a considerable difference between his exposure in the shade and the building in the bright sun. I got the shot relatively quickly and then decided to shoot only part of his face and the glasses. On the second shot, I got luck to include the face of someone else.
However, here is where I should have continued working the scene. Image a shot where I positioned his wife, who was dressed in a interesting Victorian dress a few feet behind him and positioned her so that she was what was being magnified by his eye glass pieces. I could then light his face and her. The photo would have then been about what we found most interesting to begin with.
I hope I learned something from this, but, knowing me, I will have to learn this lesson a few times over before it will stick with me.

Enjoy.
Camera settings: Nikon D3, Nikon 28-70mm f/2.8 at 42mm shot at ISO 250, f/9.5 and 1/250th of a second with a SB800 with softbox attached right and left of subject and set to ½ and ¼ power and triggered with AlienBee radio triggers.
Post Processing:
Lightroom—Set white and black points, added mid-tone contrast, added clarity.
June 26, 2009
Doctor Watson

Just a few steps from where I photographed another a lady sat a man who looked like he had been time warped from the late 19th century. For some reason he reminded me of Doctor Watson of Sherlock Holmes fame.
I wanted my Doctor Watson to appear very dignified. I felt that the background should be slightly underexposed in order to bring him to the forefront of the photograph. I also thought that I should direct the viewers’ eyes to his face (eyes, nose, lips and beard), so I selected an aperture of f/4.8 to limit the overall depth of field primarily to those areas of the photograph.
Enjoy.
Camera settings: Nikon D3, Nikon 28-70mm f/2.8 at 60mm, shot at ISO 200, f/8 and 1/30th of a second with flash set at rear sync.
Flash: Nikon SB-800 mounted on monopod with softbox attached, triggered by AlienBee CyberSync radio triggers, in manual mode at 1/16th power positioned to the camera’s right and slightly above his eyes.
Post Processing:
Lightroom—Set white and black points, added mid-tone contrast and added a slight vignette in printing.
Photoshop—cloned-out various small, distracting elements, used nik Color Efex Pro tonal contrast filter to add shadow, mid-tone and highlight contrast to her clothing.
June 25, 2009
Violinist with a Hat
The moment that I saw this young lady, I remembered her from the Texas Renaissance Festival. I tried to get an acceptable photograph of her, but came-up with nothing that I really liked.
Here, she was standing in the shadows with bright sun hitting the background. I had a choice: do I set my camera and flash to equalize the lighting in the two areas; or, do I set my camera and flash to make a proper exposure on her face and let the background effectively blow-out. I looked at the background and decided that there was nothing that I really wanted to feature so I decided to let the background blow out. I then selected f/4.8 for my aperture in order to achieve a nice blurred background.
Enjoy.

Camera settings: Nikon D3, Nikon 28-70mm f/2.8 at 60mm, shot at ISO 200, f/4.8 and 1/60th of a second with flash set at rear sync.
Flash: Nikon SB-800 mounted on monopod with softbox attached, triggered by AlienBee CyberSync radio triggers, in manual mode at 1/4th power positioned so that she is looking straight at it.
Post Processing:
Lightroom—Set white and black points, added mid-tone contrast and added vibrance.
Photoshop—cloned-out small, distracting elements and minor blemishes and hair, used nik Color Efex Pro tonal contrast filter to add shadow, mid-tone and highlight contrast to her clothing and hair.
December 15, 2008
Different Interpretations
I am always amazed at how I can do a little tweaking here and there in Photoshop and come-up with a totally different look in a photograph. Today’s photos come from my visit to Dickens on the Strand. Many people dress-up in Dickens-period costumes which means there are many opportunities to do different interpretations in your final print.

In the first image, I wanted to isolate on the two subjects. I wanted to emphasize their face and just give a hint of their settings.
Camera settings: Nikon D3, 28-70mm f/2.8 at 60mm, shot at ISO 200, f/6.7 and 1/180 of a second
Post Processing:
Lightroom—set white and black point, and added mid-tone contrast.
Photoshop—used nik Color Efex Pro tonal contrast filter to add detail to the clothing of the ladies; used nik Color Efex Pro soft skin filter to even out the ladies’ faces; added some local contrast to their eyes.

In the second image, I wanted to get a “real” Dickens look—edgy, off beat, and rough. I need to have a lot of depth of field so I selected an f-stop of 11 and adjusted the power of my strobe accordingly.
Camera settings: Nikon D3, 28-70mm f/2.8 at 45mm, shot at ISO 200, f/11 and 1/125 of a second
Post Processing:
Lightroom—set white and black point, and added mid-tone contrast, de-saturated the colors.
Photoshop—used nik Color Efex Pro tonal contrast filter to add detail to the entire image and set opacity of the layer to 60%; used nik Color Efex Pro bleached bypass filter to give the image an overall edgy feeling.