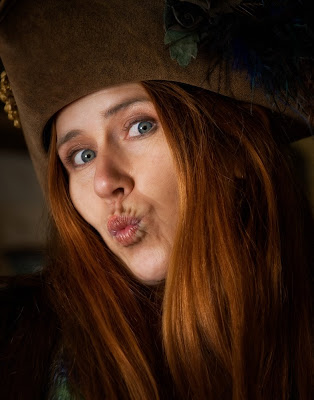
Showing posts with label Texas Renaissance Festival. Show all posts

November 6, 2009

2009 Renaissance Festival #8

Yes, the color did attracted me. Yes, the face painting attracted me. But, what really got my attention was how this young lady looked me straight in the eye and didn’t even bat an eye.

When someone, especially a very young person, looks straight into the camera lens, you have immediate connection within your portrait. I believe that I got the connection here. I had to do nothing special with the exposure or the flash. I just had to make sure that I stayed out of my own way.

Enjoy.

Camera settings: Nikon D3, Nikon 70-200mm f/2.8 at 70mm shot at ISO 200, f/8 and 1/90th of a second with a SB-800 flash in a softbox at camera left.

Post Processing:

Lightroom—Set white and black points, added mid-tone contrast, added clarity.

Photoshop—used nik Color Efex Pro tonal contrast to add contrast to highlights, mid-tones and shadows of her dress and the wagon.

November 5, 2009

2009 Renaissance Festival #7

I first noticed this lady before we entered the park. The thing that I first noticed about her was how gracefully she seemed to carry herself. She looked like a ballerina—she moved with very little effort and with such grace.

When I saw her setting on this bench, I thought that she would make a really nice portrait. I wanted this one to be very simple. I framed her so some of the bench formed a nice line and there was enough light and dark parts of the ground to form an interesting pattern.

Enjoy.

Camera settings: Nikon D3, Nikon 70-200mm f/2.8 at 120mm shot at ISO 200, f/6.7 and 1/90th of a second with a SB-800 flash in a softbox at camera right.

Post Processing:

Lightroom—Set white and black points, added mid-tone contrast, added clarity.

November 4, 2009

2009 Renaissance Festival #6

As I was walking around the Renaissance Festival, I am constantly looking for people who, to me, have interesting faces. When I saw this young lady, I really thought that she would make a great photo.

But, I must admit, I was not really sure how I wanted to photograph her. As Bob will attest, I moved her around from one background to another, and to be honest, I never really saw what I wanted. I finally settled on a relatively simple background that had more texture than color to it.

When I saw the image on the screen, I immediately thought black and white—which really simplified the overall image and made the young lady come forward.

Enjoy.

Camera settings: Nikon D3, Nikon 70-200mm f/2.8 at 135mm shot at ISO 200, f/5.6 and 1/90th of a second with a SB-800 flash in a softbox at camera right.

Post Processing:

Lightroom—Set white and black points, added mid-tone contrast, added clarity.

Photoshop—used nik Color Silver Efex to convert the image to black and white.

November 3, 2009

Getting the Photo that You Can

Today’s photo was a difficult one for me. The second I saw this person, I knew exactly what I wanted—his face with the light hitting it ever so softly, his tall hat and a muted background. Yet, no matter how I framed the shot, I did not get what I wanted because the background had too much brightness in the top half of the frame. I started to resort to the ole: “I’ll fix in Photoshop.” But then, I decided to cut the top half of his hat.

I wished that I could have gotten the image I wanted, but sometimes it’s just not in the cards and you have to settle for what you can reasonably get.

I had Bob point the light slightly in front of the subject so that I would get a soft light on his face. I limited the depth of field by using an aperture of f/2.8.

Enjoy.

Camera settings: Nikon D3, Nikon 70-200mm f/2.8 at 75mm shot at ISO 200, f/2.8 and 1/180th of a second with a SB-800 flash in a softbox at camera right.

Post Processing:

Lightroom—Set white and black points, added mid-tone contrast, added clarity.

Photoshop—used nik Color Efex Pro tonal contrast to add contrast to highlights, mid-tones and shadows.

October 30, 2009

Renaissance Festival—Part 5 for 2009

I meet these two little girls and their mother while I was taking a photo of the girl behind the counter. The smallest girl wanted to know what I was doing, so showed her a lot of the photos that I had taken. I then offered to take her and her sister’s photo. She agreed and so I asked mom who also agreed. Since Doug and Bob were off socializing with other members of Bay Area Photo Club, I had to solicited mom to be my VAL. Mom was quite nervous—she was afraid that she would hurt my light. I assured her that it would be hard since I had dropped my flash several times with no adverse effects.

For some reason, I wanted to light the portrait to be more dramatic. Now, dramatic lighting and portrait of small girls usually does not go together, so I was not really sure how this one was going come out. I showed mom the position that I wanted the light, and she did a great job putting the light where I wanted—watch-out Steve, you may have lost your VAL job!

Enjoy.

Camera settings: Nikon D3, Nikon 70-200mm f/2.8 at 70mm, shot at ISO 200, f/11 and 1/90th of a second with a SB-800 at 1/16th power.

Post Processing:

Lightroom—Set white and black points, added mid-tone contrast, added clarity.

Photoshop—used nik Color Efex Pro Monday morning filter to add a little more drama to the photo.

October 29, 2009

Renaissance Festival—Part 4 for 2009

This gentleman was quite interesting. He had a neat sense of humor and seemed to love to tell stories. I must admit, I really did not understand the point of most of his stories but I did like how he enjoyed them.

This photo is about two things: his weathered face and the light that is hitting it. I had Bob move the light back from his face so that it would be a little harder. I felt that would be a more appropriate light for his face.

Enjoy.

Camera settings: Nikon D3, Nikon 70-200mm f/2.8 at 180mm, shot at ISO 200, f/6.7 and 1/180th of a second with a SB-800 at 1/8th power.

Post Processing:

Lightroom—Set white and black points, added mid-tone contrast, added clarity.

Photoshop—used nik Silver Efex Pro to add a black and white layer and then reduced the opacity of the layer to 30%.

October 28, 2009

Renaissance Festival—Part 3 for 2009

We had seen this young lady earlier in the day, but was not able to photograph her because she had to participate in the grand parade. When we saw her after lunch, she was ready, willing and more than able to provide us with some great poses.

Most people are not initially comfortable when a photographer sticks a big lens in his/her face. Not the case with this young lady. The second that I started photographing her, she started giving me all sort of looks—all great looks!

I think her eyes says it all in this photo. I wanted to make sure that they were the main feature of the image.

Enjoy.

Camera settings: Nikon D3, Nikon 70-200mm f/2.8 at 135mm, shot at ISO 200, f/8 and 1/45th of a second with a SB-800 at 1/8th power.

Post Processing:

Lightroom—Set white and black points, added mid-tone contrast, added clarity.

Photoshop—used nik Color Efex Pro soft focus filter to soften the overall image.

October 27, 2009

Renaissance Festival—Part 2 for 2009

I saw this young man out of the corner of my eye and I was off to get his photo. I am not a Johnny Depp fan, but I must admit this guy had that same wild look in his eye that Johnny Depp has in his eyes.

I decided to push the photo somewhat for the blog. I used Topaz Adjust dramatic portrait on the image. I wanted to add to the look.

Enjoy.

Camera settings: Nikon D3, Nikon 70-200mm f/2.8 at 70mm, shot at ISO 200, f/4 and 1/250th of a second with a SB-800 at 1/8th power.

Post Processing:

Lightroom—Set white and black points, added mid-tone contrast, added clarity.

Photoshop—used Topaz Adjust dramatic portrait filter to stylize the image more.

October 26, 2009

Renaissance Festival—Part 1 for 2009

Last Saturday, Bay Area Photo Club had its October field trip to the Renaissance Festival. I believe all had a great time and everyone walked away with lots of good photographs. But, then again, it would be hard not to a few good ones when you have so many interesting subjects to photograph.

I used the same setup this year that I used last year—light on a stick (a Nikon SB-800 attached to monopod with a small softbox attached and triggered by my Alien Bee radio triggers). I had both my camera and flash set in manual mode, thus it was up to me to get my ambient and flash exposure correct. Steve was not there to be my VAL (Voice Activated Light) this year, but Bob and Doug filled-in for him very well. We would take turns photographing and manning the light.

The whole day was a lot of fun, so I decided to start this series with a shot that might help everyone understand that you can really have a great time flying around the Renaissance Festival, especially with dad’s help.

Enjoy.

Camera settings: Nikon D3, Nikon 70-200mm f/2.8 at 70mm, shot at ISO 200, f/5.6 and 1/250th of a second with a SB-800 at 1/8th power.

Post Processing:

Lightroom—Set white and black points, added mid-tone contrast, added clarity.

Photoshop—used nik Color Efex pro tonal contrast to bring out details in the dress and wings.

June 24, 2009

Polynesian Beauty

Last night I presented a body of work to the Bay Area Photo Club. It was photographs that I have taken at festivals. As I explained in my body of work write-up, this body of work grew-out of my thinking that you could produce near studio quality portraits with a minimum amount of equipment, i.e., on SB800 in a softbox. I have previously presented different photographs from these outings, but the ones I want to present now have not been show on my blog.

As this young lady approached us, there was no doubt in my mind that she would be a very striking subject for a portrait. My second thought was: don’t screw this up!

After we stopped her and asked her if we could take her photograph, I notice a large, shady tree covered with ivy not too far from us. I thought that the ivy would complement her crown very well, so we moved her in front of the tree.

I thought that the photograph to show her classical facial features. I wanted the left side to be properly exposed with a definite fall-off in the exposure on the right side. I positioned VAL Steve to my left and above her and directed the light so it would fall softly on her face. The placement of the light and the camera perspectives help ensure that the photograph is all about her.

Enjoy.

Camera settings: Nikon D3, Nikon 70-200mm f/2.8 at 120mm, shot at ISO 200, f/4.8 and 1/125th with flash set at rear sync.

Flash: Nikon SB-800 mounted on monopod with softbox attached, triggered by AlienBee CyberSync radio triggers, in manual mode at 1/16th power positioned at left at about two feet away from her and above her.

Post Processing:

Lightroom—Set white and black points, added mid-tone contrast, added vibrance, adjusted saturation and hue of green and added slight vignette to photo before printing.

Photoshop—cloned-out small, distracting elements and minor skin blemishes and hairs, used nik Color Efex Pro tonal contrast filter to add shadow, mid-tone and highlight contrast to her eyes and hair.

November 24, 2008

Texas Renaissance Festival #6—Shop Girls


I realize that everyone might be tired of looking at my Texas Renaissance Fesival images, but I find them interesting because of how simple, yet effective, the lighting with my small softbox was. A lot of them you could have improved significantly with a second light or even a reflector, but, overall I think the lighting is pretty good on most of them.

I saw this young lady taking a photo with a point-and-shoot camera of one of her pieces of pottery. I made a few suggestions of how she might get a better photo, and amazingly, she did. From there, Steve and I had two models for a few minutes. Both shots were taken from inside her shop.

In the first shot, Steve held the softbox very close and turned the power down to 1/32. You can see the catch light in her eye and reverse engineer where the softbox was in relation to the camera position. I really wanted to capture how her striking red hair framed her face. Needless to say, she was a lot of fun to photograph as you can see by her pose.

Camera settings: Nikon D3, 70-210 f/2.8 at 150mm, shot at ISO 200, f/6.7 and 1/125.

Post Processing: Lightroom—tweak white balance, set white and black point, and added mid-tone contrast, cloning some small hot spots out of image, cropped to 11x14 format.

Her assistant was younger and not nearly as out-going. I spotted this lace curtain hanging in the back of the store with some light streaming in from the back. I thought it might make for an interesting stage for her. Again, my VAL held the softbox about two feet from her face so that we would get very soft, wrap around lighting. You can easily see that the light was above her and to camera left by the shadow under her noise and the catch light in her eyes.


Camera settings: Nikon D3, 70-210 f/2.8 at 200mm, shot at ISO 200, f/6.7 and 1/125.

Post Processing:

Lightroom—tweak white balance, set white and black point, and added mid-tone contrast, cloning some small hot spots out of image, cropped to 11x14 format.

Photoshop—used nik Silve Efex Pro to convert to B&W using their platinum preset.

Both Steve and I shot about 10-12 shots of each of these ladies in probably less than 20 minutes, which shows that once you understand how your lights and camera work, you can get pretty good result with a few basic pieces of lighting and some knowledge.

You need to check-out the really nice photo that Steve posted yesterday from the Renaissance Festival. You can check out his blog by clicking here

Hope everyone has a nice day.

November 21, 2008

Texas Renaissance Festival #5—The Eyes of an Artist


This is one of my favorite photographs from the Texas Renaissance Festival. When I look at it, I think that I am part of a conversation among old friends. it seems that natural.

I took several shots in which she was looking directly at the camera, but then she and Steve (my Val, Voice Activated Light) began to talk about Hurricane Ike and all the damage it caused in Galveston. She became totally engaged in their conversation. Her eyes showed more intensity as she looked directly at Steve and talked about some of the problems after the storm.

The background was very dark, so I had to dial my shutter speed down to 1/30 so that I could get a little ambient light into the scene. I knew that I would have a few hot spots in the background, but because they would be totally out of focus, I was not overly concerned. The Speedlight and the softbox did a great job of providing soft, even lighting on her face that completely fell-off before it hit the background. The VAL was about two feet from her and had dialed the Speedlight down to 1/32 power.

Camera settings: Nikon D3, 70-210 f/2.8 at 90mm, shot at ISO 200, f/6.7 and 1/30.

Post Processing:

Lightroom—tweak white balance, set white and black point, and added mid-tone contrast, cloning some small hot spots out of image, cropped to 11x14 format.

Photoshop—sharpened her face and hat using high pass filter at 2.8 pixels in hard light mode.

November 20, 2008

Texas Renaissance Festival #4—Opportunity Squandered


Camera settings: Nikon D3, 70-210 f/2.8 at 90mm, shot at ISO 200, f/4.8 and 1/125.

Post Processing: Lightroom—tweak white balance, set white and black point, and added mid-tone contrast, cloned some small spots out of image, cropped to 11x14 format.

When this image appeared on my computer in Lightroom, I thought: nice photo. Then I started studying the image and thought: boy, did I make a mess of a wonderful opportunity to take a really good photograph. I was presented with: a subject who was willing to move in front of the background that I chose; a very warm person whose face was very easy to photograph; a colorful background that complemented the subject’s colors; and a spot that was ideal for lighting with one strobe.

What did I do with all of this? Not much.

What should I have done with all of this? First, I should have placed her further away from the background. I had probably 15 feet of shade in front of the flowers that I could have used. This would have turned the background into an array of colors rather than “somewhat out-of-focus flowers.” In addition, it would have separated her better from the background by giving better distinction between: properly exposed subject vs. under exposed background; and in-focus subject vs. out-of-focus background. You would have then seen a clear distinction between the flowers in her hair and the background flowers. Next, I should have composed the shot so that I had more room above her head. This would have made it easier to move around the photograph. She has nice eyes; yet, her hair is partly covering one of them. I think a little movement of the hair would have provided a more compelling look. Finally, with her being moved away from the background, I should have moved the light (which is positioned camera right and was feathered in front of her to make it soft and keep it off the background) to 60-degree angle from her face. This would have given a better lighting to the cape she was wearing and thus helped separated her better from the background.

I did press the right button to take the photograph!

Will I make a mistake like this again? Probably.

Can I have a “do over”?

November 19, 2008

Texas Renaissance Festival #3—A Fairy’s Wings

After taking the photograph of the lady selling drinks, I turned and saw this bright translucence of color—two ladies wearing some fairy wings. My immediate reaction was: “How would I photograph that much variation in light and still have a portrait of her?” The back lighting that made her wings so dynamic also put her face in deep shadows.

I wanted to push her fairy wings nearly to point of “blowing out” but still retain all the glow and colors. My approach was quite simple. I got an overall reading of the scene and took a test shot. I then dialed the exposure down 1 1/2 f-stop to an exposure of f/5.6 at 1/180 second so that I would make sure the wings did not blow-out. I then set my flash power to properly expose her face at my camera exposure setting. Since I wanted the light on her face to be very soft, Steve placed the flash about two feet and set it at 1/32 power.

Camera settings: Nikon D3, 70-210 f/2.8 at 150mm, shot at ISO 200, f/5.6 and 1/180.

Post Processing: Lightroom—tweak white balance, set white and black point, and added mid-tone contrast, cloning some small spots out of image, adjusting color saturation of her hat and cape


November 18, 2008

Texas Renaissance Festival #2—Gypsy Band


Steve and I stopped and watched this band that played Gypsy music. The main attraction seems to be a very large male belly dancer—I don’t think that Steve or I got into his act! Their music was very entertaining, but more importantly, their clothing and their faces were outstanding subject matter for a camera.

My approach on both of these photographs was about the same: set my camera to underexpose the background by about a 1½ stops and then properly expose the subject by varying the power of the flash. The ambient lighting was very tricky since it was filtered through trees, which required me to clone out a few “hot spots” on each photograph in post processing.

I really liked way that the the light seemed to be totally different on the guitar player and the background. I tried to keep the background as I saw it and bring the guitar player forward in the photograph by lighting only him. This is one time when the rapid fall-off of the flash’s light really worked for me.

Camera settings: Nikon D3, 70-210 f/2.8 at 200mm, shot at ISO 200, f/2.8 and 1/180.

Post Processing: Lightroom—tweak white balance, set white and black point, and added mid-tone contrast

Photoshop—sharpened guitar player using high pass filter at 2.8 pixels in overlay mode


I liked the dancer’s movement, but I did not want a blurred image. I thought that her dress and the static people in the background would provide sufficient information about her motion. The flash is pointed mostly to the top half of her; I wanted to keep light off the floor. The trees in the background were very troublesome when I first looked at the image. I “removed” them by using nik Color Efex Pro Indian Summer filter in Photoshop. The filter will generally turn yellow/green to fall colors, which I thought would really complement the colors in the rest of the photograph.

Camera settings: Nikon D3, 70-210 f/2.8 at 98mm, shot at ISO 200, f/2.8 and 1/180.

Post Processing:

Lightroom—tweak white balance, set white and black point, and added mid-tone contrast, added vignette

Photoshop—sharpened dancer using high pass filter at 4.0 pixels in soft light mode and saturated certain colors on her dress, nik Color Efex Pro Indian Summer filter


November 17, 2008

Texas Renaissance Festival—A Portrait Photographic Workshop

On Sunday, Barry, Cindi, Mike, Paul, Shirley, Steve and I (members of Bay Area Photo Club) went to the Texas Renaissance Festival. The festival is a wonderful opportunity to practice taking photographs of people. You have hundreds of models more than willing to help you take the best picture you can. Both people working at the festival and those visitors dressed in medieval attire are ready and willing to have their photograph taken. It is a photography workshop.

Overall, I was pleased with what I got. I took about 300 shots, have about 30-40 possible keepers and may have 8-12 worthy of showing. I should have done: a little better job of checking out my equipment before I went to the festival; got everyone’s name and email address so that I could forward them photographs; and, taken a little more time thinking through some of my shots. But, again, I was relatively pleased with what I got.

Steve and I paired up and helped each other through our shots. All my shots were with my Nikon D3 and my Nikon 70-200 f/2.8 VR and most included using single Nikon SB800 Speedlight with a Photoflex Q39 softbox attached to a monopod. Steve and I would hold it for each other and fire it using my AlienBee triggers. It worked great. We generally got nice soft light and were able to move it to where we wanted it.

My first Renaissance Festival shot that I am presenting is probably Steve’s favorite. He can attest, this shot image is pretty much as it came out of the camera. I was walking up to a counter where this young lady was selling drinks. I asked her if I could take her photograph and she agreed. I leaned my camera on top of the lightbox, dialed my flash to 1/16 power and fired three shots. This is the one I like the best; her face is very evenly lighted, but there are shadows on the far side of her face where the light has fallen off which gives some depth to her face.

Camera settings: Nikon D3, 70-210 f/2.8 at 200mm, shot at ISO 200, f/2.8 and 1/180.

Post Processing: Lightroom—tweak white balance, set white and black point, and added mid-tone contrast.