Showing posts with label Night Photography. Show all posts

November 27, 2012

Paris—No 1

 
More-or-less on the spur of the moment, JD and I recently visited Paris for a week.  Before I retired, I would often go to Paris on business but have not been back since I retired.
I love Paris.  There are so many great things there—great food, great wine, wonderful museums, fabulous walking and a certain excitement everywhere you go.
This time, Paris seemed tired.  The people seemed to have lost their great love of life.  They seemed to be just going through the motions.
Today’s photo is of one of Paris' great icons—the Eiffel Tower at sundown taken from the Esplanade du Trocadero. 
Enjoy. 
Camera settings:  Nikon D800, 28-300mm f/3.5~5.6 at 70mm, ISO 1600, f/11 at 1/2 of a seconds on a tripod 
Post Processing: 
Lightroom 4—applied Vivid preset during import, set white and black points and increased overall vibrance and added clarity to the Eiffel Tower using the adjustment brush.

July 15, 2011

Words of Light

Last Tuesday the assignment for Bay Area Photography Club was a photo taken at night.  I have not done much night photography so I was very interested in seeing what I could do.  I had tons of ideas of what would be neat, but because of laziness and lack of skill, I did none of my great ideas.  Take me at my word, all fifty of my great ideas were definitely world class photos.
Today’s photo is of the “a, a” sculpture at the University of Houston.  I had seen the sculpture while taking some portraits of outstanding students for the university.  I wanted to capture all the details so I took nine shots at one-stop increments.  I custom set the white balance in my camera so that the lights would take on a warmer glow.
Enjoy.
Camera settings:  Nikon D3x, Nikon 17-35mm f/2.8 at 20mm, ISO 200, f/8 and with shutter speeds (nine exposures in one-stop increments) from 1/4th of a second to 30 seconds on a tripod.
Post Processing:  
Nik HDR Pro—combined and tone mapped six images.
Photoshop CS5—removed a crane and a couple red flowers that were distracting, used lens correction filter to straighten building’s distortion and sharpened image using the high pass filter method.

June 29, 2010

Fireworks at Bay Area Photo Club Field Trip


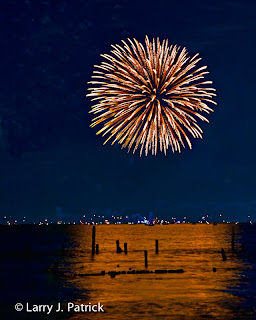
Last Friday, I joined about twenty other Bay Area Photo Club members at our monthly field trip to photograph fireworks in Kemah.  Neal Kelsoe and Mark Westerman did a great job selecting a great place and providing some instruction on how to do it.  The basic instructions included:  manual focus at infinity, manual mode, aperture of f/13, bulb shutter speed (2-3 seconds), 50-100mm lens, on a tripod and use of shutter release.
I looked at the field trip as an opportunity to sharpen my skills (which are not that good) at photographing firework.  However, when I saw that first firework, my mindset immediately switched to getting a great fireworks photo.  Big mistake.
I fired shot after shot without really looking at the display.  Finally, I took a little time to see what I had—NOTHING.   I generally held the shutter open for 2 to 3 seconds, but that seemed to make the fireworks look blurred.  So, I changed my strategy—ISO 1600, aperture f/8 and shutter speed between 1.5 and 2 seconds.  Immediately I got better results, or what I thought was better results.
What did I learn from this outing?
Remember your intentions when the gun goes off—I wanted to improve my skills at photographing fireworks, but my focus was trying to get a great photo.  I did not look at my display to get feedback.
I think that most of the fireworks look best using a shutter speed of 1.5 to 2.0 seconds, so next time, I will probably go shutter speed priority at 1.5 or 2.0 seconds and then look at what I am getting.
Higher ISO allow you to get ambient light that you want.  So, dial-in the shutter speed that is best and then select an f-stop that will get you the ambient exposure you want.  I look at it similar to using flash photography, but only in reverse.
Here are two of the shots that I liked best.
Enjoy.
Camera settings:  Nikon D3, Nikon 28-70mm f/2.8 shot at 70mm, ISO 1,600, f/8 and 1.5 and 1.7 seconds and set white balance to tungsten (to make sky bluer).
Post Processing:  
Lightroom—Set black and white points, added clarity and increased contrast.
Photoshop—used spot healing to clean-up various ugly spots.

March 19, 2010

Almost a Patrick Family Portrait

I am not allowed to show the faces of any of my family members—that is the law from the highest authority in the land. So, this is as close as a Patrick Family Portrait that you will see on my blog.

From top left, we have Miss Chloe (one in pink), Monte, Ana, who is being led by our new team leader Cameron (not shown), Cole (who is probably telling his grandmother about this or that) and finally my bride of 40+ years, Janice.

In this photo, I wanted to show the family and the lights of the rodeo carnival. We spent more than five hours at the carnival chasing Miss Chloe and Master Cole from ride to ride. At the end of the evening, we had four very tired adults and two “still-going-strong children.” Final score for the evening: Children 100, Adults 0.

Enjoy.

Camera settings: Nikon D3, Nikon 28-70mm f/2.8 at 32mm shot at ISO 1,600, f/4 and 1/90th of a second.

Post Processing:

Lightroom—Set black and white points.

Photoshop—used Topaz Adjust pop preset to enhance details.

March 16, 2010

A More Traditional Ferris-Wheel Photo


Before discussing today’s photograph, I want to put something on the table that bothers me about how photographers talk about “blown-out” highlights. I often hear photographers and critics of photos say something like this: “Good photograph, but I am troubled by the blown-out highlights” when they mean the lack of details in something that the naked eye could not discern any details in it. To me a blown-out highlight is a highlight that the naked eye could see detail however the photograph shows no detail (total white in the area). I do not consider showing pure white area for lights or specular highlights to be “blown-out” highlights. Wikipedia defines specular as: “light is perfectly reflected (100%) in a mirror-like way from the light source to the viewer” thus it is as if you were looking directly at the light (which has no details).

I do agree that showing lights or specular highlights within a photo can be distracting; however, I also believe that these elements can also set the tone of the image or add-to the overall image. Think about the “catch light” in eyes or the catch of light on drop of water. Both are generally a totally white area—a specular highlight without detail. Yet, if not included, the eyes or the water drop look flat, uninteresting and not life-like.

That’s just my thoughts on the matter.

Today’s photo is a more traditional look at a ferris wheel. The only real twist to this photograph is that I wanted to include some detail of the people in the foreground. At first, I thought about using HDR however, I soon realized that would not work because the people and the ferris wheel were moving. I thought that I need at least +2 EV to get the light that I wanted on the lower half of the photo—show some details but still keep most of the scene in shadows. I set the auto-bracketing on my camera (in aperture priority mode) to take three photos at shutters speeds of 1/180th (for the ferris wheel), 1/90th (not used) and 1/45th (for the foreground). I then blended the two photos to get the exposure I wanted.

By blending the two photos, I was better able to control the overall exposure of the lights on the ferris wheel, as you can see by the screen grab of the photo that I used of the ferris wheel.

Enjoy.

Camera settings: Nikon D3, Nikon 28-70mm f/2.8 at 35mm shot at ISO 200, f/4 and 1/180th and 1/45th of a second.

Post Processing:

Lightroom—Set black and white points on both images used.

Photoshop—used Topaz Adjust Photo Pop preset on combined image.

March 9, 2010

Midway Lights

After finishing up my final assignment, I spent a little time wondering around midway of the rodeo fair. The lights of the midway are always fun to photograph.

In this photo, I wanted to really bring out the bright lights and color of the booth versus the somewhat subdued background. I sat on the ground so that I would have an upward view of the booth. I did not do a very good job framing the photo. I should have left more room to left of the couple in the red coats walking towards me.

Topaz Adjust has just released a free upgrade—Topaz Adjust 4. I downloaded the upgrade last week and this photo provided me an excellent opportunity to try a few of the new presets that are included in the plug-in.

Enjoy.

Camera settings: Nikon D3, Nikon 28-70mm f/2.8 at 35mm shot at ISO 200, f/6.7 and 1/30th of a second.

Post Processing:

Lightroom—Set black and white points.

Photoshop—used Topaz Adjust Specify preset.

February 9, 2010

Early Morning HDR

A couple years ago, I played around with HDR a lot, but for some reason, HDR lost its charm with me. Lately, I have been looking at various photographers’ (including Barry Armer’s) HDR work. As a result, I got the bug to give HDR another try.

I was downtown Houston trying to find a site for an upcoming shoot when I saw this early morning scene of Cabo. I used HDR to capture the full range of the scene. I shot five frames in the aperture priority mode at -2, -1, 0, +1 and +2 EVs. I used Photomatix to merge the five frames and tone map the final image.

I wanted the final image to show all the details that my eyes were seeing.

Enjoy.

Camera settings: Nikon D3, Nikon 28-70mm f/2.8 at 62mm shot at ISO 200, f/4 and 1/15th of a second and on a tripod for the 0 EV exposure.

Post Processing:

Lightroom—Set white and black points.

Photoshop—used Noise Ninja to reduce noise in the photograph.

July 24, 2009

In and Around Houston #10

I knew that my final photo needed to be either a sunset or night shot. I tried a sunset shot of the Houston skyline from near Jamial Skate Park, but I did not like the results. The skyline lacked a real glow that we often get during the summer.

I waited for the sun to go down and took several shots of the Houston downtown skyline, but all the shots looked like every other photo that I have seen of the downtown skyline.

I then remembered the statue of an armadillo in front of a restaurant on Kirby. I loaded-up my gear and headed to the armadillo. Again, I walked around the armadillo to find the best perspective to take the photo. After deciding on the perspective, I decided that I would probably need to use HDR to capture the full dynamic range within the photo.

I tried to use HDR but really did not like what was produced by Photomatix Pro. My photo is the combination of four exposures with various parts of each exposure masked-off.

Enjoy.

Camera settings: Nikon D3, Nikon 28-70mm f/2.8 at 32mm with a polarizing filter attached, shot at ISO 200, f/8 and at seven different shutter speeds from -3 EV to +3 EV of a second on a tripod.

Post Processing:

Lightroom—Set white and black points, added mid-tone contrast, clarity.

Photoshop—combined four exposures in layers and then masked-off various elements of each layer in order to show only the portion of a given layer that I wanted to use.

April 30, 2009

Water, Light, Action

While in Fort Smith last week, I went down to the Arkansas River to see if I could get a few night photos.  I tried lots of different things but nothing seemed to be working.  So, I sat down on a bench and started watching the water flow.  After watching a while, I decided to move towards the bridge where the lights were casting all sorts of patterns on the river below.

Again, I tried different things, but again, not much was happening.  Finally, I settled on isolating totally on the lights reflecting off the moving water.  I switched lens to my 70-200mm f/2.8 so that I could isolate and compress the scene.  I also put a neutral density filter on the lens so that I could slow my shutter speed.

I wanted the photo to be about the colors and the patterns.

Enjoy.

Camera settings:  Nikon D3, 70-200mm f/2.8 at 170mm, shot at ISO 200, f/16 and 8 second with a exposure combination of -1.0 EV and 4-stop neutral density filter on a tripod with white balance set to 7,800K to add more warmth to the lights.

Post Processing:

Lightroom—Set white and black points, added mid-tone contrast, clarity and vibrance.

January 27, 2009

Night Shooting

One of my friends and I went over to a local carnival on Sunday evening to try a little night shooting.  I went without any plan or idea of what I wanted to get; so, for about an hour, I got nothing.  

Finally, I started watching the people look at the lights.  I decided that the people's reaction to the lights was what I wanted to show.  I found this mother and daughter going from one ride to the next, looking at the lights and then oahing and awhing.  They were having lots of fun.

This is the shot of them that I liked best.

Camera settings:  Nikon D3, 28-70 f/2.8 at 28mm, shot at ISO 3,200, f/8 and 1/45 of a second.

Post Processing: 

Lightroom—set black and white point and added mid-tone contrast, clarity and vibrance.

January 21, 2009

Before the Start of the Houston Marathon

I was out scouting for a good place to shoot my abstract runner when I found this location.  I wanted to use a traditional landscape technique of making something in the foreground very prominent and in-focus.   The sun had not risen, so the sky was that deep blue that you normally see that time of the day.

The building in the background was what I really wanted to be showing in my abstract runner, but I could not find any place where the runners were passing with this background.


Camera settings:  Nikon D700, 28-70 f/2.8 at 28mm, shot at ISO 1,600, f/11 and 1 second with the camera resting on a park bench.

Post Processing: 

Lightroom—set white and black point, and added mid-tone contrast, added clarity and vibrance.

Photoshop—sharpened foreground using high pass filter on hard light blending mode.