February 22, 2011

My First Girl’s Softball Game


On Saturday, I attended my first girl’s softball game.  My granddaughter is playing softball this year, which, of course means that grandma and grandpa is about to get a lesson in girls’ softball.
My first lesson is one of style—the boys have none and the girls are all about style (at least six year-old are).  Note the socks.  You got to admit these socks have a lot more style than the standard red, blue, etc socks that the boys wear.   
Enjoy.

February 18, 2011

Model Shoot #5A


Anne’s comment about a sepia tone got me thinking—maybe, just maybe.  So, I deleted the photo that I intended to show today and substituted this sepia toned image of the last posting.
The conversion to sepia was made using nik Silver Efex Pro.  I used a strong curves adjustment, burned the edges of both the left and bottom of the photo and used a yellow filter to even the tones.
No matter how many years I do this, I will never stop being amazed at how black and white seems to simplify and increase the emotional impact of a photo.
Enjoy.

February 15, 2011

Model Shoot #5

Not too much to this photo.  Model is very close to a door so that the light can fill her face.  Shot the photo tight to emphasize her eyes and lips.
Enjoy.
Camera settings:  Nikon D3, Nikon 70-200 f/2.8 shot at 200mm, ISO 1,800, f/4 and 1/60th of a second.
Post Processing:  
Lightroom—Set black and white points, increased mid-tone contrast and applied some noise reduction.
Photoshop CS5—used nik Color Efex Pro glamour glow filter to add some pop to her face and greater contrast with background.

February 11, 2011

Model Shoot #4

For those of you who think modeling is easy, I have a simple question:  could you look this good while leaning against a wall in a warehouse with temperatures around 50 degrees dressed in this outfit?  Jay wanted her to lean against the wall but was concerned about how cold the wall was.  She felt the wall and said: no problem.  That is professionalism.   
Enjoy.
Camera settings:  Nikon D3, Nikon 70-200 f/2.8 shot at 200mm, ISO 2,200, f/6.7 and 1/60th of a second.
Post Processing:  
Lightroom—Set black and white points, increased mid-tone contrast, applied some noise reduction and vignettting.
Photoshop CS5—used nik Color Efex Pro skin softer filter.

February 8, 2011

Model Shoot #3


Big hair + frilly dresses + wild make-up + albino Texas Rat + cold warehouse = HIGH FASHION.
 Yep, that’s the exact formula for high fashion that I learned in college and it seemed to be the one employed at my model shoot.
I was quite surprised at how all the models seemed to think nothing of having the snake draped over them.  The snake, on the other hand, had a different idea.  She (I was told the snake was a “she”) was in constant motion and often got completely tangled in the model’s hair—which made for some interesting moments.
 Enjoy.
Camera settings:  Nikon D3, Nikon 70-200 f/2.8 shot at ISO 1,600, f/2.8 and 1/45th of a second.
Post Processing:  
Lightroom 3—Set black and white points, increased mid-tone contrast and applied some noise reduction.
Photoshop CS5—converted the photo to black and white using nik Silver Efex Pro.

February 5, 2011

Model Shoot #2

Although I normally have some idea as to what my final image will be in my mind as I take the photo, I must admit, this one emerged almost exactly like I imagined it.  I wanted one sharp eye and almost everything else softly focused.  I thought the darkness of her eyes versus the light colors of everything else would draw the viewers’ eyes directly to the eyes.

Enjoy.

Camera settings:  Nikon D3, Nikon 24-70mm f/2.8 shot at 50mm, ISO 900, f/2.8 and 1/60th of a second.

Post Processing:
 
Lightroom—Set black and white points and increased mid-tone contrast.

Photoshop CS5—removed a few distracting elements within the photo and used nik Color Efex Pro skin softener filter.

February 1, 2011

Model Shoot #1

A couple weeks ago, I fell into a model shoot with photographer Jay Marroquin and designer Lizzi London—both were great being around!  The reason I said that I “fell into” the shoot is because I went by a friend’s warehouse to show him my D3 and D3x and discuss what I thought were the advantages of the D3 over the D2x (which he has).  Well, Jay was using his warehouse for a shoot of Lizzi’s clothing that morning.  The three photographers (Jay, a Canon guy, Greg and I) discussed all sorts of geek camera stuff and how Jay was planning on shooting the models.

Jay planned to use a two Canon flash setup in e-TTL mode and triggered by the PocketWizard FlexTT5.   After seeing the results using the PocketWizard, I was sold—sold to the tune of buying Nikon compatible ones (more on them in a later post).  Jay asked if I wanted to shoot.  The FlexTT5’s were not compatible with my Nikon camera so all my shots were natural light only—usually at ISO of 800 to 2,200 and f-stops of 2.8 to 5.6.

Enjoy.

Camera settings:  Nikon D3, Nikon 70-200mm f/2.8 at shot at 200mm ISO 1,100, f/5.6 and 1/45th of a second.

Post Processing:  
Lightroom 3—Set black and white points, added clarity and mid-tone contrast.

Photoshop CS5—removed a few distracting elements within the photo and used nik Color Efex Pro skin softener filter.

January 28, 2011

Old Grungie Look

After a senior portrait session in Galveston last week, I decided to roam around a while and photograph anything of interest that I found.  I really liked this old building, which, I believe was a brewery at one time.  

I wanted to push the grunge look so I produced a HDR image and then further enhanced the look by using nik Color Efex Pro tonal contrast filter.

Enjoy.


Camera settings:  Nikon D3, Nikon 24-70mm f/2.8 at shot at 35mm ISO 200, f/11 and various shutter speeds.
Post Processing:  
Lightroom 3—Set black and white points, added clarity and mid-tone contrast.
Photomatix Pro—Combined three photos to create and tone map the HDR photo.
Photoshop CS5—used nik Color Efex Pro tonal contrast filter.

January 25, 2011

Product Composite

Originally, I prepared today’s photo for Bay Area Photo Club’s January assignment of “product shot.”  When I first saw the assignment I was not very excited.  My initial reaction was to put some product in front of two strobes and a white seamless background and then fire away until I got something I liked. 

But then, I was watching some ads during a football game and saw some really cool stuff.  So I decided to do more than just a product shot—a full ad mock-up.

Enjoy.

January 21, 2011

Street Photography No. 4


Today’s post is the last in my discussion of street photography.  It comes from Dickens on the Strand and to me demonstrates the last element that I think is needs to produce good street photography—expression.  In this photo, I believe the expression makes the viewer want to understand what she is thinking about. 
 
The simple background sets her off and allows the viewer to concentrate on her expression.

Enjoy.

Camera settings:  Nikon D3, Nikon 70-200mm f/2.8 shot at 200mm,  ISO 200, f/2.8 and 1/500th of a second.

Post Processing:  

Lightroom 3—Adjusted white balance, added mid tone contrast and saturation of various colors.

Photoshop CS5—used spot healing to clean-up various spots, softened her skin slightly and then did some dodging and burning.

January 18, 2011

Street Photography No. 3

This is rare.  I have a photo that I would have normally disregarded on my first pass of reviewing what I shot  I think this demonstrates, vividly, why you need to move when doing street photography.  

This is one of the first photos that I took in the series.  The background is cluttered and does not help support or set-off the subject.  It gets in the way of what I want to convey and what I thought was important in the scene.  Definitely not a very good photograph!


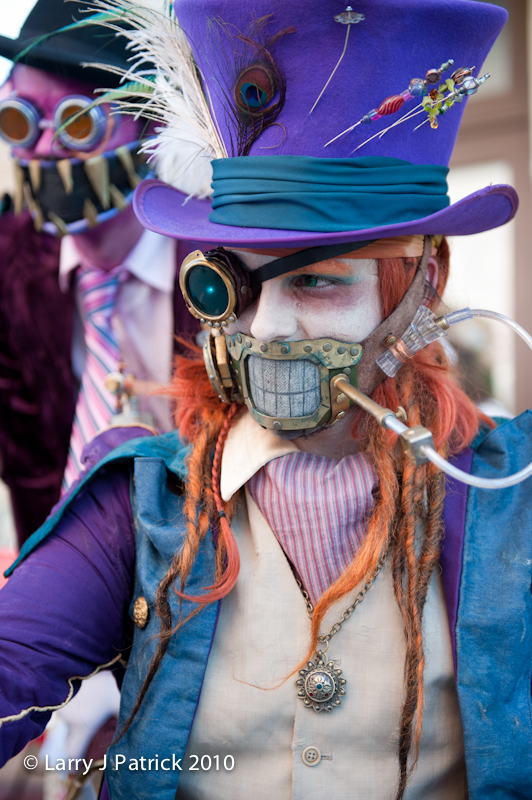
Think about how much Photoshop work it would take to make this photo be on par with the original photo I posted of the Mad Hatter.  I have neither the time nor the patience to do it.  I prefer moving the five steps it took to get the original one.

Enjoy, if you can.

January 14, 2011

Street Photography No. 2


Before I discuss what I consider the most important aspect of street photography, I would like to discuss a couple of basic technical items.  I generally set my camera to aperture priority, automatic white balance, continuous focus, 51 points (3D tracking) and auto ISO sensitivity control (which varies my ISO as needed to keep the shutter speed at a certain minimum).  If the lighting has a lot of variability, I will also set auto backeting (usually three shots—0EV, +1 EV and -1EV).  I set my camera to these settings before I start shooting.  I think these setting help me get the best exposure automatically so that I can concentrate on the subject.  If your camera does not have these exact setting (either because your Nikon model does not have them or you use a different camera manufacture), I suggest that you read your camera manual (this is the strange paper booklet that the manufacturer included with the camera) to determine which settings are best for this type of shooting.

Now the real secret of street photography, you must move.  Unfortunately, zoom lenses has taken out (or at least, reduced) the aerobic aspects of street photography.  Since I generally like shooting most subjects at focal lengths of 60mm or more, I generally rely on my zoom when I have limited space in which to move.


Dickens on the Strand #4 and #6 were part of 18 shots taken over four minutes and 22 seconds.  Below is how I moved around the subjects to get the two photos previously posted (starting at position 1 and moving to position 4), plus the photo shown above.  Posting #4 was taken from a low vantage point at position #3 and posting #6 was also taken from a low vantage point at position #4.  As I moved around, I notice that I still had a lot of clutter in the background if I photographed the subject from my normal height, so I lowered my shooting position until I got a nice clean background.  Being aware of the background is essential when photographing people.


Although today's posting does not have a clean background, I like it because it adds additional context to the photo of the Mad Hatter.  I should have taken a little more care in framing the shot to include all of the tube running from the Mad Hatter's mouth. 

January 11, 2011

Street Photography No. 1

Recently, I got a request from that famous singing group, Tina, Tyler & Ellen, to explain how I go about my street photography.

I love street photography because you never know what you are going to get (if anything) and you constantly have to adapt to changing lighting conditions, subjects and backgrounds.  If you look at the labels on my blog, you will see that street photography has 86 different posts which ties it with environmental portraits as the most posts on my blog.  If I was consistent with my labeling, I believe that street photography would have considerably more.

To me, there two essential elements to a successful street photography image:  interesting subject and separation of the subject from the background.  Interesting subjects come in all sizes, shapes, colors and ages but what I try to do with all of them is to emphasize what attracted me to them in the first place.   
A great example of how I did not do this is my December 21, 2009 post.  In the full frame version of the photo, I did not hone-in on the glasses; consequently, the photo is very ordinary.  Even the cropped version is lacking because it does not fully capture the unusual nature of the spectacles.  So, my first rule of street photography is to find a subject that interest you and make your photo about exactly what attracted you to the subject.   
Separating the subject from the background can be done several different ways:  shooting subject against a simple background, using shallow depth-of-field, under or over exposing the background while properly exposing the subject, shooting subject from an usual angle, etc.  This is one of the parts of street photography that makes you continually adapt.  Unfortunately, I cannot give you a formula as to which approach will work best in different situations.
The photo posted today is a revision of the one I posted on December 21, 2009.  If I had shot this as I should have, I would have used an f-stop of f/2.8 (rather than f/9.5) which would have completely burred the background and slightly blurred his face.  Additionally, I would used a shutter speed of 1/60th of second which would have overexposed the background by about 1 ½ f-stops.  I tried to simulate these differences using Photoshop CS5, but I must admit, the result is a very poor substitution to shooting it right to begin with.  But, I think you can better understand what I should have done.
Next post, I will describe how I try to get this result in the camera.

Enjoy.

January 7, 2011

Dickens on the Strand #8

Today’s photo is the last one that I will present from this year’s Dickens on the Strand.  Brock noticed this young lady while the parade was going past us.  She was on the opposite side of the street, so, I approached her immediately after the parade was completed.
She was great to photograph.  She went into many different poses and displayed a great deal of personality without saying a word.  This is my favorite because it is not one that you will normally see.

Enjoy.
Camera settings:  Nikon D3, Nikon 70-200mm f/2.8 shot at 200mm,  ISO 200, f/4 and 1/500th of a second.

Post Processing:   

Lightroom 3—Adjusted white balance, added mid tone contrast and saturation of various colors. 

Photoshop CS5—used spot healing to clean-up various spots, softened her skin slightly and then did some dodging and burning.

January 4, 2011

Dickens on the Strand #7

For some reason, the combination of cigar and the Steampunk goggles just seemed odd to me.  Naturally, I had to record it.
I wanted the image to showcase the goggles so I focused on the left three small lenses and then added a little sharpness and contrast to them in Lightroom 3.  As a result, his face is a little soft which will bother some people, but my intent was to focus the viewer's attention on what I found unusual and interesting and that was not his face.


Upon seeing the image on the computer, I felt that the soft background really set the subject off.
Enjoy.
Camera settings:  Nikon D3, Nikon 70-200mm f/2.8 shot at 200mm, ISO 200, f/2.8 and 1/350th of a second.
Post Processing:  

Lightroom 3—Adjusted white balance, added mid tone contrast and sharpness and contrast to the goggles.

January 1, 2011

Happy New Year!

You have now entered the second decade of this century.  Where did those first ten years go?

Have not been doing too much photography over the holidays except, of course, for family affairs.  Normally, I am not allowed to show any photos of the grandchildren but I got a special permission from Mrs Patrick the First and Mrs Patrick the Second.

Here are two shots of youngest grandson, Cameron. He has very definite opinions on what is in style and what is not.  During the unwrapping a presents he would decide on adding this or that to his attire.  And, to prove he was fair and balanced, it did not matter whose clothes it was (the boxer shorts are his eight year old brother's and the shoes are his six year old sister's).  

Hopefully Cameron will work with me this year to help me improve on my dress.

Here is hoping that everyone has a safe and happy 2011.


December 24, 2010

Dickens on the Strand #6

Merry Christmas to all!
I did not get this young man’s name but he was Mad Hatter’s running mate.  I was very lucky when I took this photo that my subject tilted his head just before I took the shot.  This slight tilt added so much to the image.  
In this photo, I wanted to bring out the bright colors and his unusual eye and mouth wear so in post processing I tried to really emphasize the contrast between his attire and the softness of the background to make sure that I had good separation between the two.  
I tried without any success to change the color of the background from a warm color to a cooler one.  Nothing that I tried seemed to look good to me, so the background is as shot.  When I try something like this, I am not sure whether I did not do a good job with my Photoshop magic or that I know that it has been changed and thus no matter what I do or how good I do it, the change just does not look right.  Welcome anyone’s comments on this one.
Again, Merry Christmas to all!
Enjoy.
Camera settings:  Nikon D3, Nikon 70-200mm f/2.8 shot at 70mm, ISO 200, f/2.8 and 1/350th of a second.
Post Processing:  
Lightroom 3—Adjusted white balance, added mid tone contrast.
Photoshop CS5—used nik Color Efex Pro tonal contrast to add contrast to his clothing and facial mask.

December 21, 2010

Dickens on the Strand #5


Today’s posting is a composite of three of the photos that I have previously posted and a photo of a poster that I took.
I do not know why I started this composite.  After looking at all my shots of Steampunk, I do know that I thought that they would make an interesting movie-type poster. 
There was not much technique to the combination.  I masked-off all of the people and sized them on the background.  I used soft light blending mode on all the people so that some of the background showed through their image.  I adjusted the opacity of each layer until I got the look that I wanted.
After I got all the people looking the way that I wanted, I decided that the poster needed something else.  I believe most people are like me and therefore, they would not know much about Steampunk. So, I decided that I should include a title.  I selected a typeface that I thought worked well with the overall poster.  Finally, I then put a black boarder around the outside of the composite.  I think  that the boarder gives the image that final touch that it needed.
Enjoy.

December 17, 2010

Dickens on the Strand #4

I must admit, I have never photographed anyone like the Mad Hatter.  He was completely “in character” every second that he was in front of my camera.  I was completely convinced:  he was truly mad and I think he trying to infect me.
The problems with photographing him were: keeping him further than the minimum focusing distance of my lens; trying to keep him in focus as he moved here, there and everywhere; and, just trying to keep from laughing as he said the most ridiculous stuff. 
This is one of the few photos that I took of the Mad Hatter that I think he was in one position for more than two seconds.
Enjoy.
Camera settings:  Nikon D3, Nikon 70-200mm f/2.8 shot at 200mm, ISO 200, f/2.8 and 1/500th of a second.
Post Processing:  
Lightroom 3—Adjusted white balance, added mid tone contrast.
Photoshop—used spot healing to clean-up various spots and used nik Color Efex Pro tonal contrast to add contrast to his clothing.

December 14, 2010

Dickens on the Strand #3

In today’s photo, I wanted to capture the intensity of the subject.  I watched this young man for a while and noticed that no matter what he was doing, he had the same intensity.  It was just part of him.  It is probably the most important aspect of him—just a guess.
Enjoy.
Camera settings:  Nikon D3, Nikon 70-200mm f/2.8 shot at 200mm, ISO 200, f/2.8 and 1/500th of a second.
Post Processing:  
Lightroom 3—Adjusted white balance, added mid tone contrast.
Photoshop CS5—used spot healing to clean-up various spots and then did some dodging and burning.