November 30, 2010

Something Out of Place


I was out scouting for a location for an upcoming portrait session when I saw this old blue, leather chair setting in the middle of the field.  It looked so out of place and unusual that I decided that I needed to take a picture of it.
I wanted to show all the details so I decided to use HDR.  I shot five exposures ranging from –EV2 to +EV2. 
Enjoy.
Camera settings:  Nikon D3, Nikon 24-70mm f/2.8 shot at 24mm, ISO 200, f/13 and five exposures ranging from 1/250th to 1/8th of a second on a tripod.
Post Processing:  
Photomatix Pro—combined four of the exposures into an HDR image and tone mapped the image.
Photoshop CS5—remove a few distracting details and used nik Color Efex Pro tonal contrast to enhance details in the chair.

November 23, 2010

Sarah Three

Everything leads to Sarah.  Upon seeing the graffiti on the wall, I immediately knew that I wanted to use its lines as a graphic element.  I positioned Sarah in couple different places but finally settled on the position you see here.  After settling on a position, Sarah commenced to give me a lot of different looks.  This is the one that I liked best.
Enjoy.
Camera settings:  Nikon D3, Nikon 50mm f/1.4 shot at ISO 200, f/1.4 and 1/90th of a second.
Post Processing:   
Lightroom 3—Set black and white points, added clarity and mid-tone contrast.
Photoshop CS5—used nik Silver Efex Pro to convert image to black and white.

November 19, 2010

Sarah Two


Today, I present another photograph of Sarah.
As I prepared to take this photo, I wanted to make sure that Sarah clearly separated from the background.  I did two things to accomplish this:  (1) I found a portion of the wall that was about two f-stops brighter than where Sarah was standing; and, (2) I moved her about ten feet from the wall so that it would be completely out-of-focus.
There was a little wind that blew Sarah’s hair that added a some movement to the photo.  After seeing what the wind did, I wished that I had a fan to move her hair more.
Enjoy.
Camera settings:  Nikon D3, Nikon 50mm f/2.8 shot at ISO 800, f/1.7 and 1/125th of a second.
Post Processing:  
Lightroom 3—Set black and white points, cropped photo and added a vignetting.

November 16, 2010

Sarah

Every once and a while the photography gods smile down on you and give you a great subject, soft light and pleasing backgrounds.  That is what I had the other day when I took some photos of Sarah.  I do not think anyone can take a bad photo of Sarah.  She is a natural in front of anyone’s camera.  She is so relaxed and has an easy way about her that readily comes through.
Because of the subject and the soft light, I decided that I wanted to shoot a lot of natural light with shallow dept of field.  I felt that the shallow depth of field would really set Sarah off from the background.  I also believed that the natural light would make Sarah's photo look as good as she looks in real life.  
I shot this photo at f/1.4, f/2 and f/2.8.  I felt that the photo at f/1.4 had too narrow depth of field while the one at f/2.8 showed too many unwanted details, especially in the brick wall to the left.  This photo at f/2 seemed to provide adequate details of Sarah's face while allowing the unwanted details to go soft.
Enjoy.
Camera settings:  Nikon D3, Nikon 50mm f/1.4 shot at ISO 200, f/2 and 1/180th of a second.
Post Processing:  
Lightroom 3—Set black and white points, added clarity, vibrance, mid-tone contrast and vignetting.
Photoshop CS5—removed a few distracting elements within the photo.

November 12, 2010

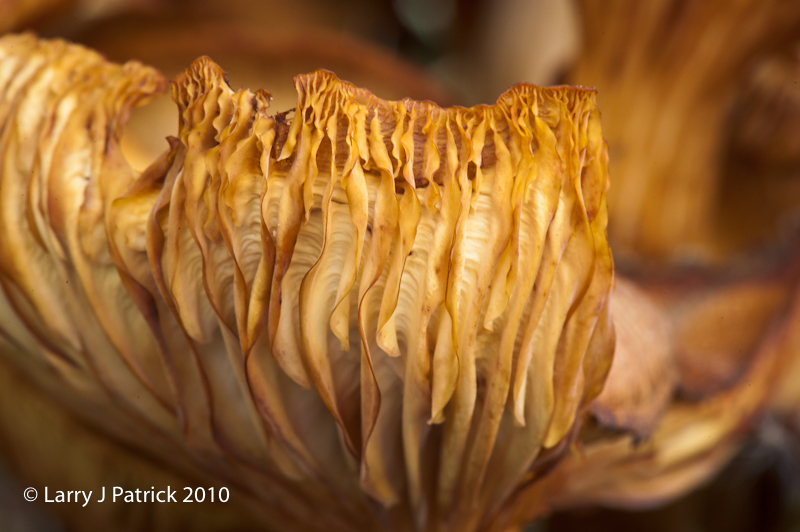
Another Mushroom Photo

Not too much to say about today's post--I wanted to show the textures within the mushroom.  The photo is 1:1 image of the mushroom.  I find it amazing how many details you will find in subjects like this and how interesting those details can be. 

Enjoy.

Camera Settings:  Nikon d3, Nikon 105mm f/2.8, shot at ISO 800, f/22 and 1/4th of a second on a tripod.

Post Processing:

Lightroom 3:  Set white and black point, increased mid-tone contrast and added vignetting.


November 9, 2010

Revisit to JD’s Garden


Barry Armer and I were talking about having problems finding inspiration.  Barry indicated that when he got a photographer’s block, he would go to Kemah to solve the problem.
I like Kemah, but do not always find something that really makes me stand-up and take notice like walking around JD’s garden.  There always seems to be something that I find interesting and most of the time they present some technical problem to photograph.
Such was the case the other day when I discovered this patch of mushrooms.  I liked the color and the texture and that is what I tried to capture.
Enjoy.
Camera settings:  Nikon D3, Nikon 105mm f/2.8 shot at ISO 800, f/22 and 1/30th of a second on a tripod.
Post Processing:  
Lightroom—Set black and white points, increased mid-tone contrast and changed saturation of yellow and orange, sharpened and reduced noise slightly.

November 5, 2010

A Hurricane Ike Reminder


As you walk around Galveston, you do not see too many reminders of Hurricane Ike.  I did, however, notice this one the other day.  Although very simple, this little sign seemed to be very powerful.  
Enjoy.
Camera settings:  Nikon D3, Nikon 24-70mm f/2.8 shot at 50mm, ISO 200, f/11 and 1/60th of a second.
Post Processing:  
Lightroom—Set black and white points, increased mid-tone contrast and changed saturation of various colors.

November 2, 2010

Everyday HDR


Not too much to say about today’s posting—I liked the colors and the way the lighting was falling on the sidewalk.  I wanted to make sure that I captured all the details so I decided that I would use HDR to present the photo.  I took five shots but only used three of them in Photomatix to create the HDR photo.
Enjoy.
Camera settings:  Nikon D3, Nikon 24-70mm f/2.8 at shot at 35mm ISO 200, f/13 and various shutter speeds..
Post Processing:  
Lightroom 3—Set black and white points, added clarity and mid-tone contrast.
Photomatix—Combined three photos to create and tone map the HDR photo.

October 29, 2010

Bird Photography by a Non-Bird Photographer 101—Lesson 3

Today’s masterpiece of bird photography shows a pelican against a very simple background of blue water.  Here I wanted the pelican to stand-out against the water.  Unfortunately, I could not blur the background to the extent that I would have liked.
Enjoy.
Camera settings:  Nikon D3, Nikon 70-300mm f/4.5-5.6 shot at 300mm,  ISO 200, f/5.6 and 1/350th.
Post Processing:  
Lightroom 3—Adjusted white balance, mid tone contrast and saturation of various colors.

October 26, 2010

Bird Photography by a Non-Bird Photographer 101—Lesson 2


I hope this photo generates a few comments and possibly a little disagreement among the viewers since my last post seems to have fallen on blind eyes.
Many people maintain that a viewer’s eyes go immediately to the brightest point of a photo.  I do not think that is correct; and, I believe a lot of research supports my view.  The research states that the eye generally goes to what the mind most readily recognizes, then the portion with the highest contrast, then the sharpest, then most saturated colors and finally to the brightest portion.  They do indicated that bright distracting points of a photo can distract the eyes but if the main subject has sufficient impact and interest, then the eyes will return to the main subject.
My last post generated several comments about wanting more separation.  I agree that good separation of the subject and the background does make the subject stand-out from the background.  In today’s post, I tried to create separation by depth-of-field and contrast in brightness. 
I used spot metering on the bird to determine my exposure.  I knew that by doing this that the background would be considerably brighter than the gull.  I was not afraid of the eyes going to the background because of how sharp and recognizable the gull is in the photo.  I believe that all the details in the bird’s feathers will generally keep the viewer’s interest and focus.  I have included a second photo to make it easier to see the details of the bird and the effect of the limited depth-of-field to separate the bird from the background.
Enjoy.
Camera settings:  Nikon D3, Nikon 70-300mm f/3.5-5.6 shot at 180mm, ISO 200, f/5.6 and 1/250th of a second on a tripod.
Post Processing:  
Lightroom—Set black and white points, adjusted saturation of various colors, added mid-tone contrast and vignetting.

October 22, 2010

Bird Photography by a Non-Bird Photographer 101—Lesson 1


Why would a non-bird photographer give a bird photography class.  Good question.  I do not think I have reached my federally approved level of humiliation this week.
I know what you are asking:  “What disqualifies you from being a bird photographer?”
1.  I take bad bird photos.
2.  I do not have the patience to take good bird photos.
3. I do not know what I am doing when a bird is in front of my lens.
4. I do not have the equipment to be a “real” bird photographer—in general, “real” bird photographers must have a lens that allows you to see ants on the moon.
I know your next question:  “Why are you doing this?”  I lost a bet?  Really, it all started when I was down in Galveston after a portrait session and I remembered that “birds of a feather” was our club’s assignment for October.  So, with my mighty 70-300mm lens in hand, I set-out to capture the perfect bird photo.
Here I wanted to play with the compression created by my massive 300mm of thundering glass.  The bird was about 100 feet from me and the rigs in the background were about 600 yards.  Yet, because of the compression, the two look like they are right next to each other.  I think this effect adds interest to the photo.
The image that is shown here only represents about 40% of the frame that I captured—a nice 600mm lens would have made the photo to be pretty much full frame and think about the compression and bokeh that I could have achieved.   And just think, I could achieve this by merely forking over $10,300 for a Nikon 600 AF-S f/4G VR.  Cheap at twice the price.  I wonder how fast B&H can get it to me?
Enjoy.
Camera settings:  Nikon D3, Nikon 70-300mm f/3.5-5.6 at shot at 300mm ISO 200, f/5.6 and 1/750th of a second.
Post Processing:  
Lightroom 3—Set black and white points, added clarity and mid-tone contrast.
Photoshop CS5—removed a few distracting elements within the photo and balanced the colors within the image.

October 19, 2010

Oregon Trip #8—Bridge at Cascade Locks


I love old bridges.  They have such wonderful grace and style.  I wished that bridges built today had the same style.
I submitted this photo at our last Honor’s Night at Bay Area Photo Club.  Even though I like the photo a lot, I was surprised that it scored as high as it did.  Why?  Well, I was worried that our judges might get caught-up with bluish color-cast of the photo.  I had taken great care when I was taking the photo to set the white balance so that the blue color-cast (which was what I was seeing) would be reflected in my photo.  Second, HDR photos are not always well received by our judges.  I think that the judges see them has gimmicks or “photo-by-computer-program.”  I think that can be the case but overall I think most of the photographers at the club who utilize HDR do a pretty good job using the program.
I wanted this photo to show the subtle nature of the scene.
Enjoy.
Camera settings:  Nikon D3, Nikon 24-70mm f/2.8 shot at 28mm, ISO 200, f/13 and at nine different shutter speeds.
Post Processing:  
Lightroom 3—Set black and white points, cropped photos, and changed, added saturation of certain colors vignetting.
Photomatix Pro—combined six of the nine exposures and tone mapped the result
Photoshop CS5—removed minor distracting element, adjusted overall mid-tone contrast and sharpened the bridge using the high pass method.

October 12, 2010

Oregon Trip #7—Art on a Bridge

The bridge at Cascade Locks is a classical old bridge.  The bridge was about 50 yards from our hotel on the Columbia River.  So naturally, I wondered over early one morning to take some photos of the bridge and the fog over the river.  After trying various angles, I finally decided to take one of the bridge pilings with its Lewis and Clark mural on it.
While I was taking the photo, I kept thinking about a comment that many of our judges at Bay Area Photo Club make:  “It’s not your art if you are merely taking a photo of someone else’s art.”   So based upon that theory, only the far right side of my photo is my art.  But then again, the design of the bridge someone else’s art.  So, I guess that portion of my photo cannot be considered my art.  Then, again, the sky and the trees—they are God’s art so I guess that portion of the photo cannot be mine.
Well, it may not be much of the photo, but you must admit, the sidewalk represents truly fine art that is all mine. 
Enjoy.
Camera settings:  Nikon D3, Nikon 28-70mm f/2.8 at shot at 28mm, ISO 200, f/11 and 1/60th of a second.
Post Processing:  
Lightroom 3—Set black and white points, added clarity, vibrance and mid-tone contrast.
Photoshop CS5—removed a few distracting elements within the photo and use nik Color Efex Pro tonal contrast to bring out details.

October 8, 2010

Oregon Trip #6—What’s Under the Water


I showed this photo on First Tuesday at the Houston Center for Photography and some of the participants wanted to know more about it.  It is a pretty basic shot with one exception—the use of a high ISO.  I told everyone at the meeting that I thought that it was shot at an ISO of about 2,200.  Well, I was mistaken.  The photo was actually taken at ISO of 6,400.  Several people commented that there did not seem to be any noise in the photo.   The version that I showed at HCP did not have any noise reduction done to it in post processing, however the version that I am showing here has had some noise reduction applied to it in Lightroom 3.


I knew that I really wanted the blue of the water to come forward in the photos so I adjusted my white balance until I got the blue I wanted.  I did this by turning on the Live View setting and then changing the white balance until I was seeing what I wanted.  I have found this approach to be a very handy way to get your white balance where you want it when the lighting is something unusual.
The unusual white balance did affect the yellows and oranges in the scene so I had to adjust them in Lightroom 3.
There are two lessons to take from today’s post:  you can shoot at high ISO’s; and, the noise reduction in Lightroom 3 works. 
Enjoy.
Camera settings:  Nikon D3, Nikon 24-70mm f/2.8 shot at ISO 6400, f/5.6 and 1/90th of a second.
Post Processing:  Lightroom 3—Set black and white points, increased mid-tone contrast and changed saturation of yellow and orange, sharpened and reduced noise slightly.

October 5, 2010

Oregon Trip #5—Early Morning


Early morning along the Columbia River brings fog, low and high clouds and the colors of sunrise.  I really like how the whole scene appeared in three distinct layers—the fog, the low cloud, touch of color from the sunrise and the high clouds.   As I sat with my coffee and camera, I wanted to capture all these elements.  I tried various exposures however I could never get the fog along the river looking like I was seeing it.  This photo is the best of the lot.
Enjoy.
Camera settings:  Nikon D3 on a tripod, Nikon 24-70mm f/2.8 shot at 70mm, ISO 200, f/11 and 1/30th of a second.
Post Processing:  
Lightroom—Set black and white points, increased mid-tone contrast and changed saturation of various colors.

October 1, 2010

Oregon Trip #4—Colors


Sometimes I see something and I know exactly what I want the photo to be—other times, I see something and I have no idea what I want the photo to be.  I guess that is what being a photographer is all about.
When I saw this scene near some rocks by some tidal pools, I knew that I wanted the image to be totally about the colors and the form.
Enjoy.
Camera settings:  Nikon D3, Nikon 24-70mm f/2.8 at shot at 62mm ISO 800, f/11 and 1/30th of a second.
Post Processing:  
Lightroom 3—Set black and white points, added clarity and mid-tone contrast.

September 28, 2010

Oregon Trip #3—Colors and Shapes along the Seashore


JD and I spent lots of time walking on the beaches and exploring tidal pools.  Oregon’s beaches are beautiful.  The rocks and color of the plants and animal life makes for a lot of different things to study all along the shoreline.
Here, I tried to capture the colors of some sea weed and rocks that I found along the shore.  I really liked the contrast between the forms and the colors
Enjoy.
Camera settings:  Nikon D3, Nikon 24-70mm f/2.8 shot at 62mm with polarizing filter attached,  ISO 200, f/9.5 and 1/180th of a second.
Post Processing:  
Lightroom—Adjusted white balance and mid tone contrast.

September 24, 2010

Oregon Trip #2—Another Fall along the Columbia Gorge


Latourell Falls is a little west of Maltnomah Falls and although it is not as spectacular as Maltnomah Falls, it does have an interesting twist because of the unusual lime-green lichen that clings to the basalt cliffs.  I had never seen such a large patch of lichen.  It gave the whole falls a somewhat eerie look.
Again, I took five bracketed exposures and used three (-2EV, 0EV and +2EV) to create a HDR image.  
Enjoy.
Camera settings:  Nikon D3x, Nikon 24-70mm f/2.8 shot at 45mm, ISO 200, f/11 and 1/15th, 1/60th and 1/250th of a second on a tripod.
Post Processing:  
Lightroom—Set black and white points, adjusted saturation of various colors, added mid-tone contrast and vignetting.
Photomatix Pro 3—combined three frames into an HDR image and tone mapped the overall image

September 21, 2010

Oregon Trip #1—An Absolute Must Photo from Oregon


JD and I just got back from a short vacation in Oregon.  I have never spent much time in Oregon and this was my first trip in which I really did much photography in the state. 
I believe it is a state law that you cannot officially say you have photographed in Oregon if you do not have a photo of Multnomah Fall that is along the Historic Columbia River Highway (Oregon Route 30) that runs parallel to I-84 east of Portland.  The falls has a 620’ drop from the top of the upper falls to the pool at the bottom of the lower falls.  It is the tallest falls in Oregon and the fourth tallest in the United States.
To me, the bridge between the upper and lower falls is what makes this fall so interesting.  Speaking of the bridge, it is slightly uphill, so please do not write that I need to make sure that my camera was level.  I used the leveling function in the Nikon D3 to make sure that everything was level and then made sure by using the leveling function in LIghtroom 3 (based upon the fall of the water).
The image is an HDR one.  And, to answer the question, possibly before it is asked, I used Photomatix Pro 3 to convert the image.  I tried Photoshop CS5 to convert it but I was not able to get the details and controls that I wanted.  This may be due to my lack of familiarity with CS5’s HDR functions and the saved settings that I have developed in Photomatix.  Although I shot five frames, I only used three of them (-2 EV, -1EV and 0EV).  The overexposed frames blurred the water too much and made it completely white, which was not what I wanted.  In addition, the overall scene is slightly dark and that is the way I wanted to present it.
Enjoy.
Camera settings:  Nikon D3, Nikon 24-70mm f/2.8 at shot at 24mm ISO 200, f/11 and 1/15th, 1/8th and 1/4th of a second.
Post Processing:  
Lightroom 3—Set black and white points, added clarity and mid-tone contrast.
Photomatix Pro 3—combined three frames into an HDR image and tone mapped the overall image.
Photoshop CS5—removed a few distracting elements within the photo and balanced the colors within the image.

September 17, 2010

Concert on the Kemah Boardwalk #4


Now these two guys were really enjoying the concert.  They were singing along with the band and generally enjoying everything about the moment—the music, the surroundings and the beer.
I tried this shot two different ways—the one presented here with a very shallow depth of field and another one with both guys in focus.  I like the shallow dept of field.  I think I like it because it leaves some things to your imagination—who is the other guy?
As always jesters always add to a photo.  Here I think it says:  “We’re having a great time!”
Enjoy.
Camera settings:  Nikon D3, Nikon 70-200mm f/2.8 shot at 180mm, ISO 200, f/3.2 and various 1/250th of a second.
Post Processing:  
Lightroom—Set black and white points, cropped photos, and changed, added saturation of certain colors vignetting.