August 28, 2012

My Vacation—Part 3


I read somewhere that Maine has more lighthouses than anywhere else in the United States.  Have no idea as to whether that is true or not, but, I do know that you will find many, many lighthouses up and down the Maine coastline. 
Many of them are small ones like this one.  Notice the size of the door in comparison with the size of the lighthouse.
In this photo, I like how the three rock outcrops mirrored each other and formed a nice repetitive lines to lead the eye to the lighthouse.   To lesser degree, I think the bank on the far side also helps carryout this idea.  
Enjoy.
Camera settings:  Nikon D4, 28-300mm f/3.5~5.6 with polarizing filter attached at 56mm, ISO 100, f/16 at 1/125th of a seconds on a tripod.
Post Processing:  
Lightroom 4—applied Landscape preset during import, set white and black points, increased contrast and tweaked the blues and aquas saturation and luminance.

August 24, 2012

My Vacation—Part 2


One of our hotels had a game room that seemed to be right out of the 1900’s.  In this photo, I tried to capture the old bowling alley.  The bowling balls were about 1/3rd the size of today’s bowling balls; the bowling pens were about the same.  The alley was well worn and quite uneven.  JD and I bowled several games and I do not think either one of us were able to bowl even a spare!  Despite our dismal scores, we had lots of fun!
The image is an HDR photo taken with three frames at -1 EV, 0 EV and +1 EV.  I used nik HDR Pro to combine the frames.  I wanted the image to have a gritty, aged look.
Enjoy.
Camera settings:  Nikon D4, 28-300mm f/3.5~5.6 at 120mm, ISO 200, f/22 at one, two and four seconds on a tripod.
Post Processing:  
Nik HDR Pro—applied filter.

August 22, 2012

My Vacation—Part 1


JD and I recently spent nine days in Maine.  We had never visited Maine and it looked like a great place to get away from Houston’s summer heat.  Our visit included only the coast of Maine.
For the trip, I packed light:  Nikon D4, Nikon 28-300mm, Nikon 50mm, two Nikon SB800s, tripod, Canon G12, Epson P6000, extra batteries and memory cards.  Everything easily fit into my ThinkTank StreetWalker backpack.


Today’s shot is of the Driftwood Inn, our hotel the second night of the trip.  The Driftwood Inn is located at the tip of Bailey Island and has a great view of the ocean.  Before the trip, I had told JD not to expect much of this “rustic” hotel however after arriving at the hotel, she parked herself on the porch and told me to cancel our dinner reservations because she had no intention of leaving the “view.”  She pretty much stayed there on the porch until bedtime—you can see her head at the far right side of the porch.
The photo was taken as the tide began to come-in.  I positioned my camera as low as I could to the rocks and used an aperture of f/16 to expand my depth of field.   I tried to frame the shot so that the rocks led you into the photo.
Enjoy.
Camera settings:  Nikon D4, 28-300mm f/3.5~5.6 at 28mm, ISO 100, f/16 at 1/60th of a second on a tripod.
Post Processing:  
Lightroom 4—applied landscape preset during import of photo, set white and black points, adjusted color balance, added vibrance and clarity.

August 17, 2012

My Workflow—Part 5


“To Photoshop or not to Photoshop, that is the question.”  If Shakespeare were here today, that would probably be a line in one of his plays.
On my last post, Allen asked:  “With this photo what would you do in Photoshop?”  Good question.
Let me start by saying that for every professional shoot I do, I use Photoshop on all the final images.  Why?  Because Photoshop has so many more tools that help me develop the specific look that I want in the final image.  Specially, Photoshop has much better selection tools, healing and cloning tools and many plug-ins that can help you achieve what you want.
Now, back to: what would I do on this image in Photoshop?   If I were going to present this image for a photographic show, I would push it more to a fine art image.  I start with the cropped Lightroom image and open it in Photoshop.  The first thing that I would do is, remove the distracting leave on the left side of the flower by cloning it out.  When clone something out, I do it on its own layer so that I can easily mask off errors I make with the cloning tool.  Next, I would tray to make the whole left side of the flower look more symmetrical.  I did this by copying the bottom leaf, moving it to its new position and then changing its shape using the warp tool under edit>transform>warp.  I do not want the two leaves looking like each other.  I then took the image into nik Color Efex Pro and used the Extract Detail and Tonal Contrast filters on the flower.  I believe these to filers really bring out detail and add punch to an image.  I usually dial down the overall effects of the filter both in nik Color Efex Pro and also using the layer opacity in Photoshop.  Finally, I would do my normal dodging and burning.   I do dodging and burning on a separate layer in the soft light mode.  I fill the layer with 50% grey and then paid at a low capacity (3-10%) with white to dodge an area and black to burn an area.  I continue to brush over the area until I get it the shade I want.
That’s it.
Enjoy.
Camera settings:  Nikon D4, 70-200mm f/2.8 at 90mm, ISO 1600, f/19 at 1/60th of a second on a tripod.
Post Processing:  
Lightroom 4—see above. 
Photoshop CS5—see above.

August 14, 2012

My Workflow—Part 4


Someone needs to teach me how to read a calendar.  I prepared this post before I went on vacation and thought that I had set it to appear on August 7th.  I did not notice that it had not appeared until I started looking at my blog this past weekend.  Sorry about not catching my mistake sooner.   I am sure many of you put your lives on hold until I posted again.
The final step of almost every photo that I take is to do some dodging and burning.  Here I burned (using the adjustment brush) the bokeh background and the leaves behind the flower.  In addition, I blurred a few of the leaves by reducing the sharpness and clarity with an adjustment brush.  The whole purpose of these adjustments is to make the flower and starburst to come forward and make the background sink further into the background.
I think that if you go back to the original photo you will see that my intended subject of the photo is definitely the subject that the viewers' eyes go to first and rest upon the most.
Enjoy.
Camera settings:  Nikon D4, 70-200mm f/2.8 at 90mm, ISO 1600, f/19 at 1/60th of a second on a tripod.
Post Processing:  
Lightroom 4—see above.

August 3, 2012

My Workflow—Part 3


As I said before the details is one of the subjects of this photo.  In fact, it is the main subject of the photo; so, I want to draw the viewers’ eyes towards the flower.
But, what draws a person’s view?  For many years, it was taught that a person’s eye always goes first to the brightest part of the image.  Recently, some researches have said that the human eye goes to the portion of an image that the human brain can most easily recognize.  Next, it goes to the area that is sharpest, has the most contrast and most colorful.
With this in mind, I next added: sharpness, contrast, saturation and clarity to the flower using the adjustment brush.  In addition, I warmed-up the color balance on the flower under the theory that warm tones are moved to the forefront and cooler tones are moved to the background by the brain.
Hopefully, the picture that I took is starting to look more like a real photograph.
Enjoy.


Camera settings:  Nikon D4, 70-200mm f/2.8 at 90mm, ISO 1600, f/19 at 1/60th of a second on a tripod.
Post Processing:  
Lightroom 4—see above.

July 31, 2012

My Workflow—Part 2


While attending his workshop, Jay Maisel said:  “If it does not add to the story then it takes away from the story.  Include only what is essential in your photos.” 
Jay believes in getting it right in the camera so almost all of his photos that you see are not cropped.  They are as he shot them.  I believe Jay is absolutely right but I lack his talent of “getting it right” in the camera.  Besides that, I think that some images just look best at ratios other than the normal 3:2 or 5:4 ratios that my camera allow me to capture.  So, I do crop my images to the format that I feel best suits them.
After I import the image, my first step is to crop the photo into the format that I believe shows only the things that “add to the story.”
In this photo, my subject is:  the details in the flower, the starburst and the bokeh.  I cropped the top, bottom and right sides of the image so that I had symmetry between the top and bottom right corners.  The corners are not important however I think including about the same amount of leaf in both corners helps anchor the flower.  I know some people will be bothered by me cutting off parts of the flower but do you know what it is even after I cut parts of it off and is there enough of the flower left to show-off the details in it.  I believe there is.  Finally, I cropped the right side of the photo so that the bottom leaf was complete.
Enjoy.


Camera settings:  Nikon D4, 70-200mm f/2.8 at 90mm, ISO 1600, f/19 at 1/60th of a second on a tripod.
Post Processing:  
Lightroom 4—see above.

July 27, 2012

My Workflow—Part 1


A few weeks ago, my friend, Doug, from the Bay Area Photo Club, asked me how I go about processing my photos.  Rather than try to tell him in words (the old problem of trying to accurately writing instructions of how you would go about sharpening a pencil), I decided to show him my basic processing on a given photo.
This photo, to me, is about three things:  the details in the flower, the starburst of the sun and the bokeh.  To get a good starburst, you must use a small aperture—here, I chose f/19.  This aperture would also make my bokeh-circles very small. I though that this combination would look pretty cool.
I shoot in RAW about 99.99999999999% of the time.  I do this because I feel that it provides me with the best file to develop the photos into the image that I want.  The image that you see on the back of your camera will not look like the one you open-up in your RAW processing program unless you do some basic processing of the file. 
Why is that?  Because what you see on the back of your camera is actually a JPEG image that is embedded within the RAW file.  The JPEG image that has been processed in accordance with the “Picture Control” (Nikon’s term; not sure what other manufacturers call it) that you selected in your camera.  Nikon has six Picture Control settings: Standard, Neutral, Vivid, Monochrome, Portrait and Vivid.  Based upon which one you select, the photo displayed on the back of your camera will show varying amounts of: sharpening, contrast, brightness, saturation and hue.
I do not believe in redoing things over and over.  I also like things to as consistent and easy as possible. As a result, I have developed a series of Lightroom presets for each of the Nikon Picture Control settings.  Before I start to shoot, I select the Nikon Picture Control Setting that I believe will produce images that are most consistent with what I want.  I rarely change this setting during any shooting session. 
As I import my photos into Lightroom, I apply the appropriate preset to the photos.  What does this do?  Well, it makes my photo look very much like what I was seeing on the back of my camera as I was shooting.
How did I develop the various presets?  First, I took photos that used the different Nikon Picture Control Settings in both JPEG and RAW.  I then imported the photos into Lightroom.  Next, I applied Lightroom’s Camera Profile (you will find it in the Develop Module under Camera Calibration tab) to the RAW file.  I then tweaked the sharpening, contrast and saturation of the RAW until it matched the JPEG file.  Finally, I saved the settings for sharpening, contrast, saturation and Camera profile as a preset for that Nikon Picture Control Settings.
The first photo today shows the RAW file as it would look without applying any preset to it.  The image is basically flat and definitely not what you were seeing on the back of your camera. 


The second photo shows what the image would look after applying my Nikon Camera Standard Control Setting preset.  Notice how the colors are richer and there is generally more details throughout the photo.


Enjoy.
Camera settings:  Nikon D4, 70-200mm f/2.8 at 90mm, ISO 1600, f/19 at 1/60th of a second on a tripod.
Post Processing:  
Lightroom 4—see above.

July 24, 2012

Nike Look


Several years ago, Nike had a series of advertisements in which they presented various athletes with a look somewhat similar to Joel Grimes work.   That look was what I wanted when I took this photo.
Casey’s look tells the whole story—I am an athlete and I love competing!
Enjoy.
Camera settings:  Nikon D800, 24-70mm f/2.8 at 70mm, ISO 140, f/6.7 at 1/45th of a second with an Elinchrom Ring flash to the right.
Post Processing:  
Lightroom 4—set white and black point and increased contrast, increased clarity and added a vignette.
Photoshop CS5—applied nik Color Efex Pro Bleached By-Pass filter.

July 17, 2012

MIA Is Back


Several people have asked why I have not been posting to my blog.  One even labeled me as MIA.  Well, she was correct.  I was missing in action with absolutely no reason.
Yes, I was a little busy with my photographic business, my grandchildren, Bay Area Photo Club and this and that.  But, I did have the time; I just decided to do other things.


Today’s photo is a continuation of the session we had with Casey.  In this photo, I wanted to isolate on Casey’s face but still give the photos some context.  I deliberately placed Casey in the center of the frame—damn the rules!  I used a spot meter on her face for my meter-reading which because of the light hitting her face, slightly underexposed the rest of the frame.  The light on her face was from the setting sun and because the rest of the pool was in the shade gave me a warm Casey against a cool background.  I think this helps isolate her.  Finally, I used a very low camera angle (my camera was almost touching the water) so the lane dividers would stack in the background.
Enjoy.
Camera settings:  Nikon D4, 70-200mm at 200mm f/2.8, ISO 800, f/5.6 at 1/1500th of a second.
Post Processing:  
Lightroom 4—set white and black point and increased contrast, increased clarity, contrast and sharpness on Casey with the adjustment brush and added a vignette.

June 26, 2012

Casey—Doctor, Competitive Swimmer and Nice Lady


Meet Casey.  She is a medical doctor that swam competitively in college.  In addition, she is a really nice person.  But, I hope I never see her professionally—no offense, Casey.
Here, I was trying to be a Sports Illustrated photographer—I really had no idea how hard it was to time the shot, even at 1/6000th of a second.  At the end of the shoot, I had lots of shots with nothing but water!  I guess this proves that every time you pick up the camera, something will be different.
Enjoy.
Camera settings:  Nikon D4, 70-200mm f/2.8, ISO 400, f/3.3 at 1/6000th of a second.
Post Processing:  
Lightroom 4—set white and black point and increased contrast, increased clarity, contrast and sharpness around Casey with the adjustment brush.

June 19, 2012

Inga


Although Inga had a great big smile and beautiful hair, I personally like her best with a slight smile and her hair put-up.  I think this way just set off her face much better.
Enjoy.
Camera settings:  Nikon D3x, 85mm f/1.4, ISO 100, f/8 at 1/90th of a second on a tripod with two Elinchrom strobes with umbrellas on each side.
Post Processing:  
Lightroom 4—set white and black point and increased contrast, increased clarity, contrast and sharpness in his eyes with adjustment brush.

June 15, 2012

Inga and Omar


Inga is a very out-going young lady who loves to smile in contrast to her boyfriend, Omar.  She lights-up in front of a camera.  She wanted a few shots of the two of them.  I had to work quite hard to get Omar to get this close to Inga.  His idea of a portrait of a couple was each person about three feet from each other looking directly into the camera with no smile.
Enjoy.
Camera settings:  Nikon D3x, 85mm f/1.4, ISO 100, f/8 at 1/90th of a second on a tripod with two Elinchrom strobes with umbrellas on each side.
Post Processing:  
Lightroom 4—set white and black point and increased contrast, increased clarity, contrast and sharpness in his eyes with adjustment brush and did some basic dodging and burning.

June 12, 2012

Omar


Omar was at this portrait session because his girlfriend told him that he would be there.  He had no desire to have his photo taken. 
He had a great smile but no matter what I did, he would not show it for the camera.  Omar is from Iceland and according to Inga, his girlfriend, men don’t smile for the camera in Iceland.  Don’t know if that is true or not, but I do know that Omar did not smile for my camera—I think he is a Canon guy!
Enjoy.
Camera settings:  Nikon D3x, 85mm f/1.4, ISO 100, f/8 at 1/45th of a second on a tripod with two Elinchrom strobes with umbrellas on each side.
Post Processing:  
Lightroom 4—set white and black point and increased contrast, increased clarity, contrast and sharpness in his eyes with adjustment brush and did some basic dodging and burning.

June 8, 2012

Brent—A C&W Singer and Songwriter


I recently had a portrait session with Brent, a country & western singer and songwriter.  Brent is originally from Alabama but recently moved here to promote his career.  He is very natural in front of a camera, but became even more so when he picked-up his guitar.
This photo is a natural light photo.  There was a very small spot in the lobby of the building where the light was streaming-in.  I wanted to use that light as a spotlight on his face, but was faced with a problem—it was right in front of a pole and so I would have pole coming-out of his head.  To me, it was a no brainer—light first!
If I were going to print this, I would probably try to remove the post.
Enjoy.
Camera settings:  Nikon D3x, 85mm f/1.4, ISO 400, f/4 at 1/60th of a second on a tripod.
Post Processing:  
Lightroom 4—set white and black point and increased contrast, increased clarity, contrast and sharpness in his eyes with adjustment brush and did some basic dodging and burning.

June 5, 2012

Christina—A Serious Young Lady


Before I took Christian’s photos, I asked: “What type of photo do you want?”  She said:  “I am pretty serious and I look stupid with a big smile on my face.  I am not a super model.  I do not like that plastic-skin look that you see on so many portraits.  I want the photo to look like me.  As I am.”
I think this is impressive insight for a junior in high school!
In the photo I tried to follow her wishes.  The photo is a high key portrait of a serious young lady with a minimum amount of retouching.
Enjoy.
Camera settings:  Nikon D3x, 85mm f/1.4, ISO 100, f/4.8 at 1/90th of a second on a tripod with ring flash lighting her face and strobes lighting the background.
Post Processing:  
Lightroom 4—set white and black point and increased contrast, increased clarity, contrast and sharpness in her eyes with adjustment brush and cloned out some temporary blemishes on her skin.

June 1, 2012

Nikon D4—A New Experience—Letting the Shutter Rip!


Today’s photo was also taken at Brazos Bend State Park.  I wanted to isolate the bird from the background so I did wait until he got in a good position on the log.  I then did something that I rarely do—I put my camera in high-speed continuous shooting mode and held the shutter down.  Do you know how many frames you can rip-off in about five seconds of shooting—a lot more than I am accustom to!  I shot 68 frames in a matter of seconds.  I can see how Tim Timmins (see his work here) fills up so many memory cards each week.
I almost forgot my normal disclaimer:  I am not a bird photographer!!!
Enjoy.
Camera settings:  Nikon D4, 28-300mm f/3.5-5.6 at 300mm, ISO 800, f/5.6 at 1/180th of a second on a tripod.
Post Processing:  
Lightroom 4—set white and black point and increased contrast.

May 26, 2012

Nikon D4—What’s My Favorite Thing about the Nikon D4?


I did not receive many comments about my Tuesday’s post on my blog, however, I received many emails asking me questions about the Nikon D4.  I welcome communication with everyone but I would like to remind you that if you make a comment on my blog, everyone sees it; if you send me an email, only you and I see it.  Regardless which way you go, I do appreciate your comments.
Probably the biggest single question I received was:  what is the best thing about the Nikon D4? 
If I had to name one thing, I think it would be the sensor—images are just crisper and contain a wider dynamic range than those taken with my Nikon D3 or Nikon D3x.  I compared photos taken of the same subject and with the same lens (Nikon 85mm f/1.4—my sharpest lens) with the D4 and the D3x (which I think has a wider dynamic range than the D3), and looked at them on my computer.  To me, the D4 just outperformed the D3x.
Next, I would say high ISO performance.  The D4 has about two f-stops better performance than my D3.  The D3x is not made for high ISO use.
But, I am not sure that I would be as happy with the D4 if that were the only changes that Nikon made.  The “little refinements” in how the how the D4 operates makes it a real joy to use and easier to get the image that you want.
Today’s photo was taken at Brazos Bend State Park.  This alligator was near one of the piers.  There was a sliver of light that hit the alligator.  Although he (?) was not very active, I did wait until he moved so his eye was in that sliver of light.  In the photo, I wanted to show the texture of the alligator.
Enjoy.
Camera settings:  Nikon D4, 28-300mm f/3.5-5.6 at ISO 400, f/5.6 at 1/125th of a second on a tripod.
Post Processing:  
Lightroom 4—set white and black point and increased contrast.

May 22, 2012

Nikon D4—What’s with It?


At 4:17 PM on April 30, 2012, my UPS man delivered a package that I have been expecting for over three months.  Yet, no D4 photos have appeared on my blog.  What’s with that?
Well, the two of us have been getting to know each other.  Sound a little crazy.  Yep, that’s what my bride (of 45 years) thinks.  But, let me explain.
The first thing that I did (now hold your breathe) was read the manual.  I then started setting-up it the way that I thought would best fit my way of shooting.  Many people have said that the D4 is an evolution from the D3—well, that may be, but what an evolution.
So many of the D4’s controls have bee refined from the D3.  The D4 is much easier to shoot with because some critical controls have been moved from being buried within the menus to buttons on the camera.  To change image size, picture controls and autofocus mode and area-mode on the D4, you merely push a button.  No more searching menus.  Now this may not sound like much but all three of these controls were place in my menu on my D3 because I accessed them so often.
Enjoy.
Camera settings:  Nikon D4, 70-200mm f/2.8 at ISO 1600, f/5.6 at 1/350th of a second.
Post Processing:  
Lightroom 4—set white and black point and increased contrast.

May 18, 2012

Taylor #5


Obviously, today’s photo is a Joel Grimes rip-off.  Unlike Joel’s photos, this photo is not a composite with the background being an HDR photo. 
The lighting is pretty straight forward as you can see by the diagram.  The only difficult part of the lighting is making sure that the two rim lights (SB800s) are pointed at the same direction and are at the same power settings.  This required some fine tune adjusting to get it just right.  The Elinchrom Beauty Dish with a diffuser was attached to a pole and held in-front and above Taylor’s face
Enjoy.
Camera settings:  Nikon D3x on a tripod, Nikon 85mm f/1.4 at ISO 100, f/4 at 1/60th of a second with two Elinchrom Quadra flashes—one positioned in front of her and the other behind her as a hair light.
Post Processing:  
Lightroom 4—increased clarity and vibrance and did some basic dodging and burning various parts of the photo and used adjustment brush to cool temperature of background so that it would appear bluer than it actually was.
Photoshop CS5—ran nik Color Efex Pro glamour glow filter.

May 15, 2012

Taylor #4


Today’s photo was taken at the same location as last Tuesday’s photo.  Again, I wanted the photo to have both a lot of environment and an “after the race” look for Taylor.  Here, I had Taylor look at the camera to make a better connection between her and the viewer.
Enjoy.
Camera settings:  Nikon D3x on a tripod, Nikon 85mm f/1.4 at ISO 100, f/4 at 1/250th of a second with two Elinchrom Quadra flashes—one positioned in front of her and the other behind her as a hair light.
Post Processing:  
Lightroom 4—increased clarity and vibrance and did some basic dodging and burning various parts of the photo.
Photoshop CS5—ran nik Color Efex Pro glamour glow filter.

May 8, 2012

Taylor #3


Today’s photo was taken at the same location as Tuesday’s photo.  Here I wanted to bring more of the environment into the scene and make it appear as if Taylor had just finished a race.
I do like how the shadows in the background seem to mirror her mood.
Enjoy.
Camera settings:  Nikon D3x on a tripod, Nikon 85mm f/1.4 at ISO 100, f/4 at 1/250th of a second with two Elinchrom Quadra flashes—one positioned in front of her and the other behind her as a hair light.
Post Processing:  
Lightroom 4—increased clarity and vibrance and did some basic dodging and burning various parts of the photo.
Photoshop CS5—ran nik Color Efex Pro glamour glow filter.

May 4, 2012

Taylor #2


Before Taylor arrived, Steve and I walked around the area for the photo shoot.  When we walked behind the stands, I immediately thought of using the shadows as background.  I felt that the shadows would give the photo an added sense of depth.
Here, Taylor is setting on a support for the stands.  I wanted this photo to look more like a grab shot than a formal portrait. 
Enjoy.
Camera settings:  Nikon D3x on a tripod, Nikon 85mm f/1.4 at ISO 100, f/4 at 1/250th of a second.
Post Processing:  
Lightroom 4—increased clarity and vibrance and did some basic dodging and burning various parts of the photo.
Photoshop CS5—ran nik Color Efex Pro glamour glow filter only on Taylor.

May 1, 2012

Taylor #1


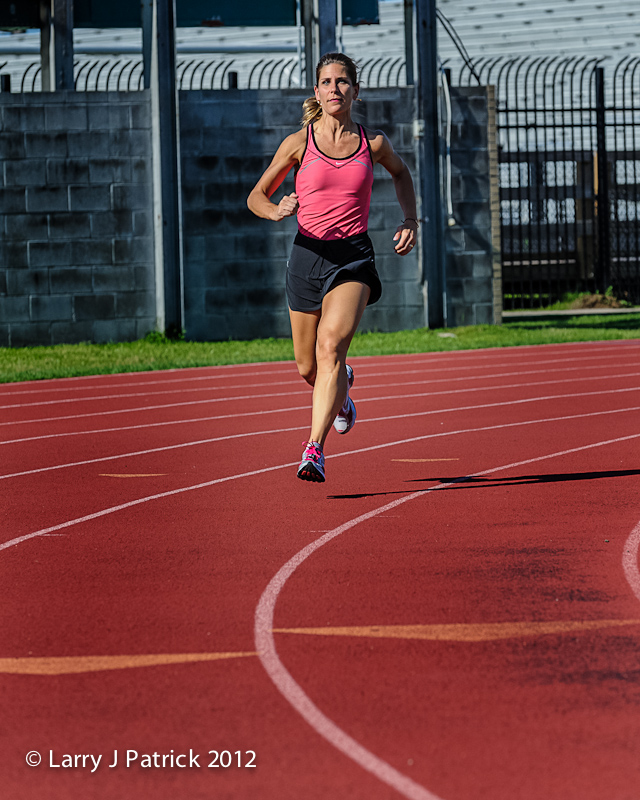
Meet Taylor—M.D., PhD., marathon runner and really nice lady.  I am sure there any many more things that you could say about here, but I think you get the idea—she is an accomplished young lady.
My buddy, Steve, and I had the pleasure of photographing her about a week ago.  Taylor’s only request was for us to get a good photograph of her running.  According to Taylor, a good photograph would be one in which both her feet were off the ground and she did not look like she was dreading the next step.
Steve and I had a few problems getting her good running photo—hard light, messy background and, in my case, not too much sports photography talent.
I think this photo qualifies.  But, as always, what do you think.
Enjoy.
Camera settings:  Nikon D3 on a tripod, Nikon 70-200mm f/2.8 at ISO 800, f/5.6 at 1/3000th of a second.
Post Processing:  
Lightroom 4—increased clarity and vibrance and did some basic dodging and burning various parts of the photo.