November 30, 2010

Something Out of Place


I was out scouting for a location for an upcoming portrait session when I saw this old blue, leather chair setting in the middle of the field.  It looked so out of place and unusual that I decided that I needed to take a picture of it.
I wanted to show all the details so I decided to use HDR.  I shot five exposures ranging from –EV2 to +EV2. 
Enjoy.
Camera settings:  Nikon D3, Nikon 24-70mm f/2.8 shot at 24mm, ISO 200, f/13 and five exposures ranging from 1/250th to 1/8th of a second on a tripod.
Post Processing:  
Photomatix Pro—combined four of the exposures into an HDR image and tone mapped the image.
Photoshop CS5—remove a few distracting details and used nik Color Efex Pro tonal contrast to enhance details in the chair.

November 23, 2010

Sarah Three

Everything leads to Sarah.  Upon seeing the graffiti on the wall, I immediately knew that I wanted to use its lines as a graphic element.  I positioned Sarah in couple different places but finally settled on the position you see here.  After settling on a position, Sarah commenced to give me a lot of different looks.  This is the one that I liked best.
Enjoy.
Camera settings:  Nikon D3, Nikon 50mm f/1.4 shot at ISO 200, f/1.4 and 1/90th of a second.
Post Processing:   
Lightroom 3—Set black and white points, added clarity and mid-tone contrast.
Photoshop CS5—used nik Silver Efex Pro to convert image to black and white.

November 19, 2010

Sarah Two


Today, I present another photograph of Sarah.
As I prepared to take this photo, I wanted to make sure that Sarah clearly separated from the background.  I did two things to accomplish this:  (1) I found a portion of the wall that was about two f-stops brighter than where Sarah was standing; and, (2) I moved her about ten feet from the wall so that it would be completely out-of-focus.
There was a little wind that blew Sarah’s hair that added a some movement to the photo.  After seeing what the wind did, I wished that I had a fan to move her hair more.
Enjoy.
Camera settings:  Nikon D3, Nikon 50mm f/2.8 shot at ISO 800, f/1.7 and 1/125th of a second.
Post Processing:  
Lightroom 3—Set black and white points, cropped photo and added a vignetting.

November 16, 2010

Sarah

Every once and a while the photography gods smile down on you and give you a great subject, soft light and pleasing backgrounds.  That is what I had the other day when I took some photos of Sarah.  I do not think anyone can take a bad photo of Sarah.  She is a natural in front of anyone’s camera.  She is so relaxed and has an easy way about her that readily comes through.
Because of the subject and the soft light, I decided that I wanted to shoot a lot of natural light with shallow dept of field.  I felt that the shallow depth of field would really set Sarah off from the background.  I also believed that the natural light would make Sarah's photo look as good as she looks in real life.  
I shot this photo at f/1.4, f/2 and f/2.8.  I felt that the photo at f/1.4 had too narrow depth of field while the one at f/2.8 showed too many unwanted details, especially in the brick wall to the left.  This photo at f/2 seemed to provide adequate details of Sarah's face while allowing the unwanted details to go soft.
Enjoy.
Camera settings:  Nikon D3, Nikon 50mm f/1.4 shot at ISO 200, f/2 and 1/180th of a second.
Post Processing:  
Lightroom 3—Set black and white points, added clarity, vibrance, mid-tone contrast and vignetting.
Photoshop CS5—removed a few distracting elements within the photo.

November 12, 2010

Another Mushroom Photo

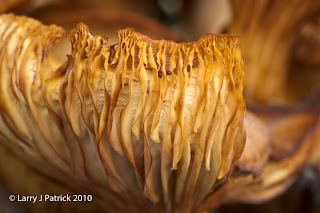
Not too much to say about today's post--I wanted to show the textures within the mushroom.  The photo is 1:1 image of the mushroom.  I find it amazing how many details you will find in subjects like this and how interesting those details can be. 

Enjoy.

Camera Settings:  Nikon d3, Nikon 105mm f/2.8, shot at ISO 800, f/22 and 1/4th of a second on a tripod.

Post Processing:

Lightroom 3:  Set white and black point, increased mid-tone contrast and added vignetting.


November 9, 2010

Revisit to JD’s Garden


Barry Armer and I were talking about having problems finding inspiration.  Barry indicated that when he got a photographer’s block, he would go to Kemah to solve the problem.
I like Kemah, but do not always find something that really makes me stand-up and take notice like walking around JD’s garden.  There always seems to be something that I find interesting and most of the time they present some technical problem to photograph.
Such was the case the other day when I discovered this patch of mushrooms.  I liked the color and the texture and that is what I tried to capture.
Enjoy.
Camera settings:  Nikon D3, Nikon 105mm f/2.8 shot at ISO 800, f/22 and 1/30th of a second on a tripod.
Post Processing:  
Lightroom—Set black and white points, increased mid-tone contrast and changed saturation of yellow and orange, sharpened and reduced noise slightly.

November 5, 2010

A Hurricane Ike Reminder


As you walk around Galveston, you do not see too many reminders of Hurricane Ike.  I did, however, notice this one the other day.  Although very simple, this little sign seemed to be very powerful.  
Enjoy.
Camera settings:  Nikon D3, Nikon 24-70mm f/2.8 shot at 50mm, ISO 200, f/11 and 1/60th of a second.
Post Processing:  
Lightroom—Set black and white points, increased mid-tone contrast and changed saturation of various colors.

November 2, 2010

Everyday HDR


Not too much to say about today’s posting—I liked the colors and the way the lighting was falling on the sidewalk.  I wanted to make sure that I captured all the details so I decided that I would use HDR to present the photo.  I took five shots but only used three of them in Photomatix to create the HDR photo.
Enjoy.
Camera settings:  Nikon D3, Nikon 24-70mm f/2.8 at shot at 35mm ISO 200, f/13 and various shutter speeds..
Post Processing:  
Lightroom 3—Set black and white points, added clarity and mid-tone contrast.
Photomatix—Combined three photos to create and tone map the HDR photo.